> ## Content Index
> Fetch the complete content index at: https://blog.afi.io/llms.txt
> Use this file to discover other available public pages before exploring further.
# Clean up noisy GPS data with the Google Snap to Roads API
- URL: https://blog.afi.io/blog/clean-up-noisy-gps-data-with-the-google-snap-to-roads-api/
- Published: 2026-01-24T07:32:12.000Z
- Updated: 2026-08-21T05:12:44.000Z
- Description: Learn how to use the Google Snap to Roads API for map matching and reconstructing routes from GPS data.
- Author: Afian Anwar
- Tags: googlemaps
One of the hardest problems in logistics is *map matching*, the process of taking raw GPS coordinates (which can be noisy or imprecise) and aligning them to the most likely path taken. In this blog post, I’ll show you how to use the [Snap to Roads](https://developers.google.com/maps/documentation/roads/snap?ref=blog.afi.io) endpoint of the [Google Roads API](https://blog.afi.io/blog/map-matching-speed-limits-and-more-the-google-road/) to map raw GPS points to the actual road network. We’ll walk through practical examples of map matching, explore common use cases, and build a simple app that converts a list of coordinates into the sequence of roads traveled ([demo](https://google-snap-to-roads.afi.dev/?ref=blog.afi.io) / [source code](https://github.com/afilabs/google%5Fsnap%5Fto%5Froads?ref=blog.afi.io)).
Part 1: [The Google Roads API: Map matching, speed limits and more](https://blog.afi.io/blog/map-matching-speed-limits-and-more-the-google-road/)
**Part 2: Clean up noisy GPS data with the Google Snap to Roads API (this article)**
Part 3: [How to get the speed limit in Google Maps](https://blog.afi.io/blog/how-to-get-the-speed-limit-in-google-maps/)
[Map matching with the Google Snap to Roads APIHow to use the Google Snap to Roads API to map GPS points to the road network](https://google-snap-to-roads.afi.dev/?ref=blog.afi.io)
### What is Map Matching?
Map matching is how we figure out which road a vehicle is actually on, using sensor data (usually GPS, since it's available pretty much everywhere). It's been a key part of in-vehicle navigation systems for years because it provides real time information about which road you're driving on.
### What is the Google Snap to Roads API?
The [Snap to Roads](https://developers.google.com/maps/documentation/roads/snap?ref=blog.afi.io) endpoint of the [Google Roads API](https://blog.afi.io/blog/map-matching-speed-limits-and-more-the-google-road/) (referred to in this blog post as the *Snap to Roads API*) is a paid service that does map matching for you. You send it a list of GPS coordinates and it does its best to guess which roads you were on.
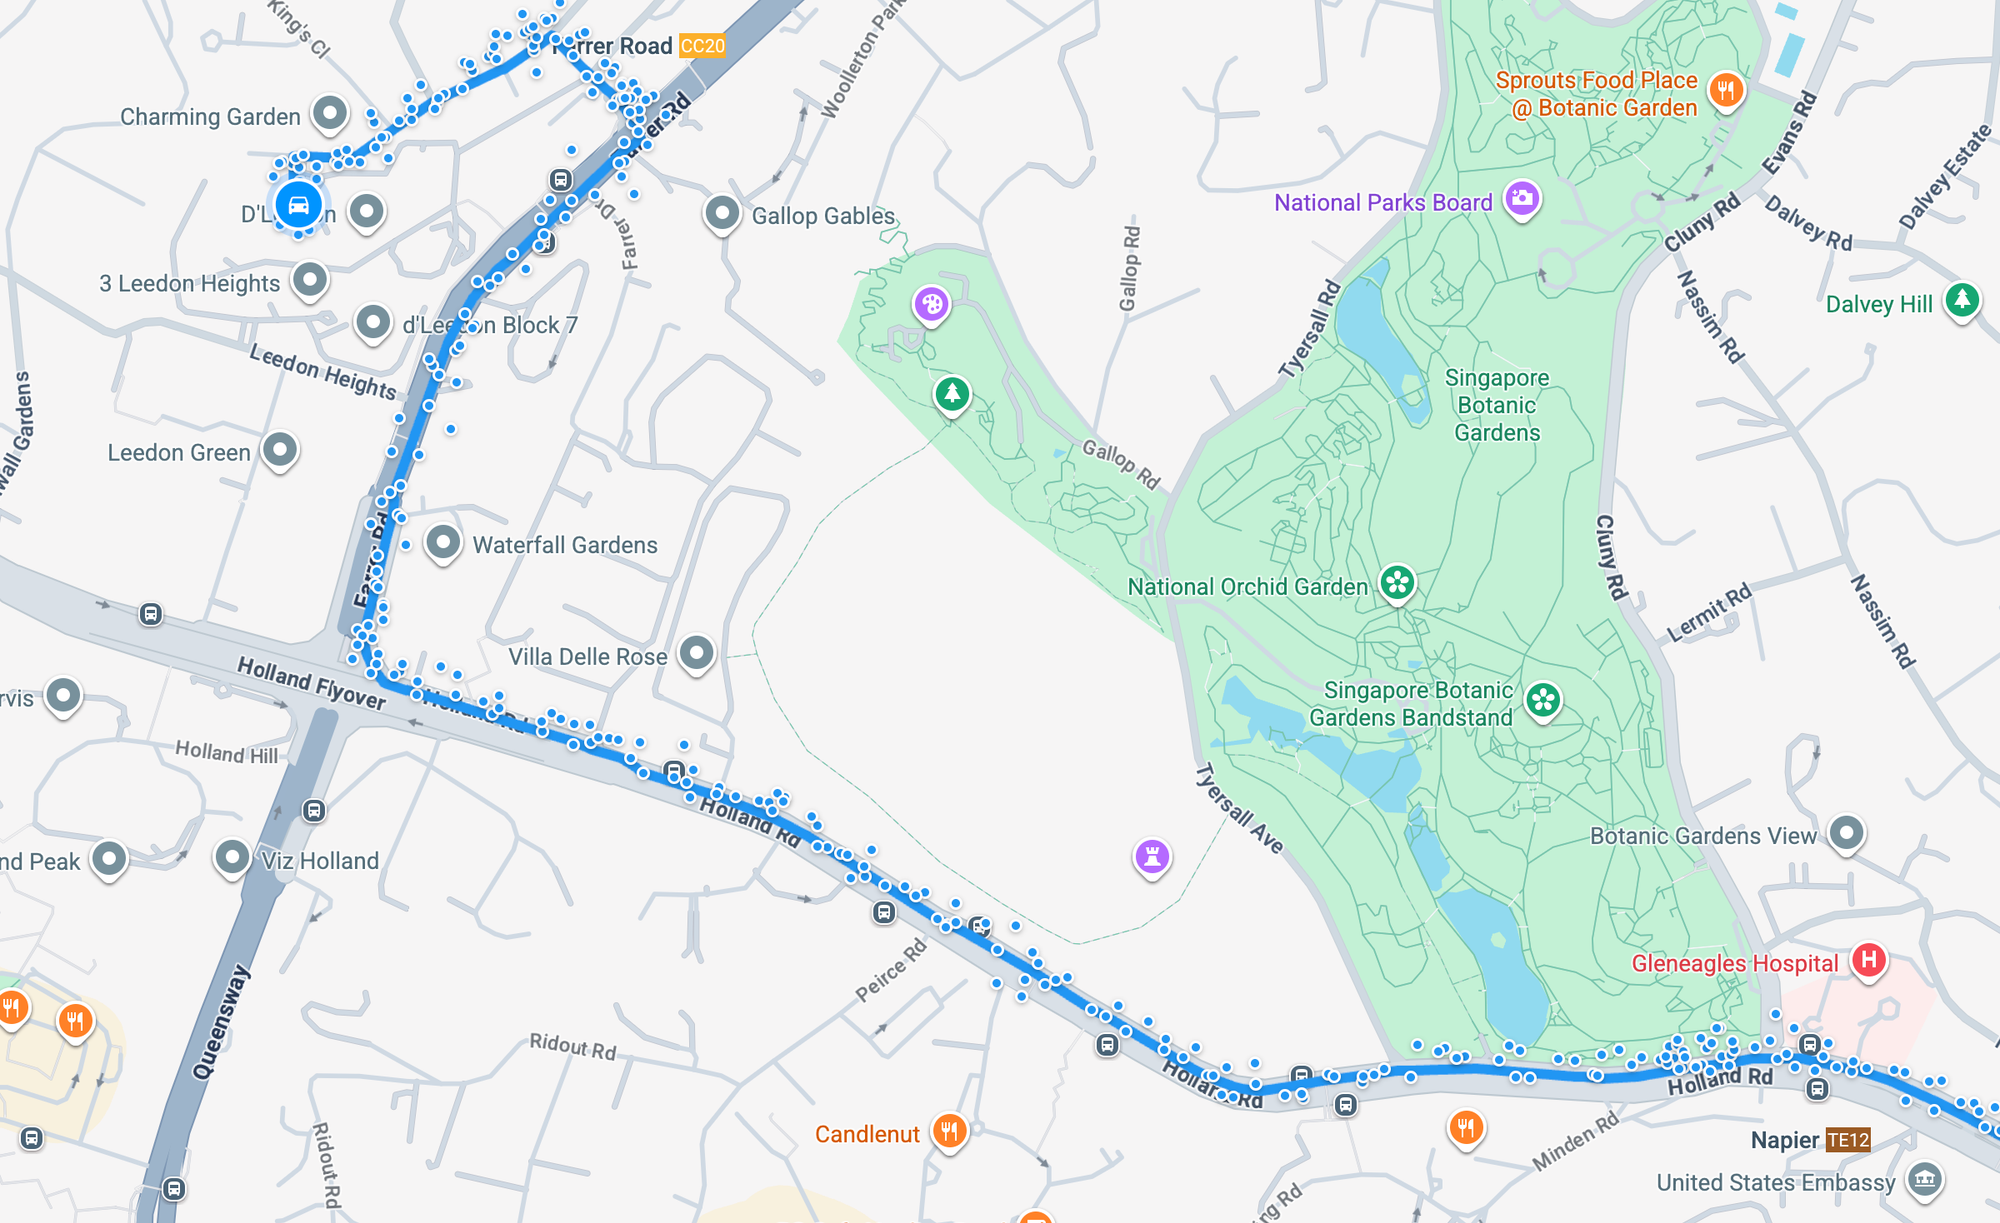
Map matching using the Snap to Roads endpoint of the Google Roads API
The screenshot above (taken from the [google-snap-to-roads app](https://google-snap-to-roads.afi.dev/?ref=blog.afi.io)) shows the map matching problem using GPS points marked as blue dots. You could try to match each point to the nearest road, but this might fail because GPS data can be noisy.
In the example, the correct path (also in blue) is visually obvious, but it would be incorrectly matched if we just picked the closest road (side note: Google also has an API that does this - the [Nearest Roads Endpoint](https://blog.afi.io/blog/how-to-get-the-speed-limit-in-google-maps/) of the Roads API). Even with modern GPS devices, you still see major errors and long stretches of bad data caused by tall buildings, atmospheric distortion or other features that interfere with GPS signals.
### How does map matching work?
To understand how map matching works, we first need to understand [Hidden Markov Models](https://en.wikipedia.org/wiki/Hidden%5FMarkov%5Fmodel?ref=blog.afi.io) (HMMs). Imagine you're in a room with no clock or window, and the only clues about the time of day come from the sounds you hear outside. In the morning, you might hear birds chirping; in the afternoon, the sound of kids playing; and at night, crickets. While you can’t directly observe the time, you can make an educated guess based on these sounds. Each type of sound is more likely to occur at a certain time of day, and the time of day tends to progress in a predictable order - morning to afternoon to night. This is a classic example of an HMM: the actual time of day is hidden, but the sounds are observations linked to that hidden state with certain probabilities. By listening over time, you can infer the most likely sequence of time periods based on what you hear.
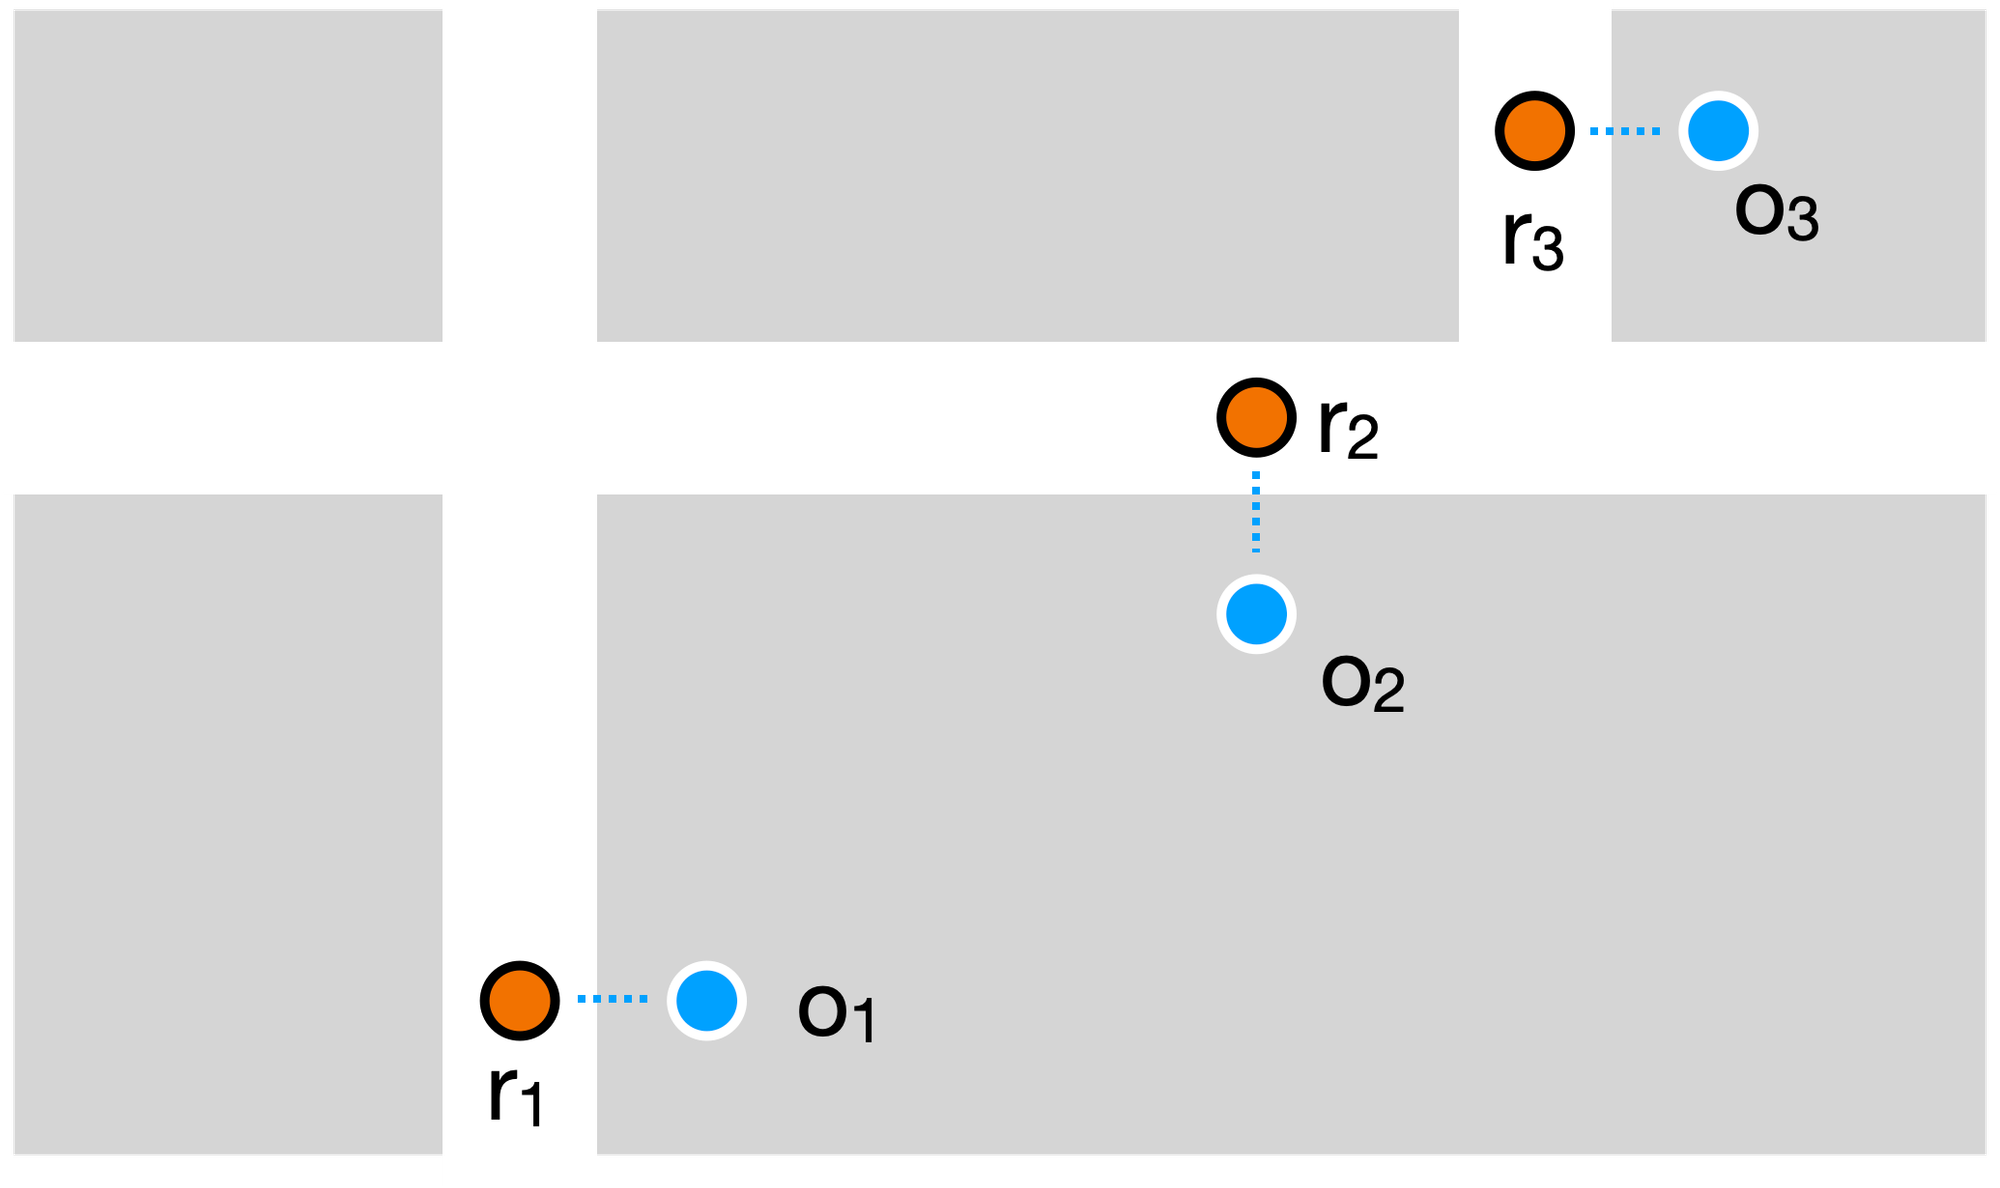
Observed GPS locations matched to the actual roads the vehicle was on
Now lets apply this to the map matching problem using a simplified example (above). You have a set of observed sequential GPS points 1, O2 and O3 and a set of roads r1, r2 and r3\. We don’t know which road the vehicle was on, that’s hidden. But we do know the GPS observations, that’s visible. We also have information about the road network, so we know how likely it is to go from one road to another based on geometry or travel time. Some transitions will be very unlikely, such as those requiring sudden u-turns or a complicated set of maneuvers, so we can rule them out.
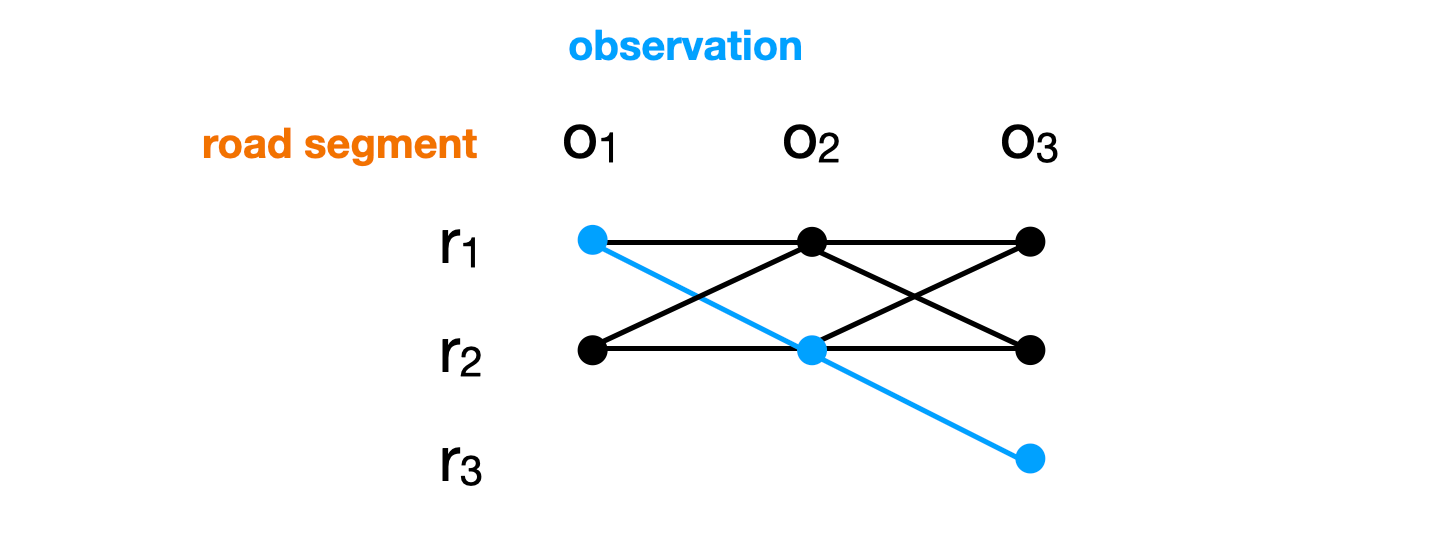
State transition diagram showing that the most likely path is r1, r2 and r3
We use this information to build a state transition diagram that shows hidden states as nodes and transitions between states as edges. Each edge is labeled with the transition probability while each node represents the maximum probability of any path that ends at that node.
With this information you can then run the [Viterbi algorithm](https://en.wikipedia.org/wiki/Viterbi%5Falgorithm?ref=blog.afi.io) on the HMM to find the most likely sequence of hidden states. In a HMM used for map matching, this would automatically yield the most likely set of roads the vehicle actually followed (diagram above, in blue), even if the GPS signal jumps or drifts.
I don’t know for certain that the Google Maps Roads API Snap to Roads endpoint uses Hidden Markov Models because Google has never publicly disclosed the internal implementation details of that specific API. However, I'm pretty sure it does, for three big reasons:
1. HMMs are state of the art since about ten years ago (2015 ish) and Google's internal research and papers on Google Maps, GPS trace processing, Waymo self-driving car localization, etc reference HMMs and Viterbi-style decoding ([link to patent](https://patents.google.com/patent/US10533862B1/en?ref=blog.afi.io)).
2. The Snap to Roads endpoint performs well in urban canyons and with sparse or jumpy data - conditions where point to road matching fails but HMM-based approaches shine.
3. The official documentation states that "the points snapped to the most likely roads the vehicle was traveling along", not just the nearest points.
All this indicates that Google's Snap to Roads logic is based on some form of HMM-like probabilistic model, even if its not publicly disclosed. There's nothing special or proprietary about this, the free Open Source Routing Machine's (OSRM) [Match service](https://project-osrm.org/docs/v5.5.1/api/?ref=blog.afi.io#match-service) uses HMMs too.
### Google Snap to Roads API use cases
There are several important use cases for map matching, all of them relevant to transportation and logistics.
**In-vehicle navigation**: If you've ever used Google Maps for turn-by-turn navigation, you've used the Snap to Roads API whether you realized it or not. When you first start driving, especially in a parking lot or near multiple road options, the map may jump around or give confusing instructions. That’s because Google Maps needs a few seconds of GPS data to confidently determine which road you’re actually on. It relies on the Snap to Roads API to match your GPS position to the correct road segment, improving its accuracy as more data points come in.
**Route reconstruction:** Logistics companies often track their vehicles using a driver app or telematics device that sends GPS data to a central server every few seconds. These raw GPS traces alone aren’t very helpful. They can be noisy, incomplete, or misaligned with the actual roads. To visualize where a driver went, review past trips, or generate reports, the Snap to Roads API is used to convert that messy location data into a clean polyline that matches the vehicle's real world route.
**Transportation research:** Many transportation research projects use vehicle probe data to study congestion, driving behavior, and route choice. This data often comes from sources like taxi fleets (e.g. [Singapore real time taxi availability](https://data.gov.sg/datasets/d%5Fe25662f1a062dd046453926aa284ba64/view?ref=blog.afi.io)) or from volunteers who share location data through mobile tracking apps. To understand how many vehicles used a particular road or followed a specific route, raw GPS traces must first be matched to the road network. The Google Snap to Roads API provides a straightforward (though relatively expensive) way to perform this map matching at scale.
### Google Snap to Roads API alternatives
Most researchers active in transportation work actually write their own map matching implementation e.g. [Online map-matching of noisy and sparse location data with hidden markov and route choice models](https://www.tum-create.edu.sg/sites/default/files/files/jagadeesh2017onlineSMAT.pdf?ref=blog.afi.io) because it gives them the flexibility to explore advanced techniques and push the boundaries of what's technically possible. Research budgets also do not typically allow for discretionary expenditure on cloud services, so even though the Snap to Roads API is reasonably priced at $0.01 per request ($10 CPM), it can get expensive fast, especially when dealing with large datasets.
If budget is a constraint but you have sufficient time and engineering expertise, using open source solutions like OSRM’s [Match service](https://project-osrm.org/docs/v5.5.1/api/?ref=blog.afi.io#match-service) or Valhalla’s [Map Matching API](https://valhalla.github.io/valhalla/api/map-matching/api-reference/?ref=blog.afi.io) can be a good alternative.
### Google Snap to Roads API example
Here's a basic example that shows how the Snap to Roads API works.
**Endpoint:** `GET`
```
https://roads.googleapis.com/v1/snapToRoads?key={YOUR_API_KEY}
&interpolate={INTERPOLATE}
&path={PATH}
```
**{YOUR\_API\_KEY}** This is your Google Maps API key with the Google Roads API enabled.
**{INTERPOLATE}** is a boolean. When set to `true`, it returns a larger set of points that smoothly follows the geometry of the road network, even around corners and through tunnels.
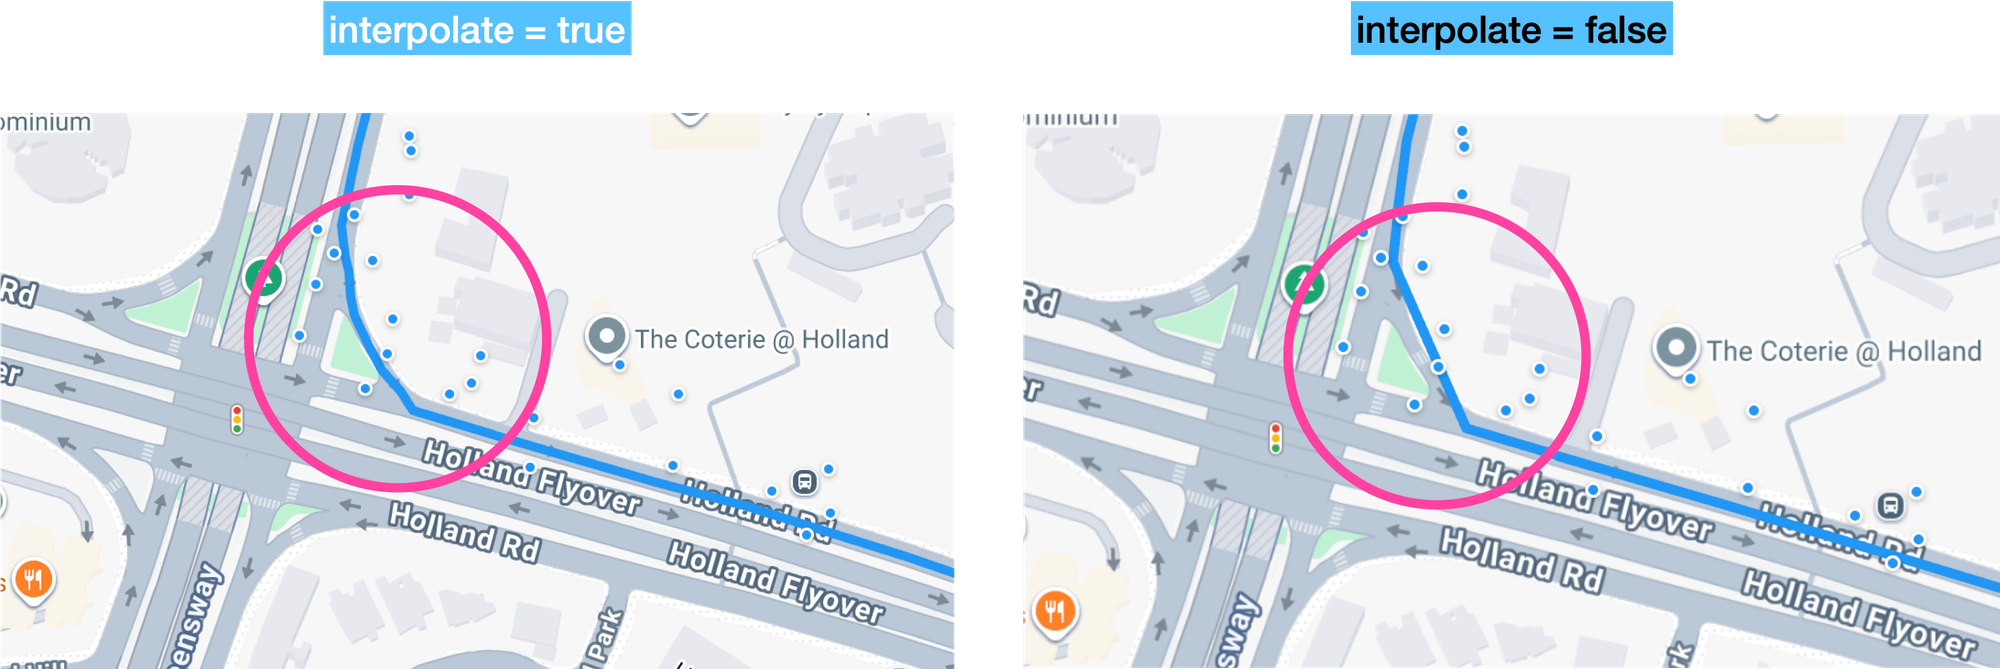
Interpolate as true vs false when calling the Snap to Roads endpoint
**{PATH}** is a sequential list of points to be snapped. Latitude and longitude values should be separated by commas with each coordinate pair separated by the pipe character: "|" e.g. `path=1.3066183,103.818177|1.3067547,103.8188982| 1.3072331,103.8188789|1.3066655,103.8190823|1.3058367,103.8220922`.
It's important to note that {PATH} has a hard limit of 100 points per request. If you are dealing with long routes, you should chunk you array into 100 point requests and add a little overlap so that the final points from the previous request are included as the first points of the subsequent request. This will keep the snapped path continuous between chunks ([docs: Process long paths](https://developers.google.com/maps/documentation/roads/advanced?ref=blog.afi.io#process%5Flong%5Fpaths)).
Using GPS points taken from a short taxi ride in Singapore gives us:
**Endpoint:** `GET`
[https://roads.googleapis.com/v1/snapToRoads?interpolate=true&path=1.3066183,103.818177|1.3067547,103.8188982|1.3072331,103.8188789|1.3066655,103.8190823|1.3058367,103.8220922&key={YOUR\_API\_KEY}](https://roads.googleapis.com/v1/snapToRoads?interpolate=true&path=1.3066183,103.818177|1.3067547,103.8188982|1.3072331,103.8188789|1.3066655,103.8190823|1.3058367,103.8220922&key={YOUR%5FAPI%5FKEY}&ref=blog.afi.io)
**Response**
```
{
"snappedPoints": [
{
"location": {
"latitude": 1.3067466801461456,
"longitude": 103.81816653609614
},
"originalIndex": 0,
"placeId": "ChIJHxwgtiEa2jER_CgoXQuRLf4"
},
... // 40 more snapped points
{
"location": {
"latitude": 1.3058949960130322,
"longitude": 103.82215374498297
},
"originalIndex": 4,
"placeId": "ChIJSbZIgYoZ2jER06xspzEe_D0"
}
]
}
```
The response is simply a `snappedPoints` array. Each object in the array contains a coordinate `location`, `placeId` and `originalIndex` (the index of the GPS coordinate in the `path` string that was snapped to this point).
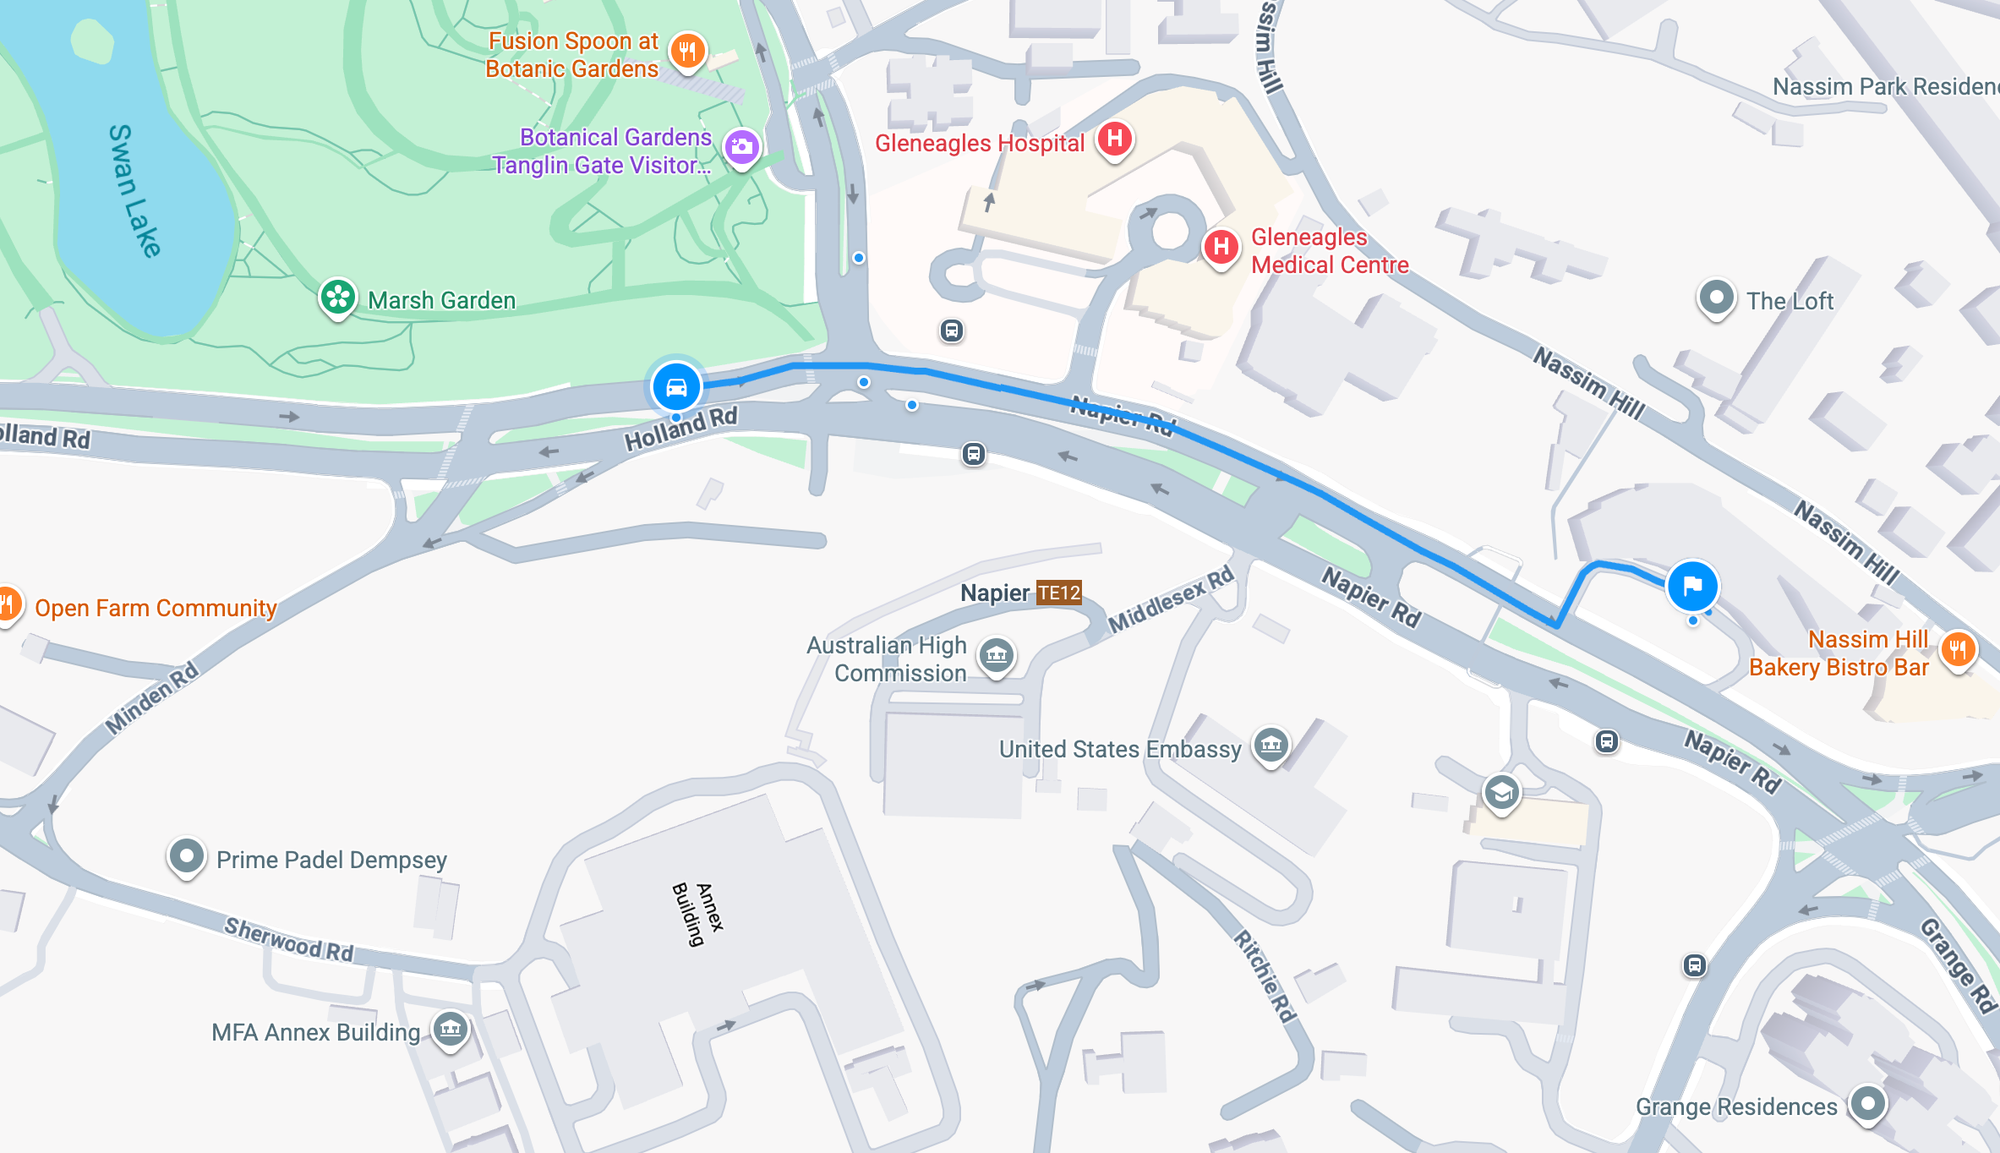
The Snap to Roads endpoint of the Roads API can correctly match sparse GPS points
If you run these points through our [Snap to Roads demo app](https://google-snap-to-roads.afi.dev/?ref=blog.afi.io) by uploading the GPX file below, you’ll see that the API correctly reconstructs the taxi’s route, even though the data is *sparse* (there are only 5 GPS points included in the request) and some of the GPS points deviate from the actual road.
[snap\_to\_roads\_example\_v2snap\_to\_roads\_example\_v2.gpx1 KBdownload-circle](https://blog.afi.io/content/files/2026/01/snap%5Fto%5Froads%5Fexample%5Fv2.gpx "Download")
### Building a map matching app with the Snap to Roads API
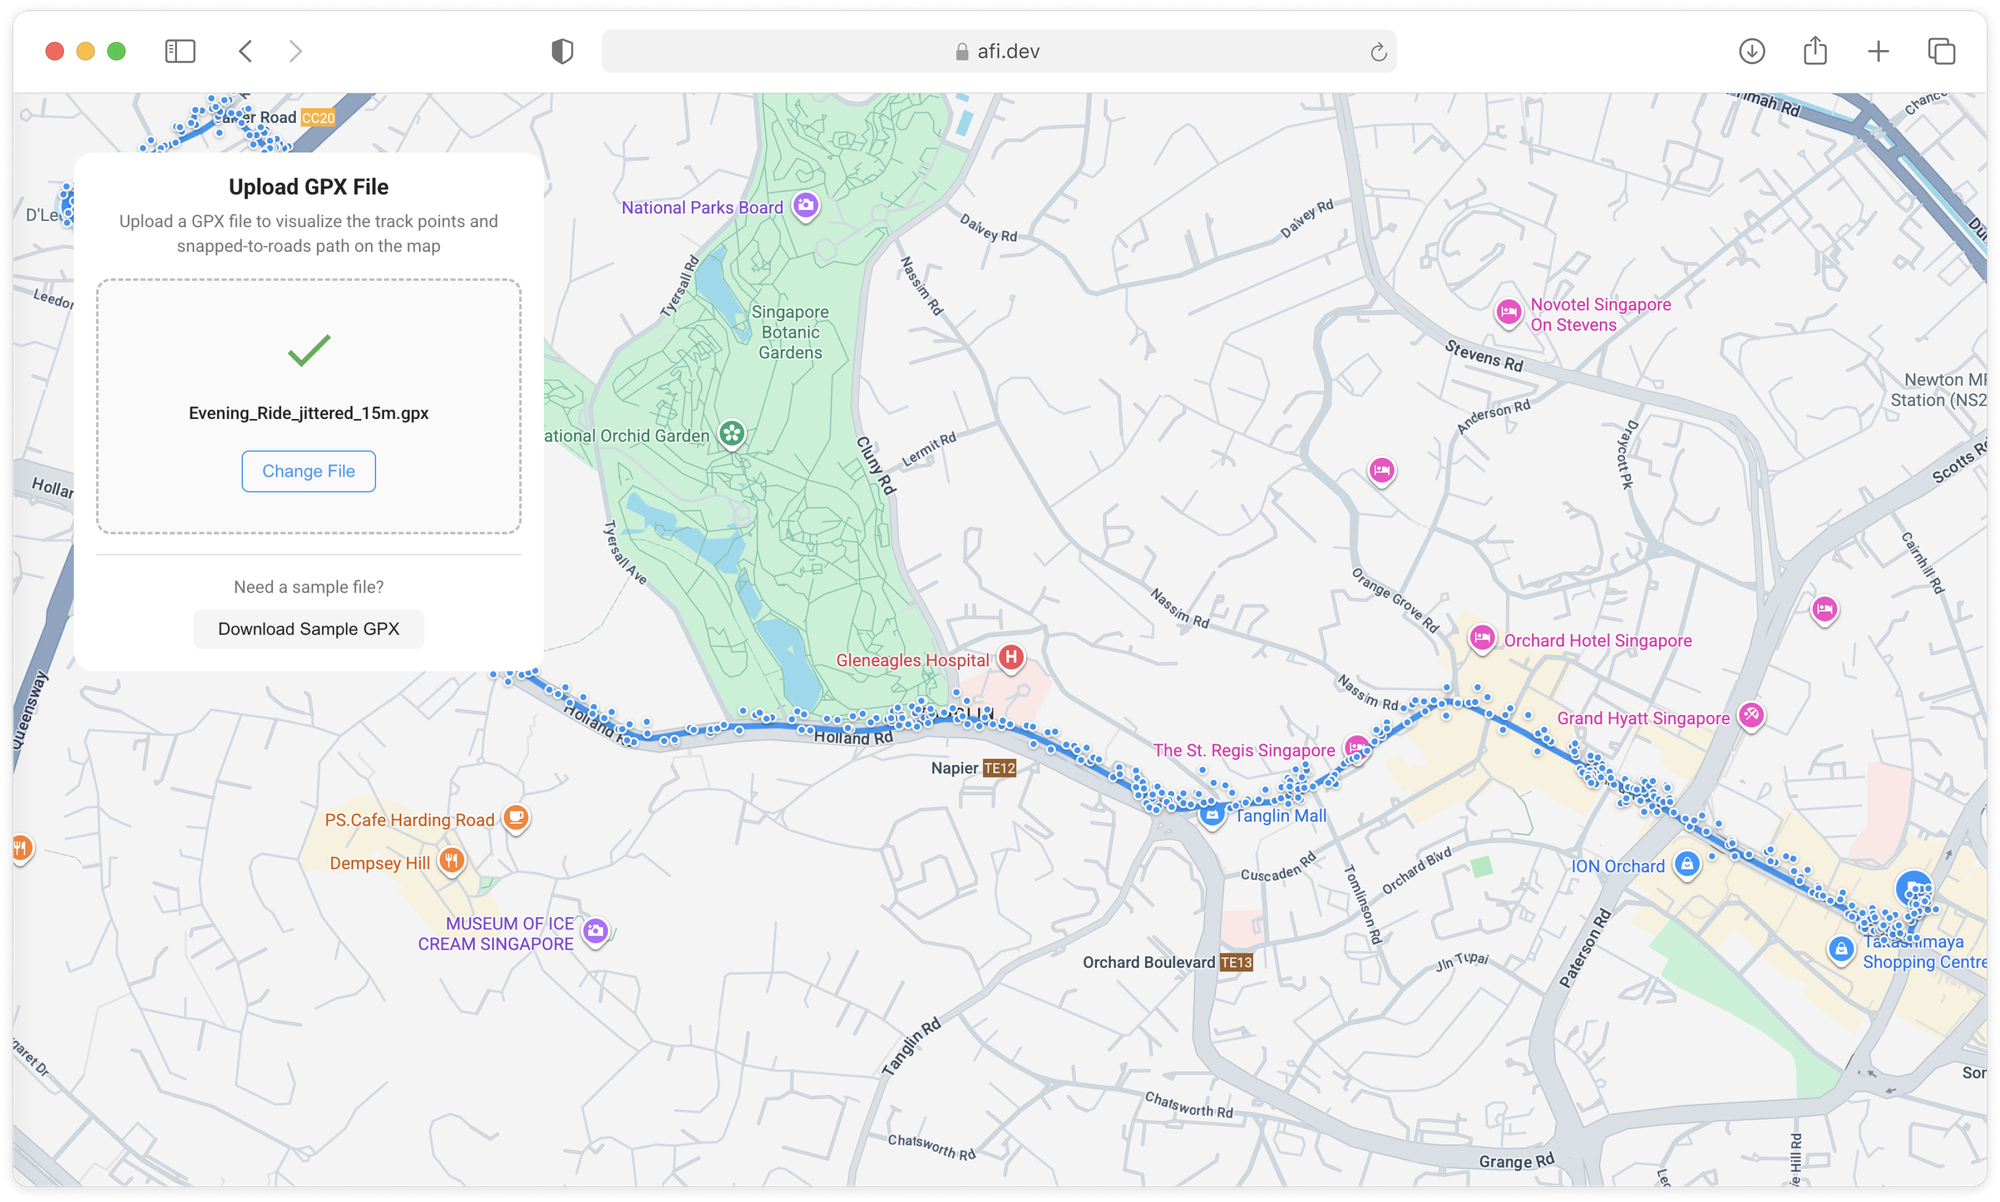
The Google Snap to Roads demo app lets you upload a route and map match it
In this last section, we'll walk through how to parse a [GPX file](https://en.wikipedia.org/wiki/GPS%5FExchange%5FFormat?ref=blog.afi.io) (a common format for storing GPS traces), send coordinates to the [Google Snap to Roads API](https://developers.google.com/maps/documentation/roads/snap??ref=blog.afi.io) and display the snapped route on an interactive map. If you don't want to pull the code from GitHub and run the app locally, you can play around with a live demo at [https://google-snap-to-roads.afi.dev/](https://google-snap-to-roads.afi.dev/?ref=blog.afi.io).
### How our code is organized
[google\_snap\_to\_roads](https://github.com/afilabs/google%5Fsnap%5Fto%5Froads?ref=blog.afi.io) is a single-page [React](https://react.dev/?ref=blog.afi.io) app that takes a GPX file and uses the API to match those raw points to the most likely route taken. If you don’t already have a GPX file, you can easily create one by recording a trip or activity with an app like [Strava](http://www.strava.com/?ref=blog.afi.io).
The app uses [Redux](https://redux.js.org/?ref=blog.afi.io) as a single source of truth for map-related state. When a user uploads a GPX file or runs Snap to Roads, the UI dispatches actions (like `setData`) to update the `map` slice with the latest `gpxCoordinates`, `snappedCoordinates`, `mapCenter`, and status flags such as `isSnapped` and `error`. Components then read those values with `useSelector`, so the uploaded data and the map stay in sync without passing props through multiple layers.
**App.jsx**
`App.jsx` is the top level component of the application. It defines the overall layout and manages shared state. From here, it wraps the components responsible for parsing the uploaded GPX file, calling the Snap to Roads API, and rendering the matched route on a Google map.
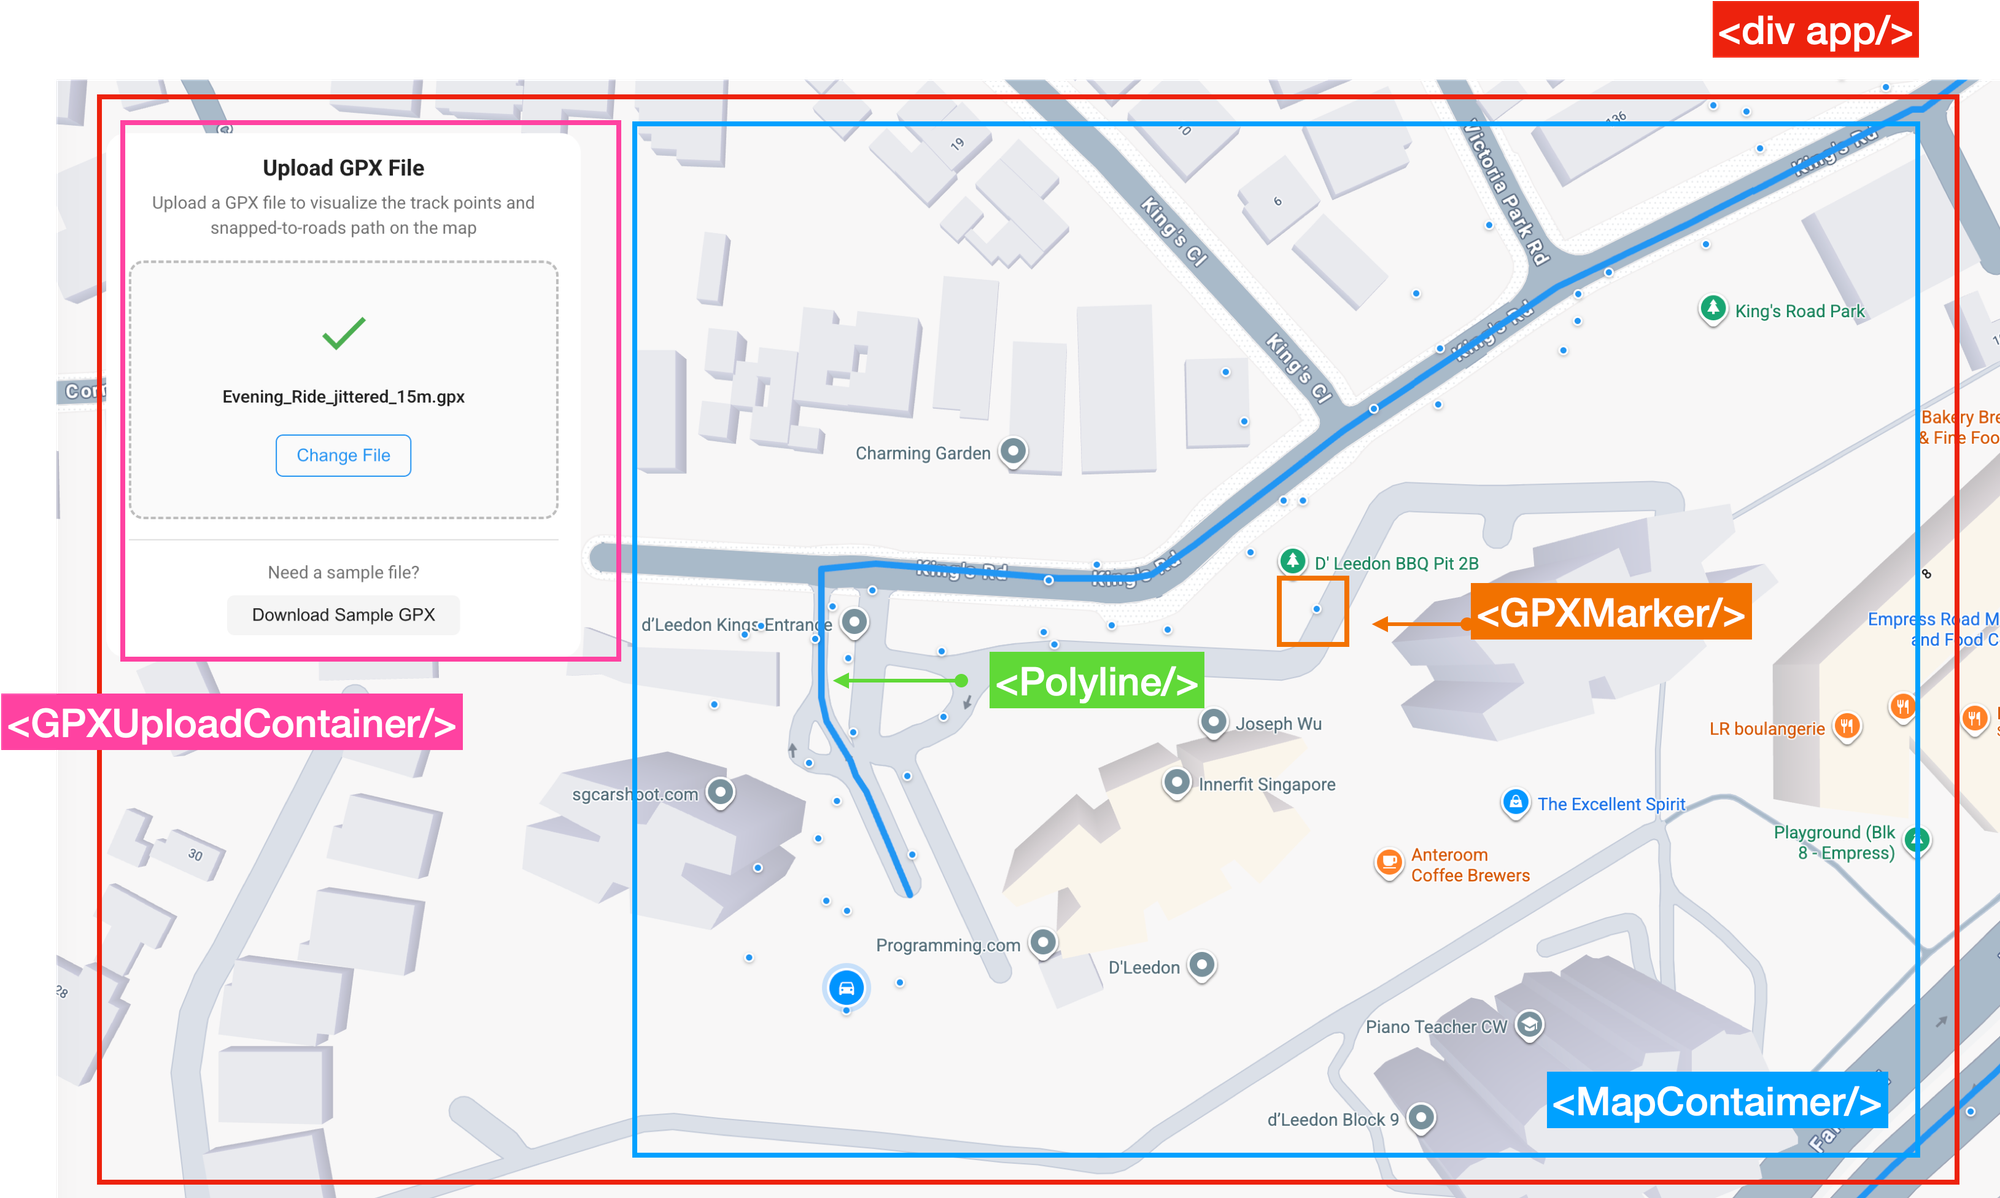
The structure of the google\_snap\_to\_roads app
`App.jsx` has two child components:
`` displays a file upload widget and uses `gpx.js` to extract latitude and longitude pairs from the GPX file. It then calls `google.js` to run the Google map matching algorithm on those coordinates.
`` is a wrapper for the react-google-maps [ component](https://visgl.github.io/react-google-maps/docs/api-reference/components/map?ref=blog.afi.io). It's responsible for displaying the `` and `` components.
```
/*** App.jsx ***/
import React from 'react';
import { APIProvider } from '@vis.gl/react-google-maps';
import MapContainer from './containers/MapContainer';
import GPXUploadContainer from './containers/GPXUploadContainer';
import './App.scss';
const App = () => {
return (
);
};
export default App;
```
**GPXUploadContainer.jsx**
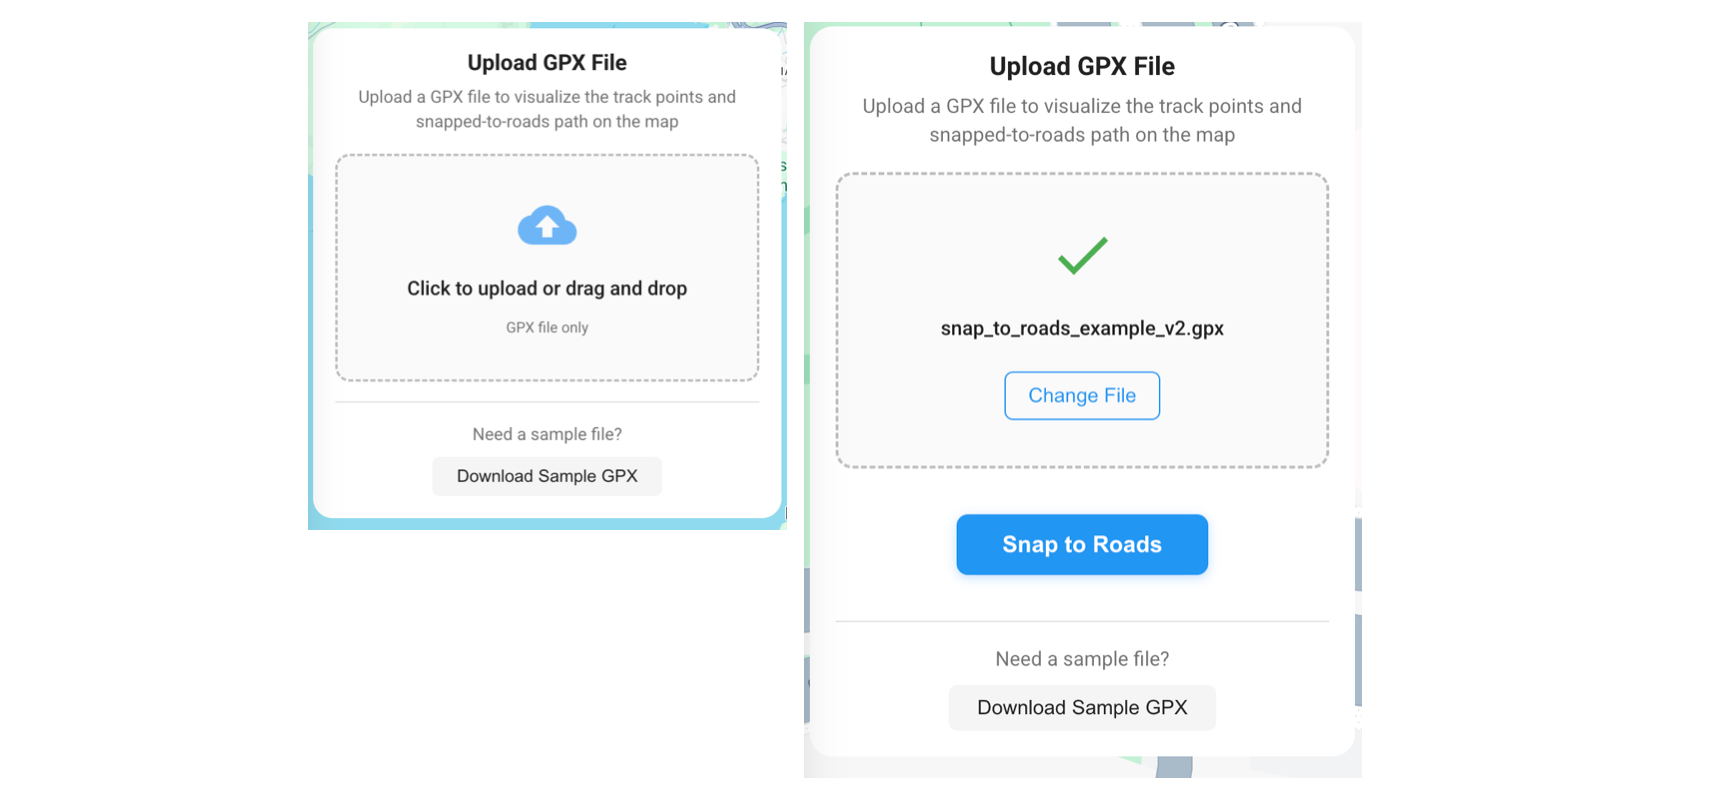
The upload UI for the Google Snap to Roads demo app
`containers/GPXUploadContainer.jsx` acts as a stateful container component for its child `GPXUpload.jsx`. It's responsible for calling the Google Snap to Roads API and updating the map state while `GPXUpload.jsx` mostly handles UI.
**GPXFileUpload.jsx**
When a user drags a file onto the drop zone, the browser triggers `dragover` event.
```
/*** components/GPXUpload.jsx ***/
fileInputRef.current?.click()}
>
;
```
This is picked up the the `onDragOver={handleDragOver}` event handler, which calls calls `event.preventDefault()` to get the div ready to accept the file drop. That’s important because by default, most elements won’t accept drops. Preventing default signals “this is a valid drop target”..
```
/*** components/GPXUpload.jsx ***/
const handleDragOver = (event) => {
event.preventDefault();
};
```
When the file is released, the browser triggers the `drop` event and the `onDrop={handleDrop}` is called. Again, the first thing we do is call `event.preventDefault()` so that the default behavior, opening the file in a new tab, is ignored.
```
/*** components/GPXUpload.jsx ***/
const handleDrop = (event) => {
event.preventDefault();
const file = event.dataTransfer.files[0];
if (!file) return;
if (!file.name.toLowerCase().endsWith(".gpx")) {
setError("Please upload a valid GPX file");
return;
}
setFileName(file.name);
setError("");
onFileUpload(file);
};
```
If the GPX file is valid, its data is saved to a `file` object with the line `const file = event.dataTransfer.files[0];` and passed on to the `onFileUpload()` method, which points to `handleFileUpload()` in `GPXUploadContainer.jsx`.
The `handleFileUpload()` method does two things:
1. It parses the GPX file and extracts the latitude and longitude coordinates for display on the Google Map.
```
/*** components/containers/GPXUploadContainer.jsx ***/
const handleFileUpload = async (file) => {
const gpxPoints = await parseGPX(file);
const coordinates = gpxPoints.map((point) => ({
lat: point.lat,
lng: point.lng,
}));
};
```
1. This updates the app’s [Redux](https://redux.js.org/?ref=blog.afi.io) map state with the newly uploaded GPS data, which is immediately rendered on the Google Map. At this stage, only the raw GPS points are stored. The Snap to Roads API is invoked later, when the user clicks the \[Snap to Roads\] button.
```
/*** components/GPXUploadContainer.jsx ***/
const handleFileUpload = async (file) => {
dispatch(
setData({
gpxPoints: gpxPoints,
gpxCoordinates: coordinates,
snappedCoordinates: [],
mapCenter: { lat: centerLat, lng: centerLng },
error: "",
isSnapped: false,
}),
);
};
```
Now, when \[Snap to Roads\] is pressed, this triggers the button’s `onClick` event and calls `onSnapToRoads`. Since `onSnapToRoads` is really just a reference to `handleSnapToRoads` from the parent `GPXUploadContainer`, clicking the button in the child triggers the business logic in the `handleSnapToRoads()` method.
`handleSnapToRoads()` first intelligently samples the GPS track to produce an array of no more than 100 points, ensuring compliance with the Snap to Roads API request limit.
```
/*** components/GPXUploadContainer.jsx ***/
const handleSnapToRoads = async () => {
try {
const coordinates = gpxPoints.map((point) => ({
lat: point.lat,
lng: point.lng,
}));
const pointsToSnap =
coordinates.length > 100
? coordinates.filter(
(_, i) => i % Math.ceil(coordinates.length / 100) === 0,
)
: coordinates;
} catch (error) {
} finally {
}
};
```
Next, it calls the `snapToRoads()` method with the trimmed array of GPS coordinates. The response, an array of map matched points, is saved to the `snappedCoordinates` object.
```
/*** components/GPXUploadContainer.jsx ***/
const handleSnapToRoads = async () => {
try {
const snappedCoordinates = await snapToRoads(pointsToSnap, true);
} catch (error) {
} finally {
}
};
```
Lastly, the method dispatches the Redux action (`setData`) to update the app's state and display the new map matched route on the Google Map.
```
/*** components/GPXUploadContainer.jsx ***/
const handleSnapToRoads = async () => {
try {
dispatch(
setData({
snappedCoordinates: snappedCoordinates,
isSnapped: true,
error: "",
}),
);
} catch (error) {
} finally {
}
};
```
**google.js**
`services/google.js` acts as a service layer for interacting with the Google Roads API. Its only method, `snapToRoads()`, is an async utility that calls the [Snap to Roads endpoint](https://developers.google.com/maps/documentation/roads/snap?ref=blog.afi.io) of the Google Roads API, sending a list of GPS coordinates and returning the cleaned-up, snapped-to-road version of those coordinates.
Here's how it works:
1. `snapToRoads()` takes in an array of `coordinates` in `{lat, lng}` format.
```
/*** services/google.js ***/
const snapToRoads = async (coordinates, interpolate = true) => {
try {
} catch (error) {
if (error.response) {
}
throw error;
}
};
```
1. It converts those coordinates into the path string format required by the Roads API by concatenating them together like so: `lat,lng|lat,lng|...`.
```
/*** services/google.js ***/
const snapToRoads = async (coordinates, interpolate = true) => {
try {
const path = coordinates
.map((coord) => `${coord.lat},${coord.lng}`)
.join("|");
} catch (error) {
if (error.response) {
}
throw error;
}
};
```
1. We use [Axios](https://axios-http.com/docs/intro?ref=blog.afi.io), a widely adopted HTTP client for Javascript, to send a GET request to the Snap to Roads API. This request includes three key query parameters: `path`, which contains the list of GPS coordinates; `key`, which is the Google Maps API key; and `interpolate`, a boolean flag that instructs the API to return additional points that smoothly follow the road network. Axios handles the request and waits for the response, which includes the snapped points generated by the API.
```
/*** services/google.js ***/
const snapToRoads = async (coordinates, interpolate = true) => {
try {
const params = new URLSearchParams({
key: API_KEY,
interpolate: interpolate.toString(),
path: path,
});
const response = await axios.get(
`${SNAP_TO_ROADS_API_URL}?${params.toString()}`,
);
const snappedPoints = response.data?.snappedPoints || [];
} catch (error) {
if (error.response) {
}
throw error;
}
};
```
1. Finally, we return a cleaned up `snappedCoordinates` array in a format convenient for drawing the route polyline on Google Maps.
```
/*** services/google.js ***/
const snapToRoads = async (coordinates, interpolate = true) => {
try {
const snappedCoordinates = snappedPoints
.map((point) => {
const location = point.location || {};
return {
lat: location.latitude || point.lat,
lng: location.longitude || point.lng,
};
})
.filter((coord) => coord.lat && coord.lng);
return snappedCoordinates;
} catch (error) {
if (error.response) {
}
throw error;
}
};
```
**MapContainer.jsx**
`MapContainer.jsx` functions as a stateful container component for its child `` component. Its main role is to connect to the Redux store, extract the relevant state (`gpxPoints`, `gpxCoordinates` and `snappedCoordinates`), and pass that data down as props to the stateless Map component.
```
/*** components/containers/MapContainer.jsx ***/
import React from 'react';
import { useSelector } from 'react-redux';
import Map from '../components/Map';
const MapContainer = () => {
const { gpxPoints, gpxCoordinates, snappedCoordinates } = useSelector((state) => state.map.data);
return ;
};
export default MapContainer;
```
Because MapContainer uses `useSelector` to subscribe to the Redux store, any time `gpxPoints`, `gpxCoordinates`, or `snappedCoordinates` change in the store, the component automatically re-renders. This ensures that the child `` component always receives the most up-to-date data as props, without requiring any manual updates or prop drilling.
**Map.jsx**
`Map.jsx` (`components/Map/index.jsx`) wraps the [react-google-maps](https://visgl.github.io/react-google-maps/?ref=blog.afi.io) component, which itself is a React abstraction over the [Google Maps Javascript API](https://developers.google.com/maps/documentation/javascript/overview?ref=blog.afi.io). It is responsible for loading and initializing the Google Map in the DOM, configuring properties such as the map center, zoom level, and display options via props, and acting as a parent container for child components like ``, which renders GPS track points, and ``, which is used to display the route on the map.
In the return statement of `Map.jsx`, we iterate over the `gpxCoordinates` array to render the raw GPS trace as markers. We also pass an encoded polyline version of the `snappedCoordinates` to the map, allowing us to display the matched route as a continuous line.
```
/*** components/Map/index.jsx ***/
return (
{snappedPolylinePath && geometryLibrary && (
)}
{gpxCoordinates && gpxCoordinates.length > 0 && (
<>
{gpxCoordinates[0] && (
)}
{gpxCoordinates.length > 1 &&
gpxCoordinates[gpxCoordinates.length - 1] && (
)}
)}
);
```
**GPXMarker.jsx**
`components/Map/GPXMarker.jsx` is a React wrapper around the Google Maps [Advanced Marker Element](https://developers.google.com/maps/documentation/javascript/advanced-markers/overview?ref=blog.afi.io), which creates a custom marker at a specific location.
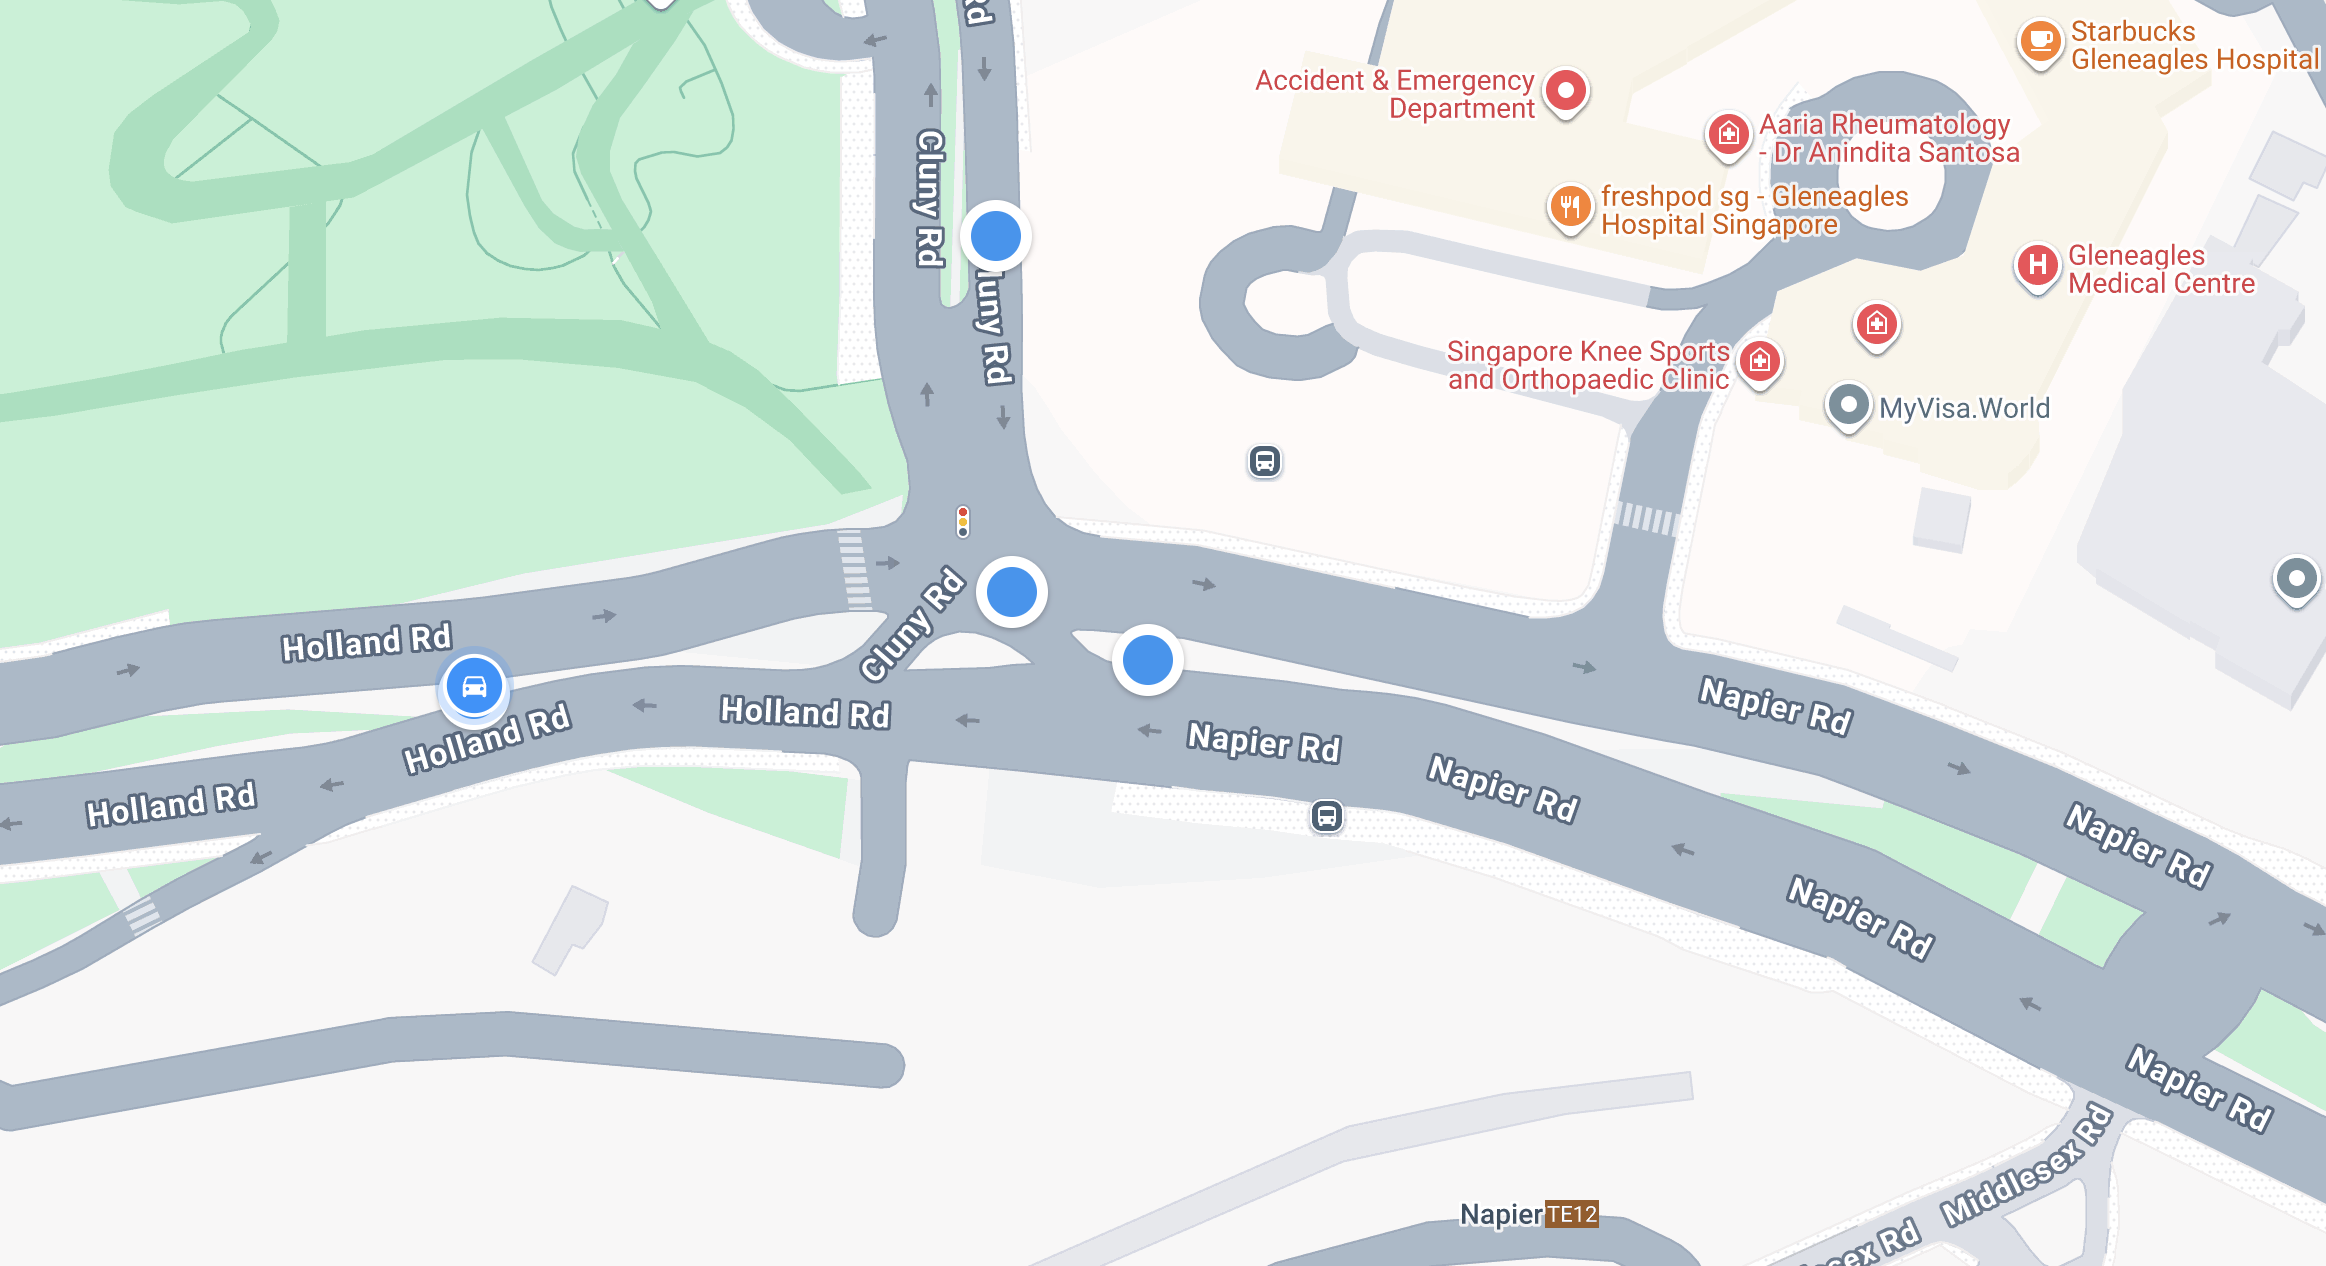
Advanced Marker elements used to display GPS points on the map
Instead of using a default pin icon, the marker's appearance is defined using raw HTML/CSS like so:
```
/*** components/Map/GPXMarker.jsx ***/
import React from 'react';
import { AdvancedMarker } from '@vis.gl/react-google-maps';
const GPXMarker = ({ position, onClick, active }) => {
return (
);
};
export default GPXMarker;
```
This `` is rendered inside the marker as a small blue circle with a white border and shadow.
**Polyline.jsx**
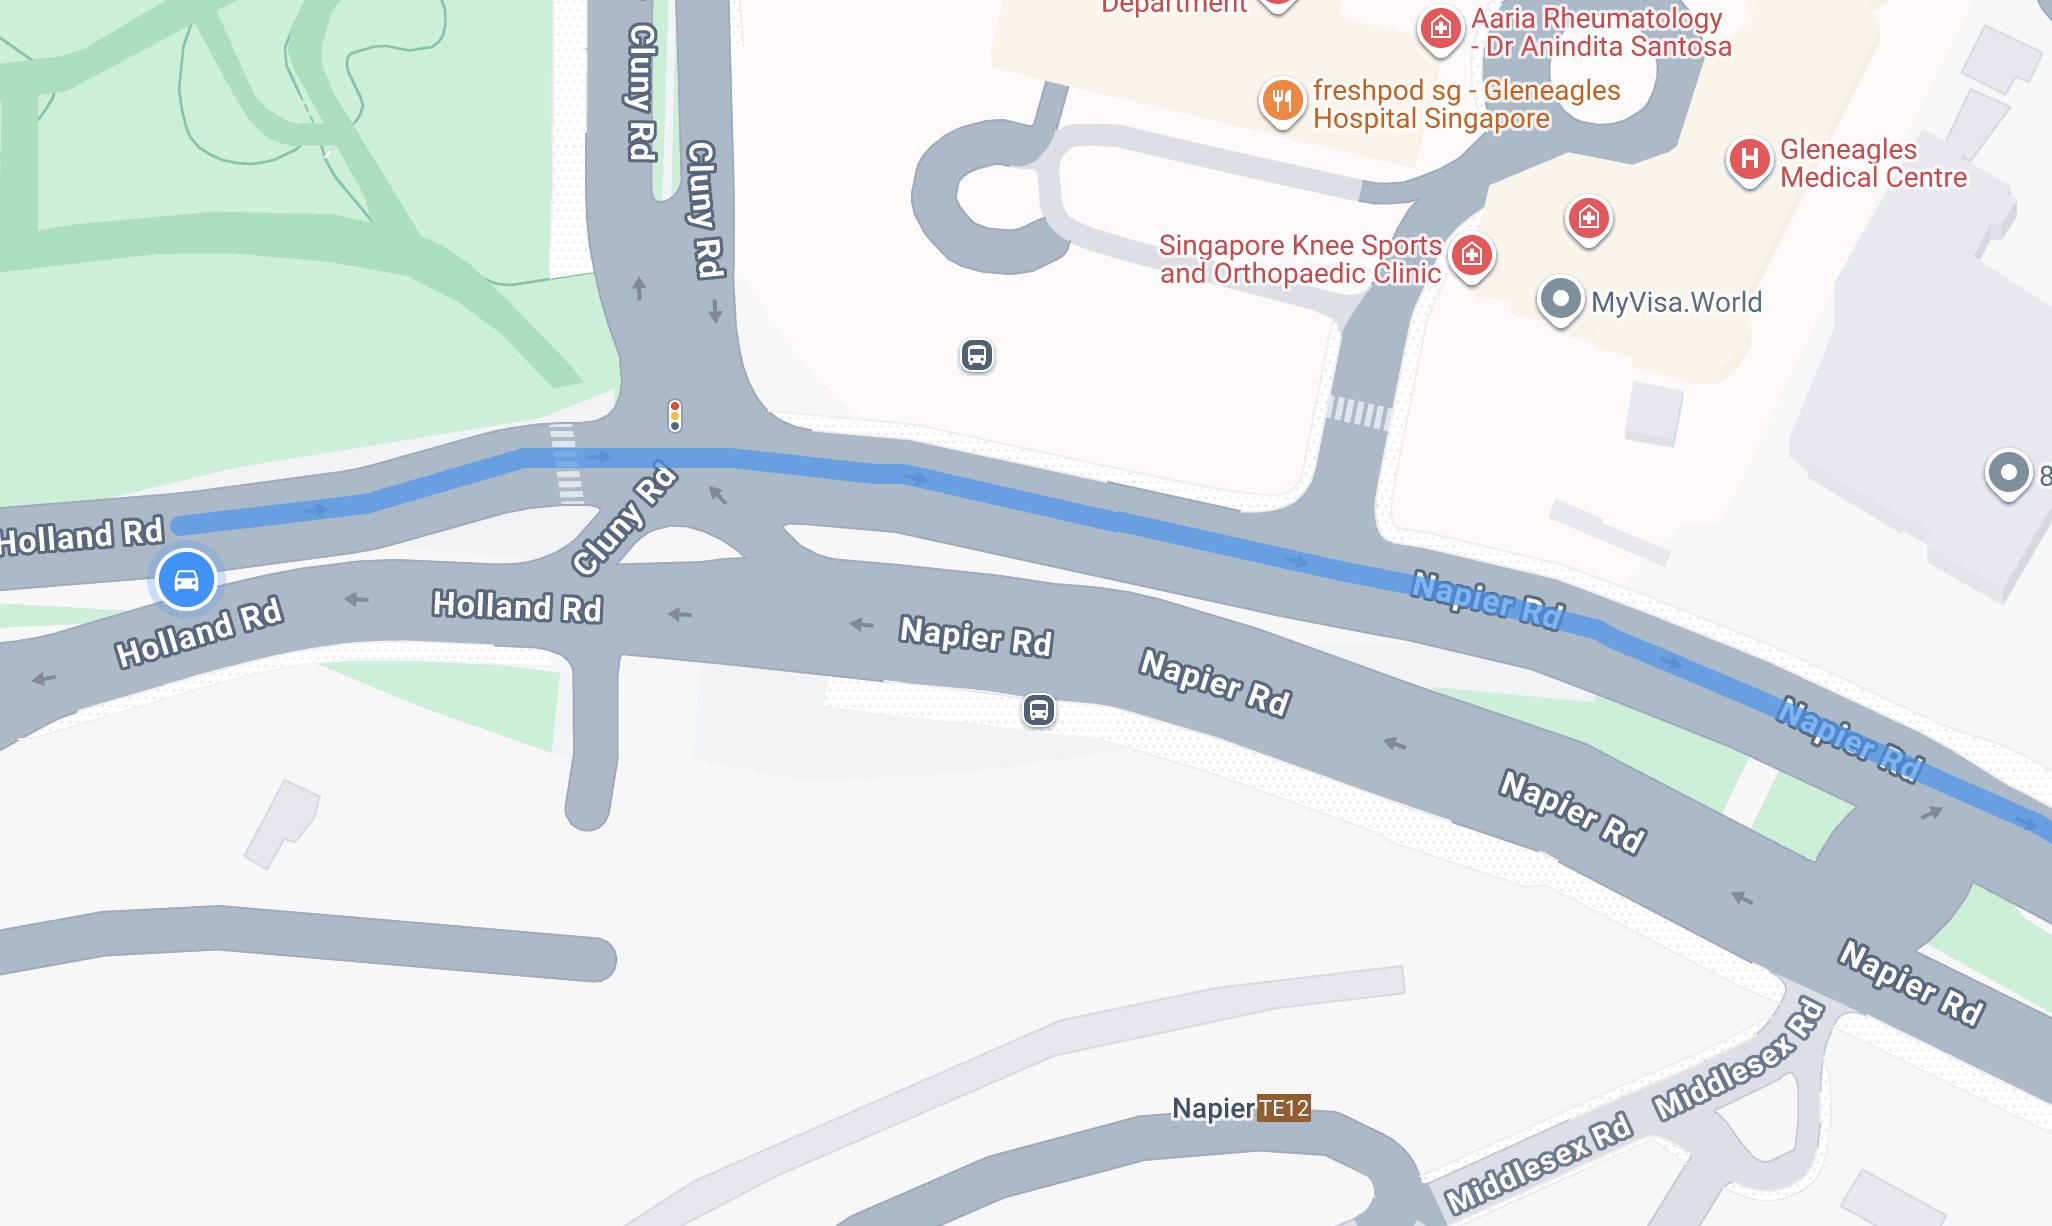
Encoded polyline used to display the map matched route
Rendering a polyline on a Google Map with React is straightforward. You simply add a `` component as a child of `` and provide an encoded polyline string along with styling options such as color (`#2196F3` for blue), `strokeWeight` (5.0), and other display attributes. The implementation in `Polyline.jsx` is based on the [Geometry Example](https://visgl.github.io/react-google-maps/examples/geometry?ref=blog.afi.io) of the [react-google-maps](https://visgl.github.io/react-google-maps/?ref=blog.afi.io) library.
**Deploy and run**
To run the app locally, clone the [google\_snap\_to\_roads](https://github.com/afilabs/google%5Fsnap%5Fto%5Froads?ref=blog.afi.io) repository, update the `.env` file with your Google Maps API key and Map ID, and then run `npm install` to install dependencies and `npm run` to start the app. Alternatively, you can play with the Snap to Roads demo online at: [https://google-snap-to-roads.afi.dev/](https://google-snap-to-roads.afi.dev/?ref=blog.afi.io).
### Beyond the Snap to Roads API
When considering a service like Google Maps, one of the key tradeoffs is cost versus convenience. The Snap to Roads endpoint, for example, is priced at $10 CPM (or $0.01 per request). While that may seem high, replicating the same functionality would require developing your own map matching algorithm and integrating with road network data from OpenStreetMap or another commercial provider, an effort that’s both time consuming and technically difficult. Viewed in this way, the Snap to Roads API offers excellent value, especially given Google's high quality road data.
**This article was written by** [**Afi Labs**](https://afi.io/?ref=blog.afi.io)**, a** [**Google Maps Premier Partner**](https://www.afi.io/?ref=blog.afi.io) **and reseller. We build route optimization, navigation, and fleet tracking software on Google Maps, and offer volume pricing on GMP licensing.** [**Talk to an engineer**](https://www.afi.io/contact%5Fus?ref=blog.afi.io) **or** [**follow Afian on LinkedIn**](https://www.linkedin.com/in/afian-anwar/?ref=blog.afi.io)**.**