> ## Content Index
> Fetch the complete content index at: https://blog.afi.io/llms.txt
> Use this file to discover other available public pages before exploring further.
# Getting started with the Google Navigation SDK
- URL: https://blog.afi.io/blog/getting-started-with-the-google-navigation-sdk/
- Published: 2024-12-25T14:51:37.000Z
- Updated: 2026-08-05T07:35:56.000Z
- Description: Build a basic in-app turn by turn navigation app for Android with the Google Navigation SDK.
- Author: Afian Anwar
- Tags: googlemaps
In this tutorial, we are getting hands on with the [Google Navigation SDK ](https://mapsplatform.google.com/resources/blog/introducing-navigation-sdk-deliver-seamless-customized-in-app-google-maps/?ref=blog.afi.io)(commonly known as the Nav SDK) by building a simple Android navigation app using starter code from the [official Navigation SDK Code Lab](https://codelabs.developers.google.com/codelabs/maps-platform/navigation-sdk-101-android?ref=blog.afi.io). We’ll go over how to set up the Nav SDK, make sure your app has the right permissions and libraries, and get it to provide in-app driving directions to a preset destination. Future blog posts will show you how to let users set their destination address using a [Place Autocomplete text box](https://developers.google.com/maps/documentation/places/android-sdk/autocomplete?ref=blog.afi.io), customize the navigation interface with your branding, and adjust the position and visibility of key UI elements for better control.
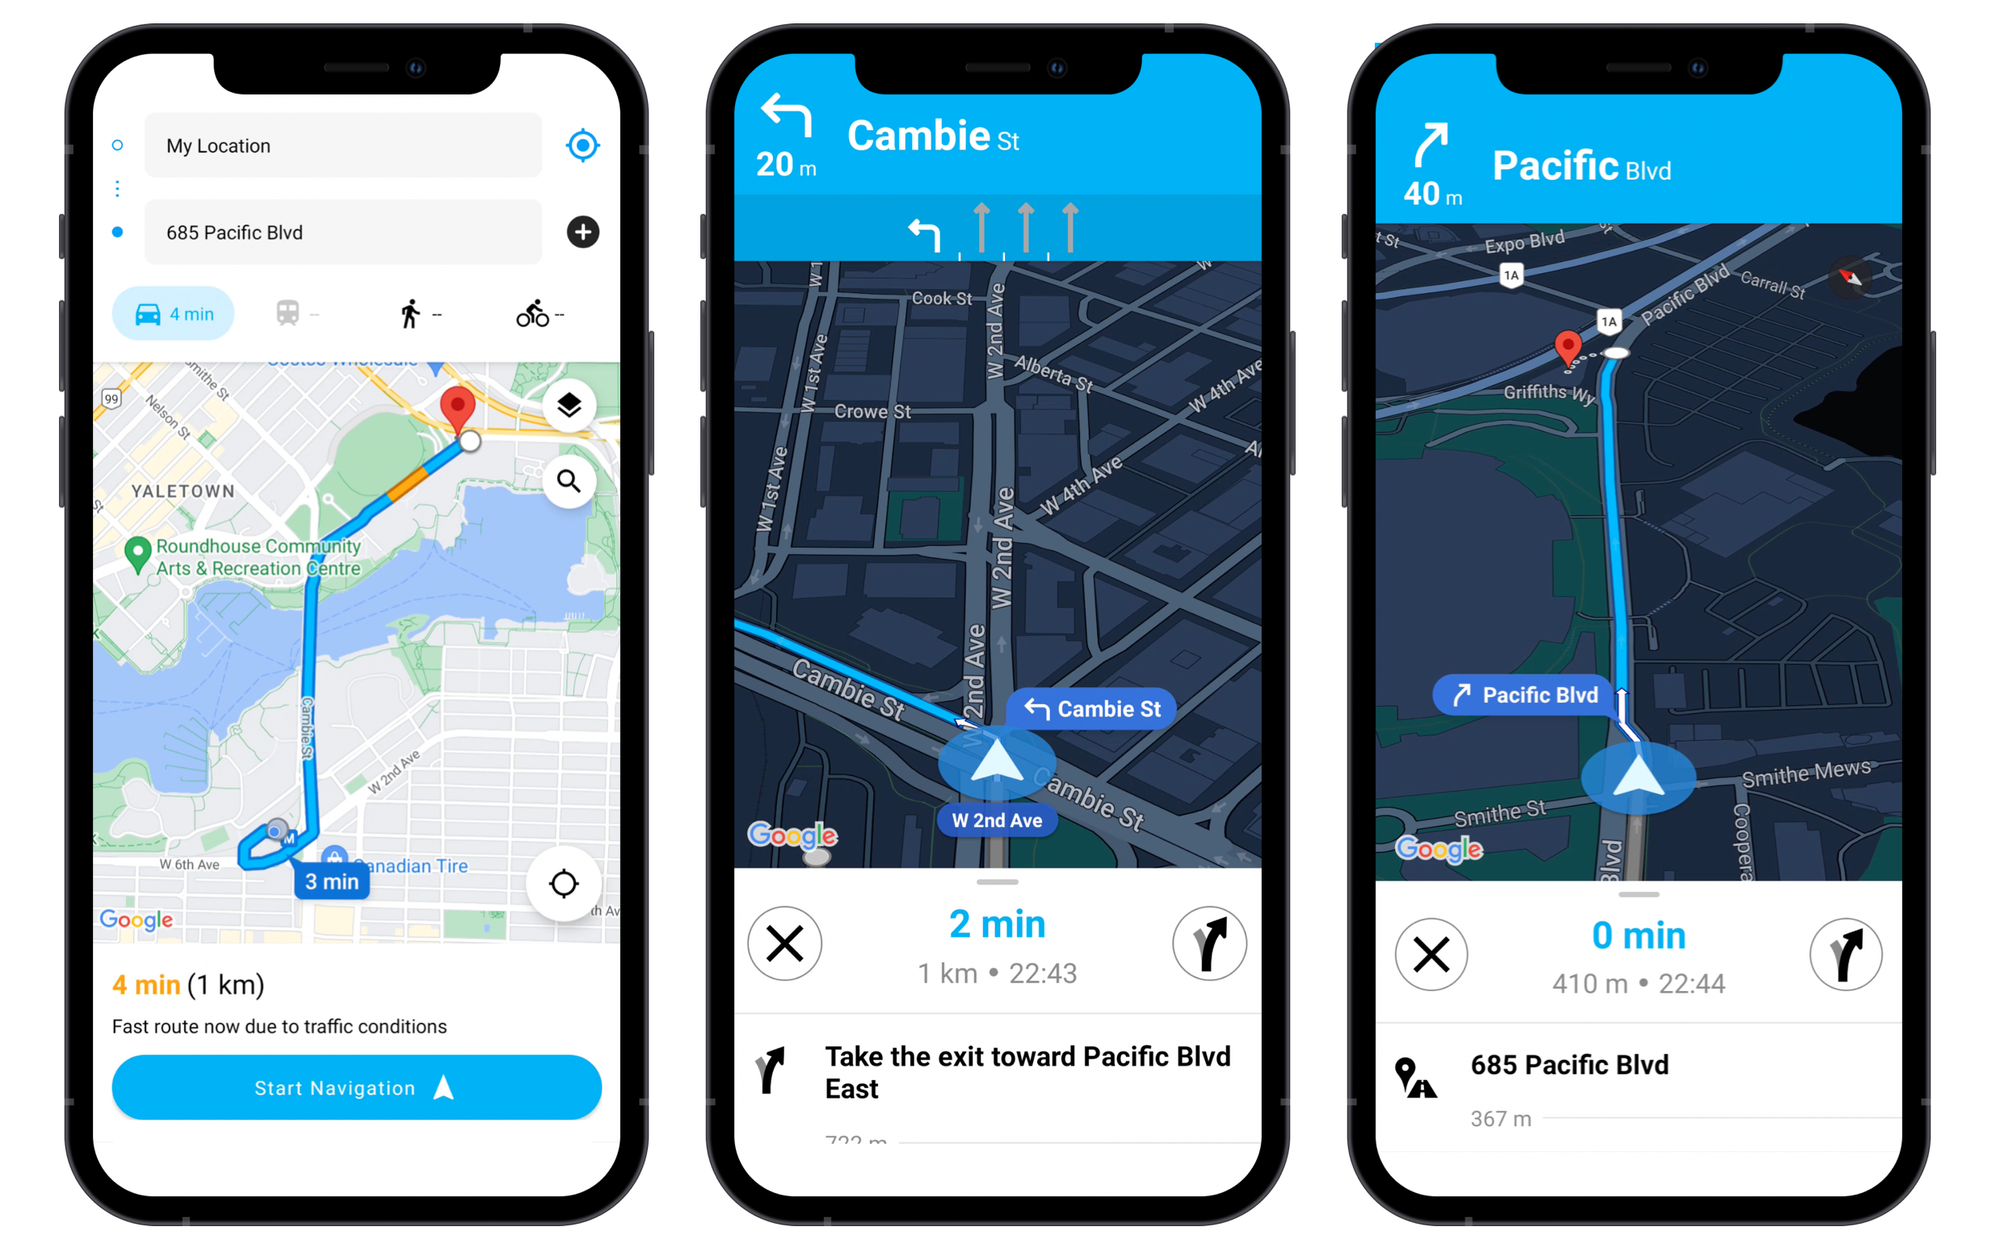
What we'll (eventually) build - a branded navigation app using the Google Nav SDK
Part 1: [Google Navigation SDK standalone](https://blog.afi.io/blog/google-navigation-sdk-standalone/)
**Part 2: Getting started with the Google Navigation SDK (this article)**
Part 3: Adding a Place Autocomplete text box to your Android app
Part 4: How to draw a route on Google Maps for Android with the Routes API
Part 5: Styling the Navigation SDK with custom UI and branding
Part 6: Custom Google Maps markers on the navigation view
Part 7: Customize your vehicle icon with the Navigation SDK
Part 8: Custom polygons, boundaries and base map styles in the Navigation SDK
Part 9: Using the Navigation SDK for multi waypoint navigation
Part 10: Passing a GMPRO or Routes API route token to the Navigation SDK
Part 11: Listening for events and detecting arrival at destination
Part 12: Google Navigation SDK vs Mapbox vs HERE Maps
### About this Google Navigation SDK tutorial
This tutorial is intended for developers with general software development experience but who are not experts in Android mobile development or the [Kotlin](https://kotlinlang.org/?ref=blog.afi.io) programming language. There are two ways to get the most out of this tutorial. If you already have a mobile app and want to use the Navigation SDK as a drop-in replacement for your existing in-app navigation system, go ahead and clone the [nav\_sdk\_tutorial ](https://github.com/afilabs/nav%5Fsdk%5Ftutorial?ref=blog.afi.io) repository, add your Google Maps API key to the `local.defaults.properties` and `secrets.properties` files and run the app in [Android Studio](https://developer.android.com/studio?ref=blog.afi.io). To understand the nuts and bolts of the Nav SDK, follow along line by line. If you get stuck at any point you can always refer to the [commit history](https://github.com/afilabs/nav%5Fsdk%5Ftutorial/commits/main/?ref=blog.afi.io) of [nav\_sdk\_tutorial](https://github.com/afilabs/nav%5Fsdk%5Ftutorial?ref=blog.afi.io) for guidance.
> [Afi Labs](https://www.afi.io/?ref=blog.afi.io) builds custom transportation and logistics management software. From route optimization, live tracking to proof of delivery and driver apps, we've got you covered!
>
> [👋 Say Hello!](https://afi.io/?ref=blog.afi.io#contact-us)
### How the Google Navigation SDK works
To enable turn-by-turn navigation in your app, the Navigation SDK requires a predefined route. You can create this route by specifying an *origin* (typically the user's current location) and a *destination*, or by passing an encoded polyline generated using the Google [Directions API](https://developers.google.com/maps/documentation/directions/get-directions?ref=blog.afi.io), [Routes API](https://developers.google.com/maps/documentation/routes?ref=blog.afi.io) or [GMPRO](https://developers.google.com/maps/documentation/route-optimization?ref=blog.afi.io). The following code demonstrates how to set up a Navigation SDK service that accepts a route and delivers turn-by-turn navigation to the specified destination.
🌎
A great resource for developers is the official [Navigation SDK for Android docs](https://developers.google.com/maps/documentation/navigation/android-sdk/reference?ref=blog.afi.io), where you'll find reference guides for the [Navigator](https://developers.google.com/maps/documentation/navigation/android-sdk/reference/com/google/android/libraries/navigation/Navigator?ref=blog.afi.io), [NavigationView](https://developers.google.com/maps/documentation/navigation/android-sdk/reference/com/google/android/libraries/navigation/NavigationView?ref=blog.afi.io) and [NavigationAPI](https://developers.google.com/maps/documentation/navigation/android-sdk/reference/com/google/android/libraries/navigation/NavigationApi?ref=blog.afi.io) classes.
### Initial commit
To get hold of our starter code, clone the Codelab repo with `git clone https://github.com/googlemaps-samples/codelab-navigation-101-android-kotlin.git`. This code was written by [Ed Boiling](https://www.linkedin.com/in/edboiling/?ref=blog.afi.io), a solutions engineer at Google, and this tutorial is basically a rewrite of his very excellent [Google Codelab: Build a simple Android navigation app with Google Maps Platform Navigation SDK](https://codelabs.developers.google.com/codelabs/maps-platform/navigation-sdk-101-android?ref=blog.afi.io#0) using my basic understanding (with a generous helping of ChatGPT) of how one should go about building an Android navigation app. I've always found that the best way to learn a new language or framework is to try and implement a piece of working code on my own, which is what I've done here. Often, I would copy and paste his working code into an LLM ([ChatGPT-4o](https://openai.com/index/hello-gpt-4o/?ref=blog.afi.io) is especially good at this, as are the latest models from [Anthropic](https://www.anthropic.com/?ref=blog.afi.io)) to try and understand what's going on.
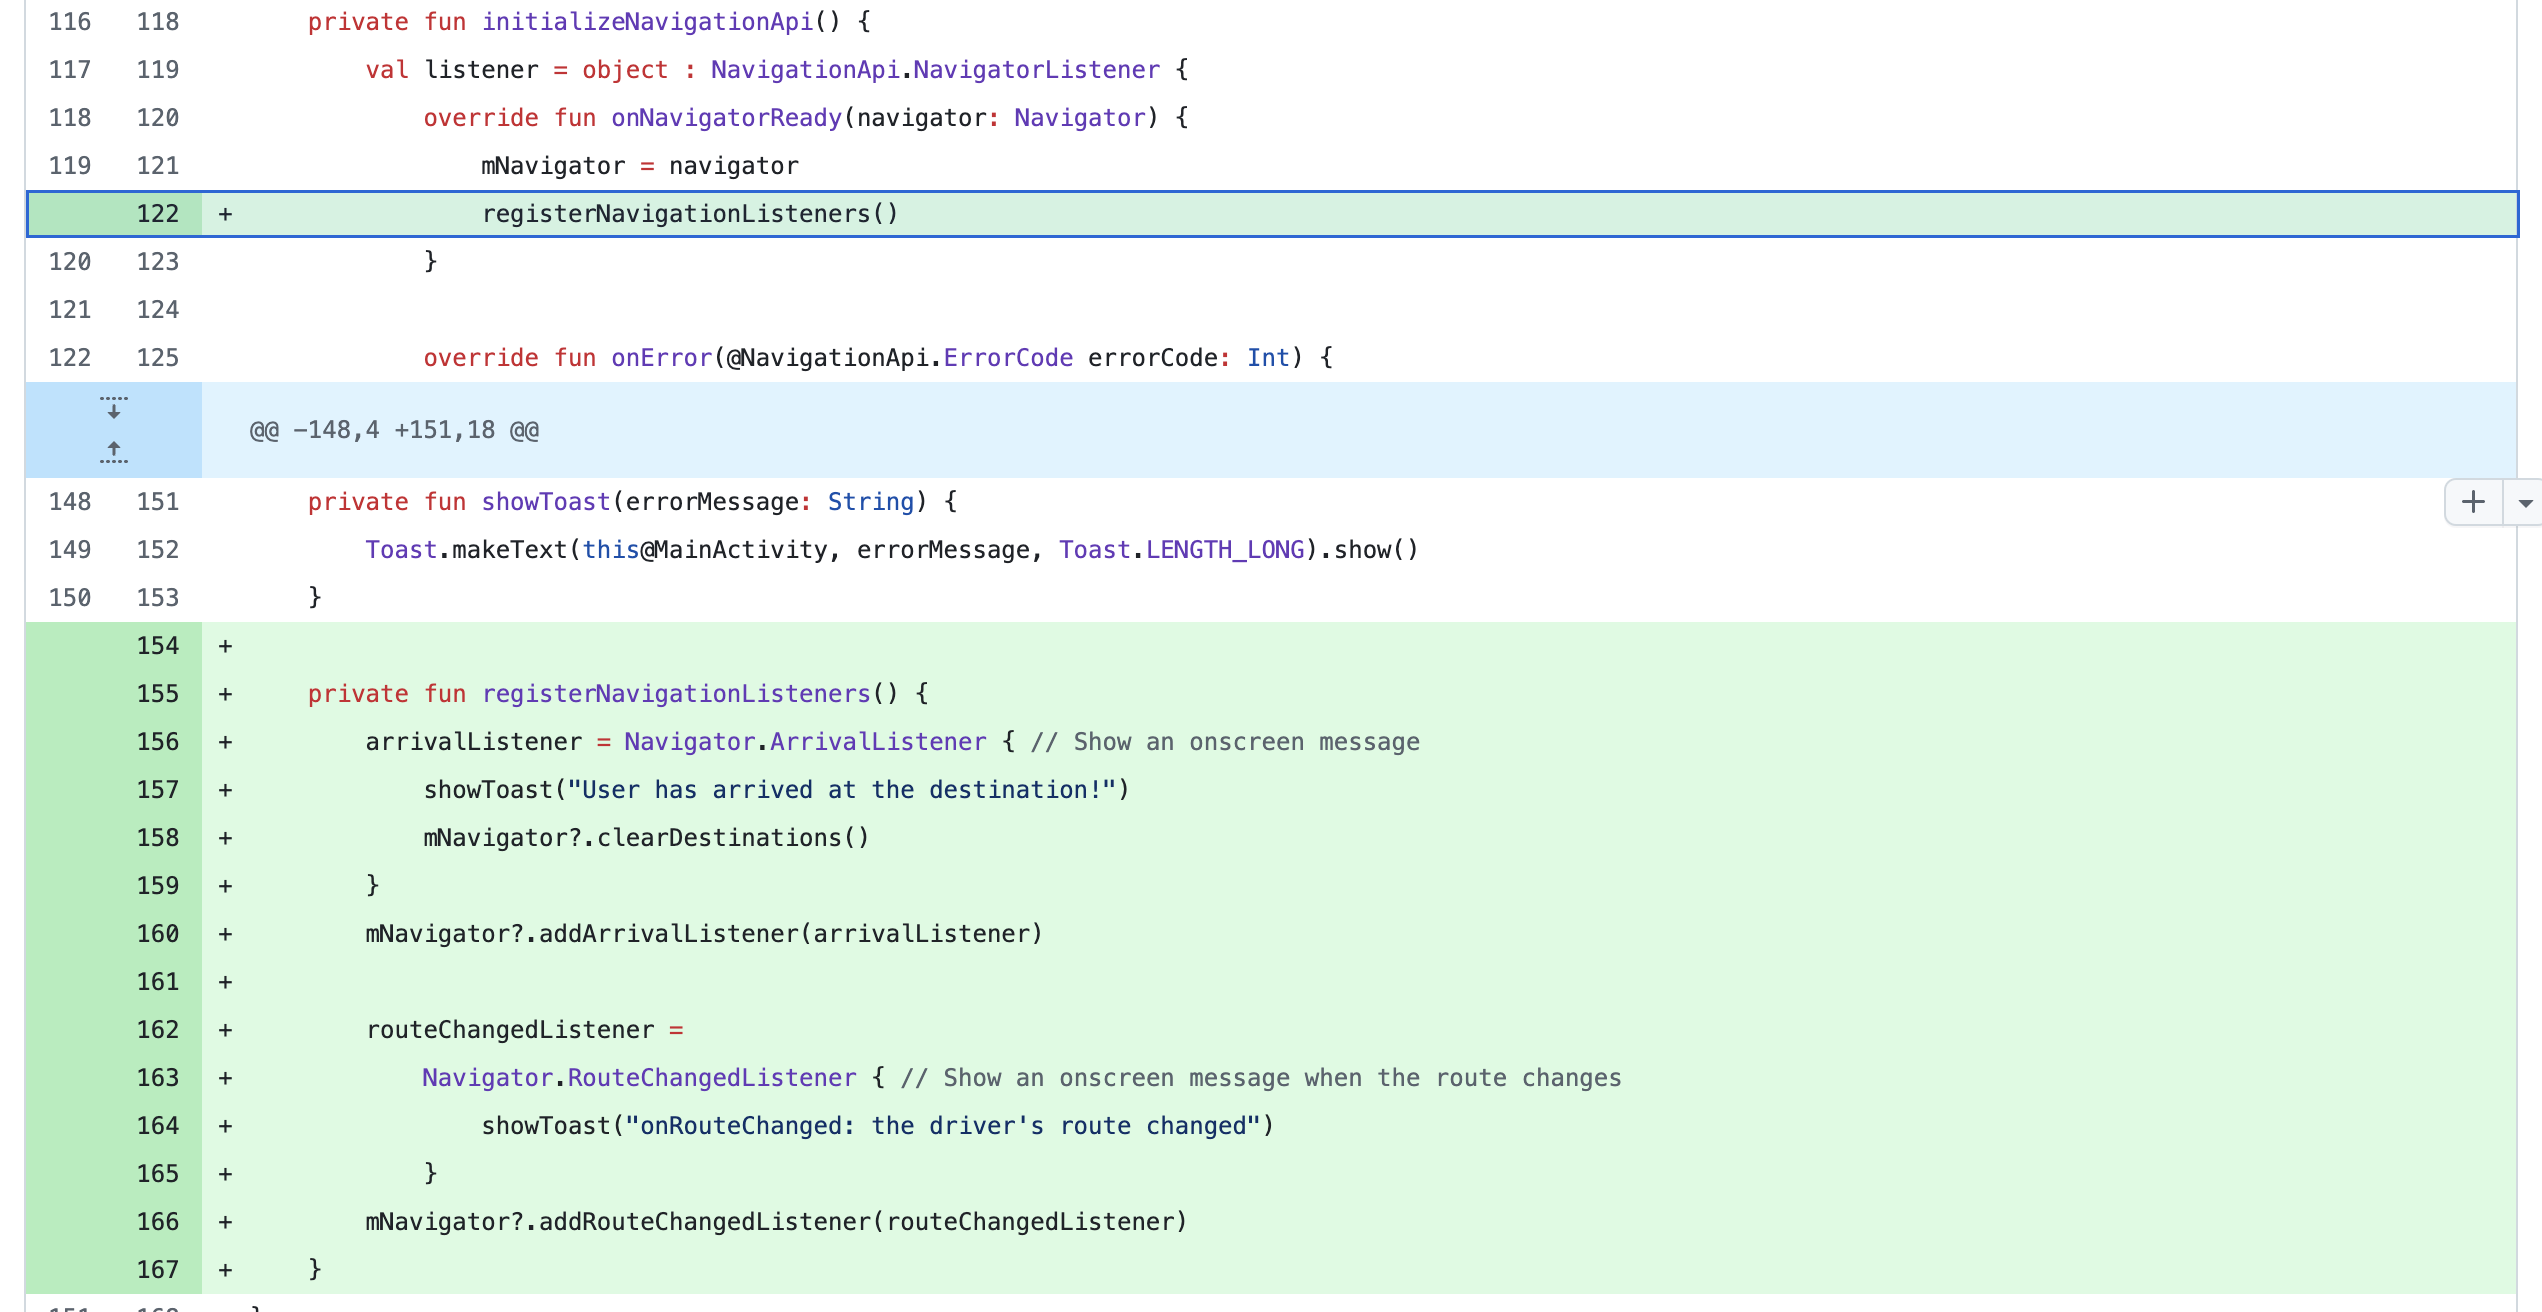
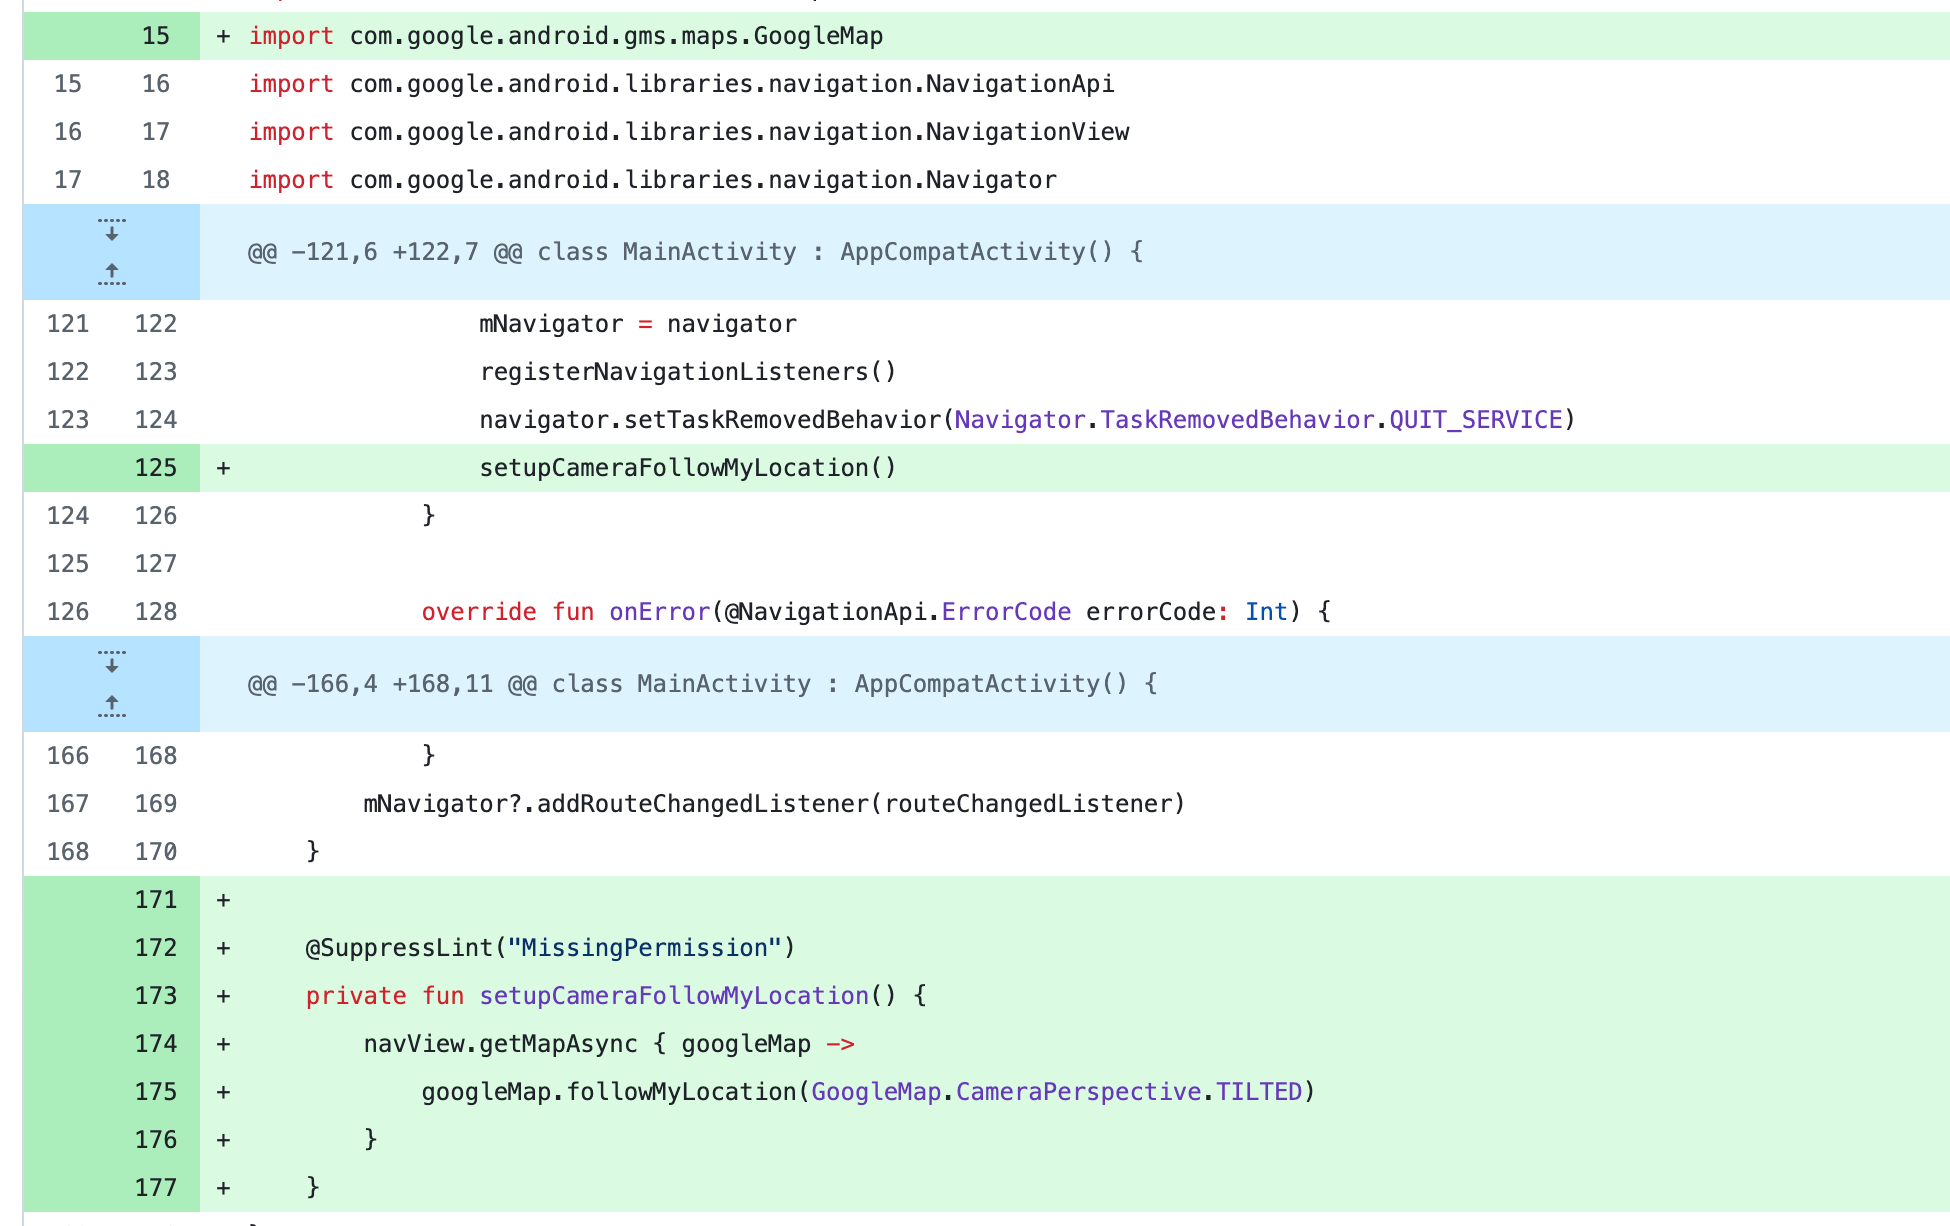
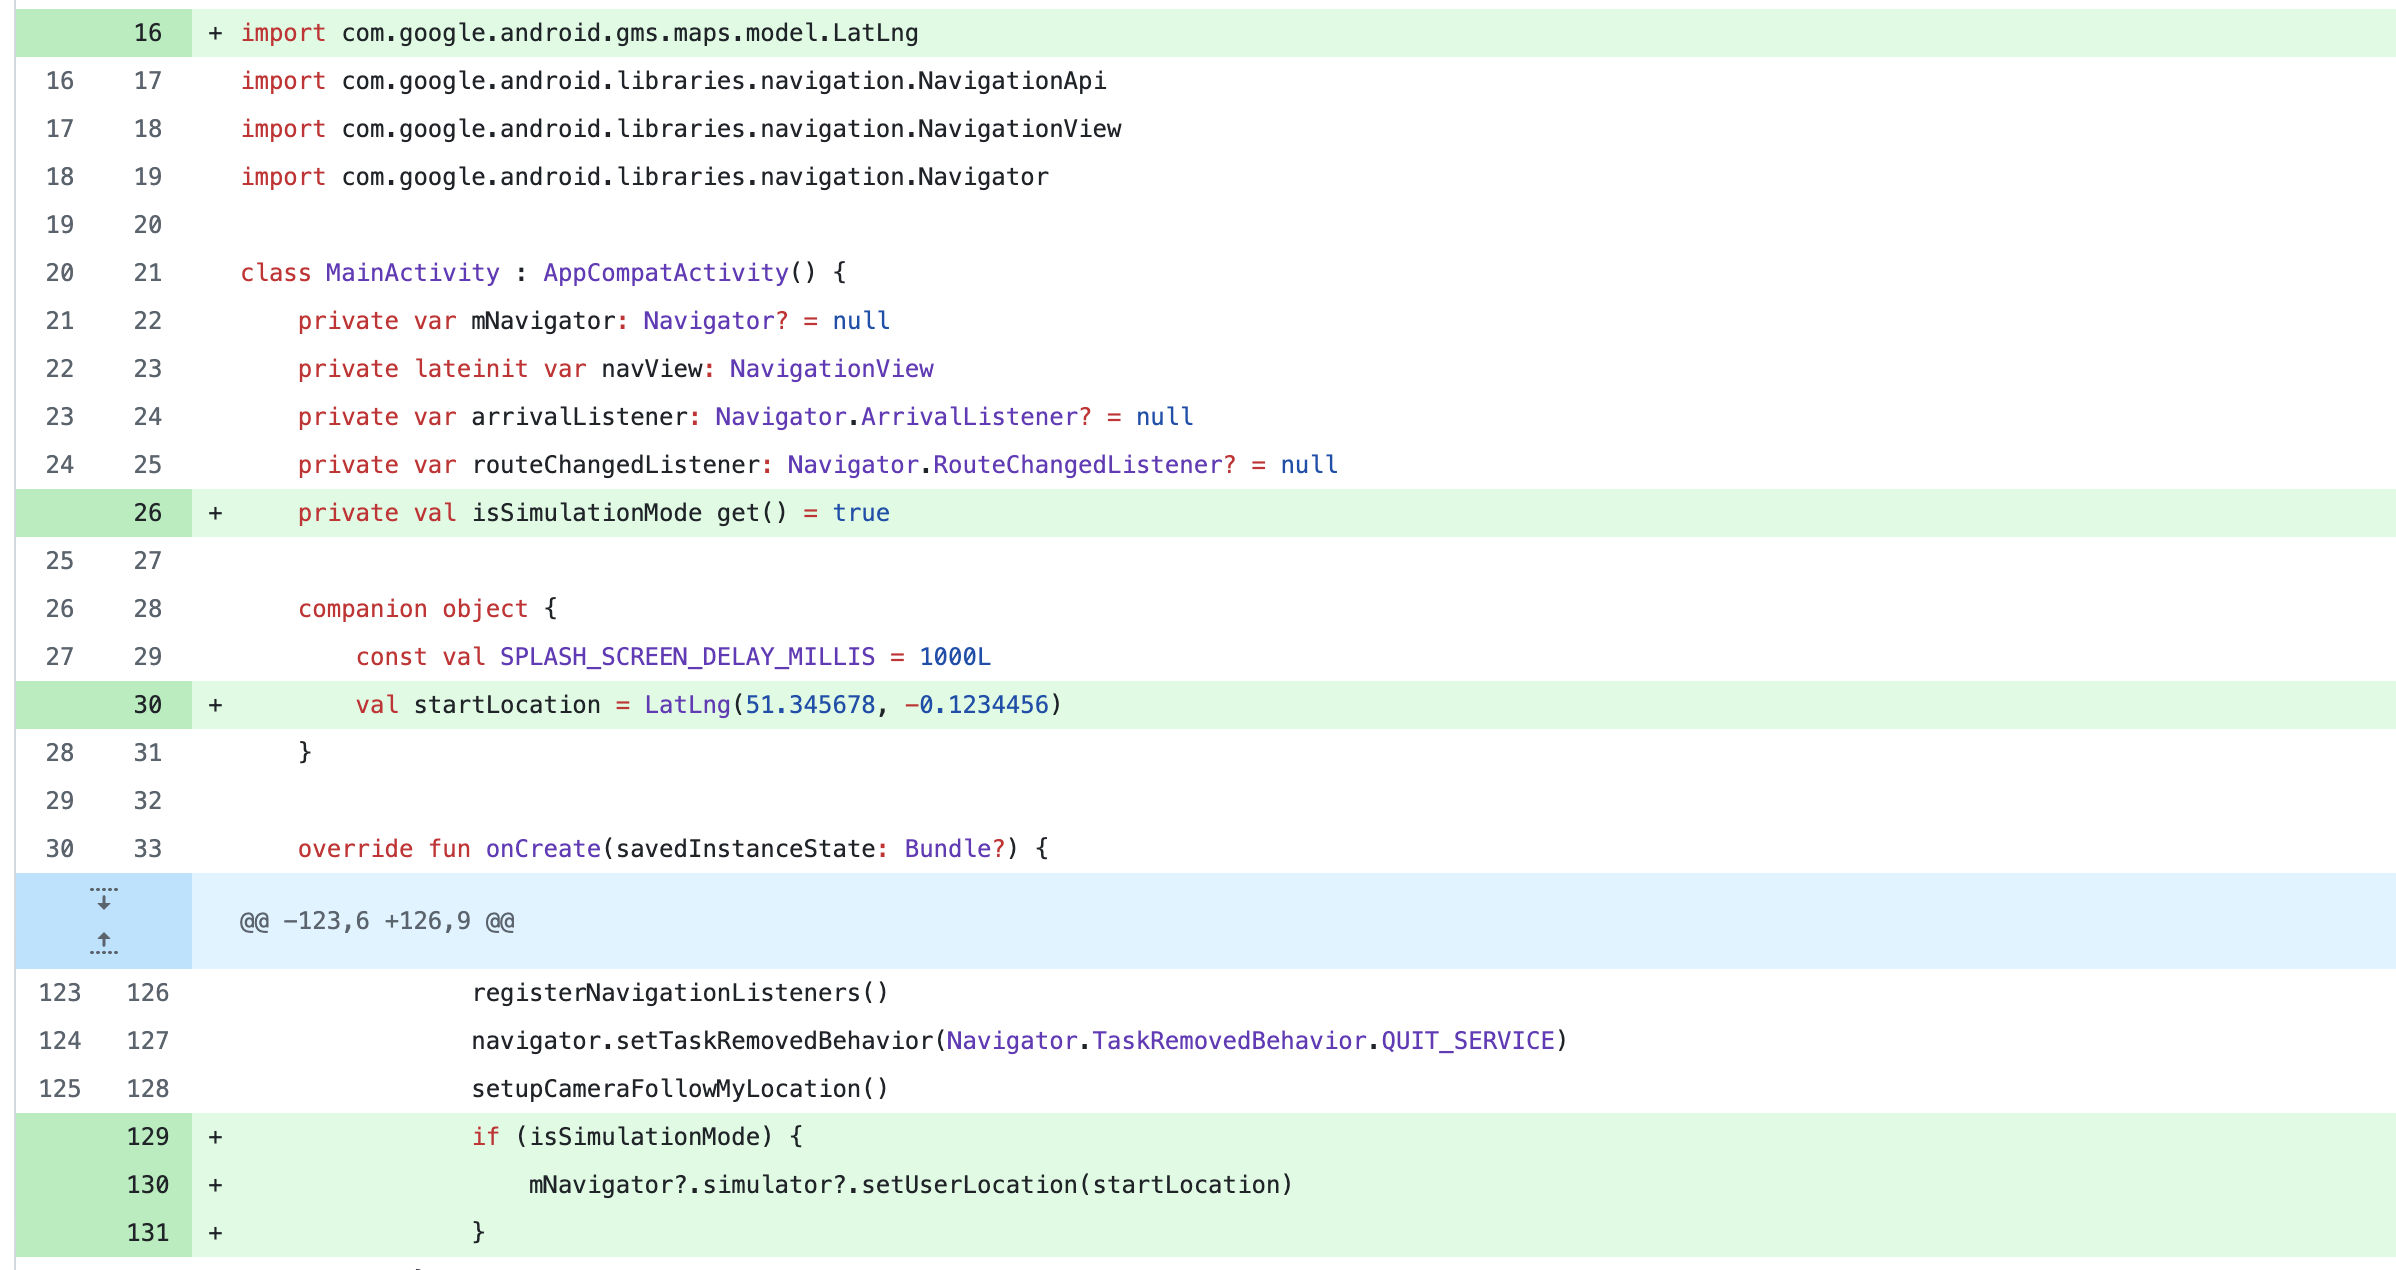
The code snippets in this tutorial only show the new code being added and may omit some or all of the surrounding existing code. To determine where to insert new code, refer to the screenshots of the Git commit diffs provided in each section.
To start, navigate to the `/Starter` directory of Ed's [Codelap repository](https://codelabs.developers.google.com/codelabs/maps-platform/navigation-sdk-101-android?ref=blog.afi.io#0) and copy + paste its contents into a new folder called `nav_sdk-afi_labs`.
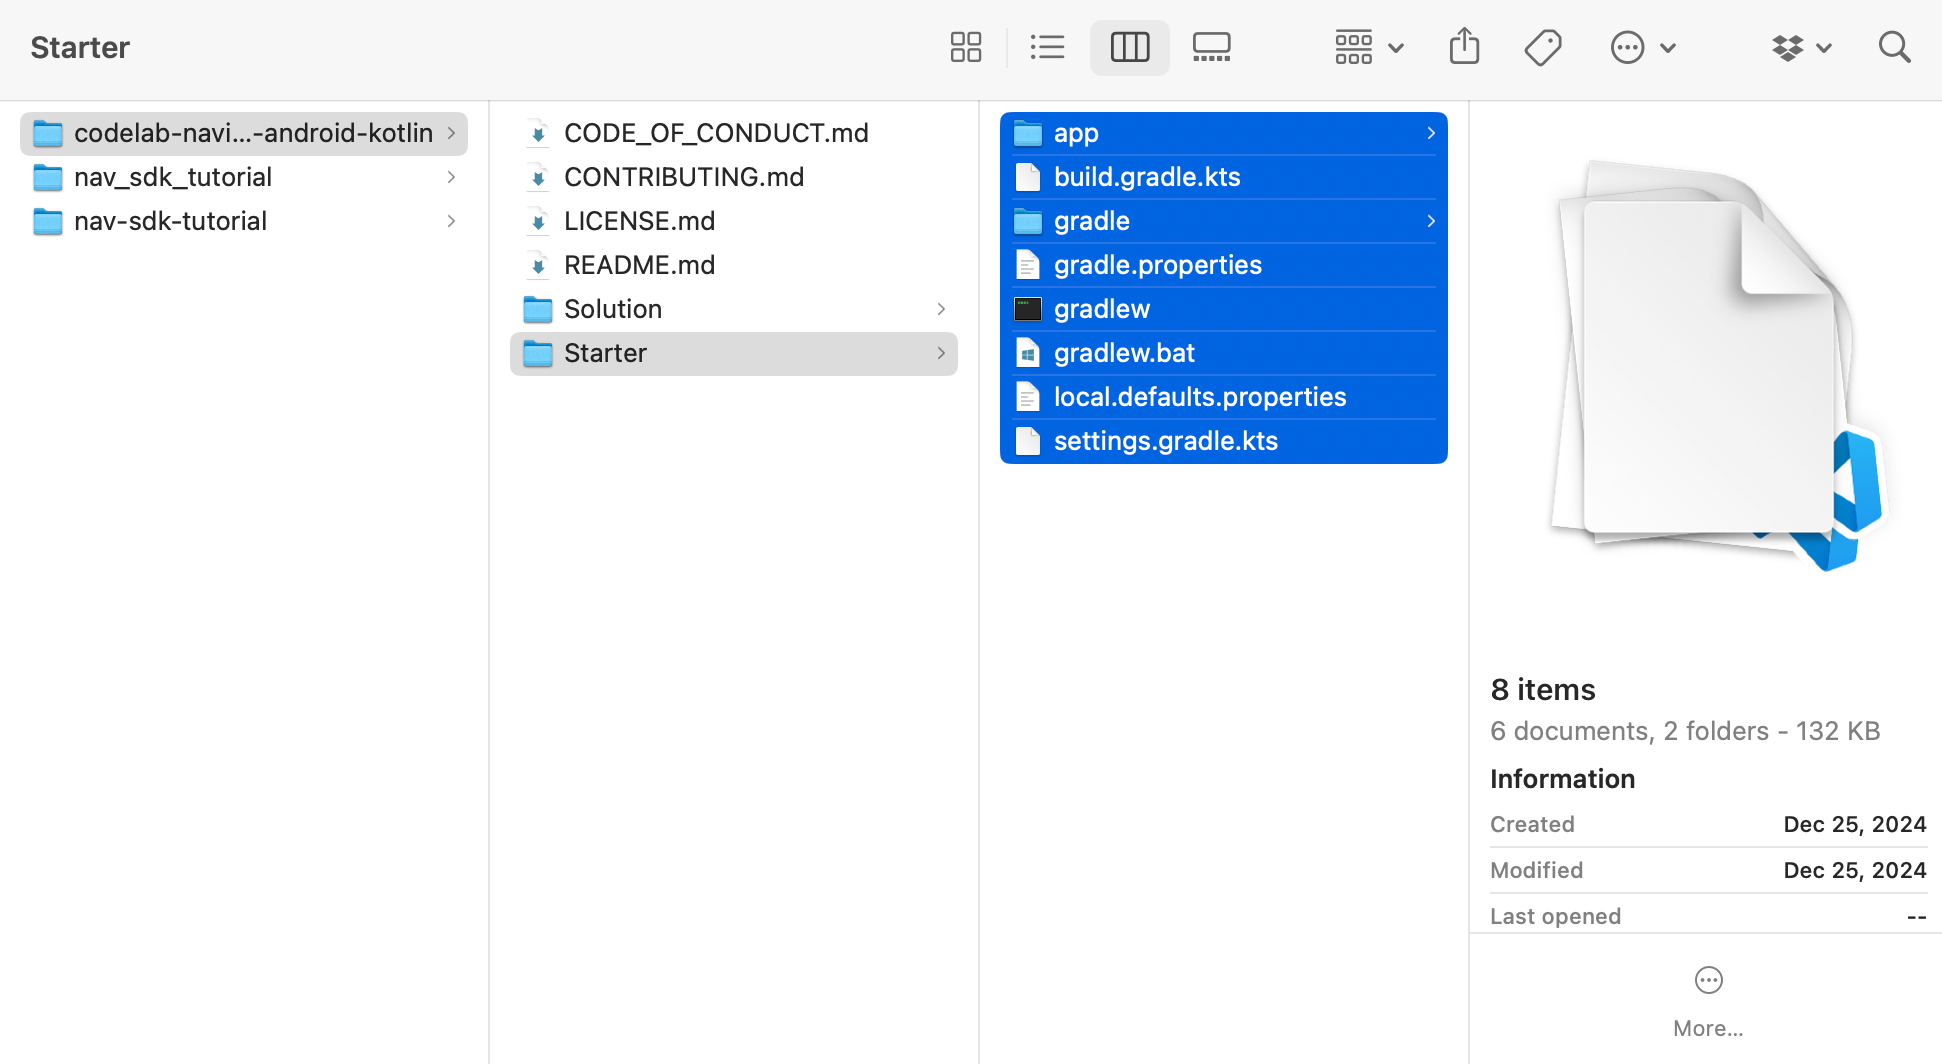
Copy + paste the contents of the Starter folder to bootstrap our navigation app
We'll be using this code base as the starting point for our navigation app. Download [Android Studio](https://developer.android.com/studio?ref=blog.afi.io) and open the `/nav_sdk-afi_labs` folder. Run the app by pressing the ▶️ button on the top nav bar. You should see an empty app running in the simulator. This means that your computer has everything it needs to run an Android app locally.
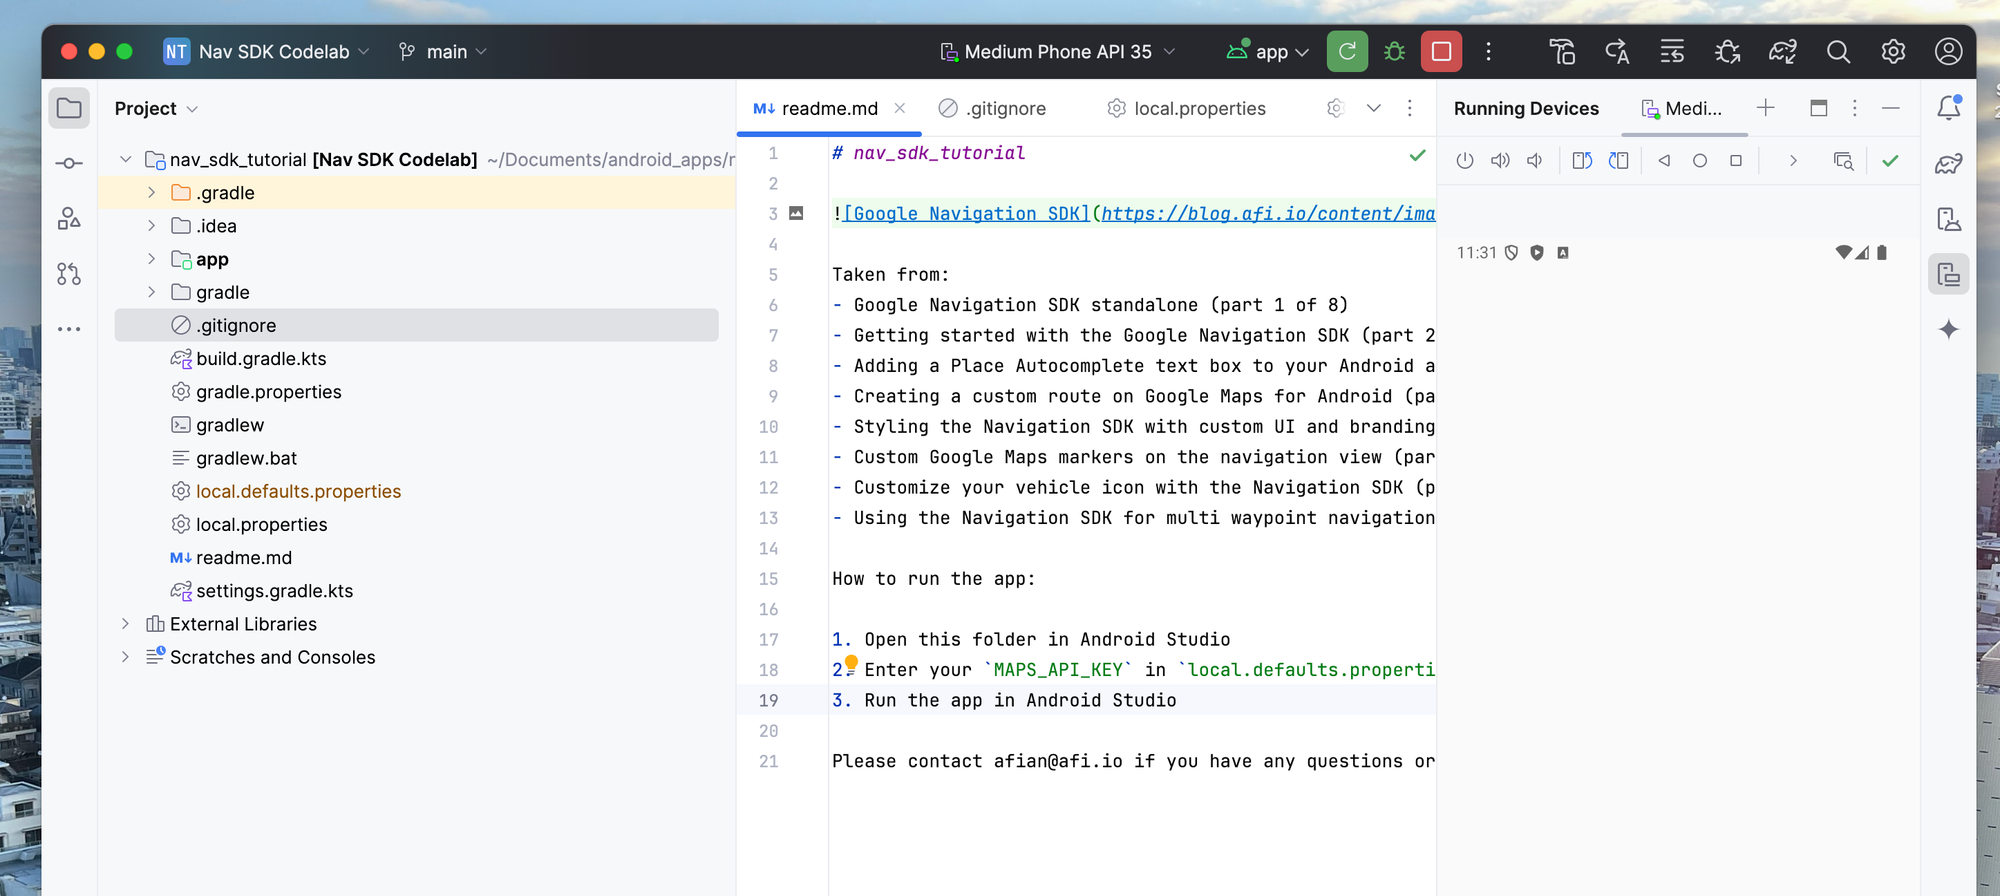
An empty app running in the Android Studio simulator
### Setup SDK: Add dependencies
The initial part of this tutorial involves working with Gradle, an open-source build automation tool primarily used for building, testing, and deploying software written in Java and Kotlin. Gradle uses a domain-specific language (DSL) based on Kotlin, so don't be surprised if it looks unfamiliar, especially if you are used to working in Javascript.
Open the `app/build.gradle.kts` file and add the line:
```
/*** app/build.gradle.kts ***/
api("com.google.android.libraries.navigation:navigation:5.2.3")
```
to the `dependencies` object. This line adds a dependency on the `com.google.android.libraries.navigation:navigation` library (version 5.2.3) and ensures it is downloaded and included in your project during the build process.
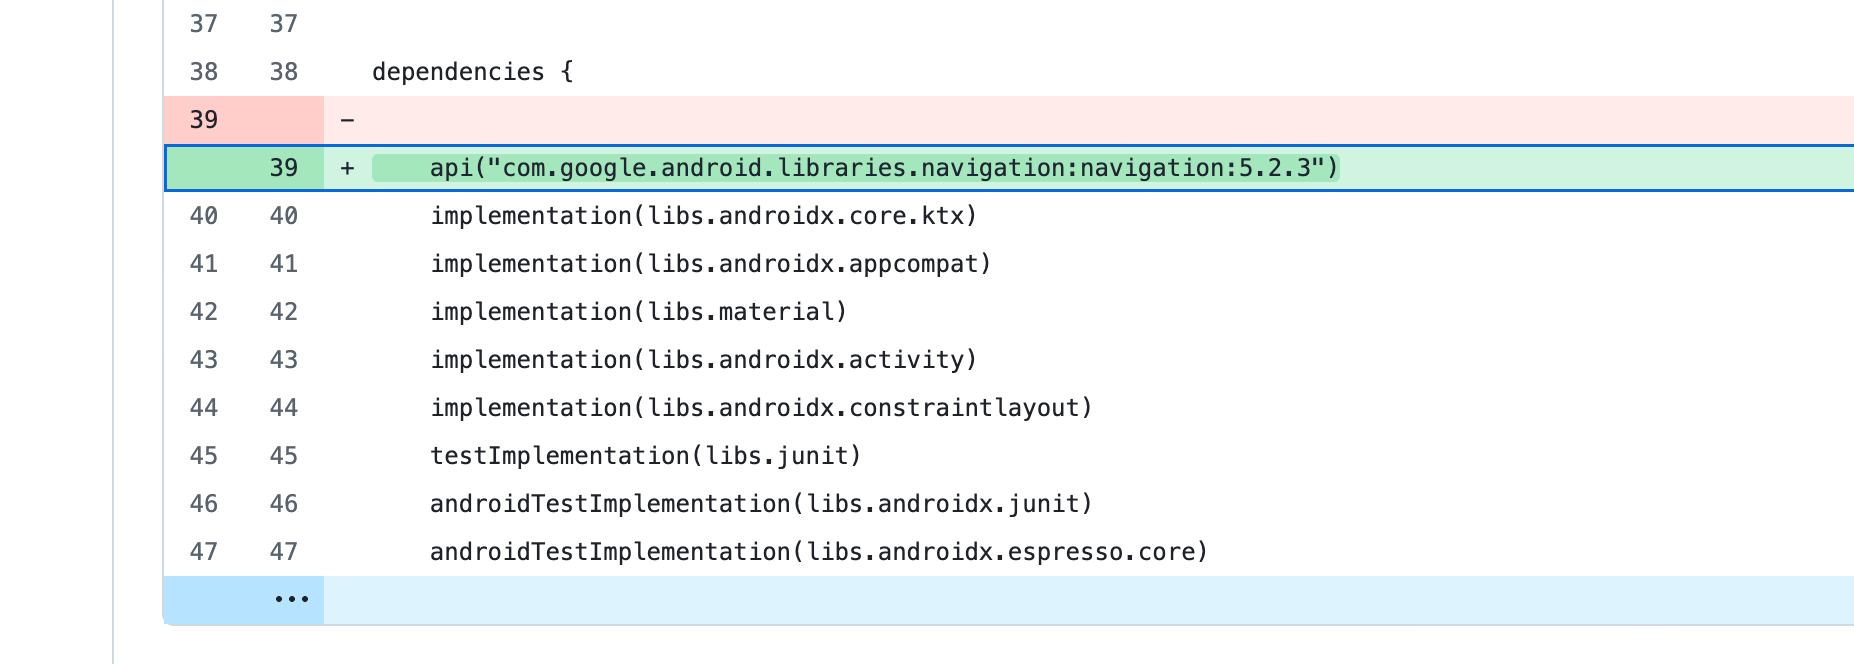
### Setup SDK: Config Navigation SDK API key
Next, we are going to securely authenticate with the Google Maps server using the Navigation SDK enabled API key we created in the previous section. We will use the [Secrets Gradle Plugin](https://developers.google.com/maps/documentation/android-sdk/secrets-gradle-plugin?ref=blog.afi.io), which serves a similar purpose to a `.env` file in Node.js development by providing developers with a secure way to store API keys and other credentials while ensuring these sensitive details are not checked into version control, reducing the risk of accidental exposure.
First, open `app/build.gradle.kts` and the line below to the `plugins` object.
```
/*** app/build.gradle.kts ***/
id("com.google.android.libraries.mapsplatform.secrets-gradle-plugin") version "2.0.1" apply false
```
In the same `app/build.gradle.kts`, add a `secrets` object with the following code snippet. This defines a configuration block for the the [Secrets Gradle Plugin](https://developers.google.com/maps/documentation/android-sdk/secrets-gradle-plugin?ref=blog.afi.io).
```
/*** app/build.gradle.kts ***/
secrets {
// Optionally specify a different file name containing your secrets.
// The plugin defaults to "local.properties"
propertiesFileName = "secrets.properties"
// A properties file containing default secret values. This file can be
// checked in version control.
defaultPropertiesFileName = "local.defaults.properties"
}
```
The plugin reads secrets from the specified `secrets.properties` file during the build process. This file is typically **not committed to version control** to keep sensitive information secure. If a secret is not found in `secrets.properties`, the plugin will fall back to the `local.defaults.properties` file for a default value.
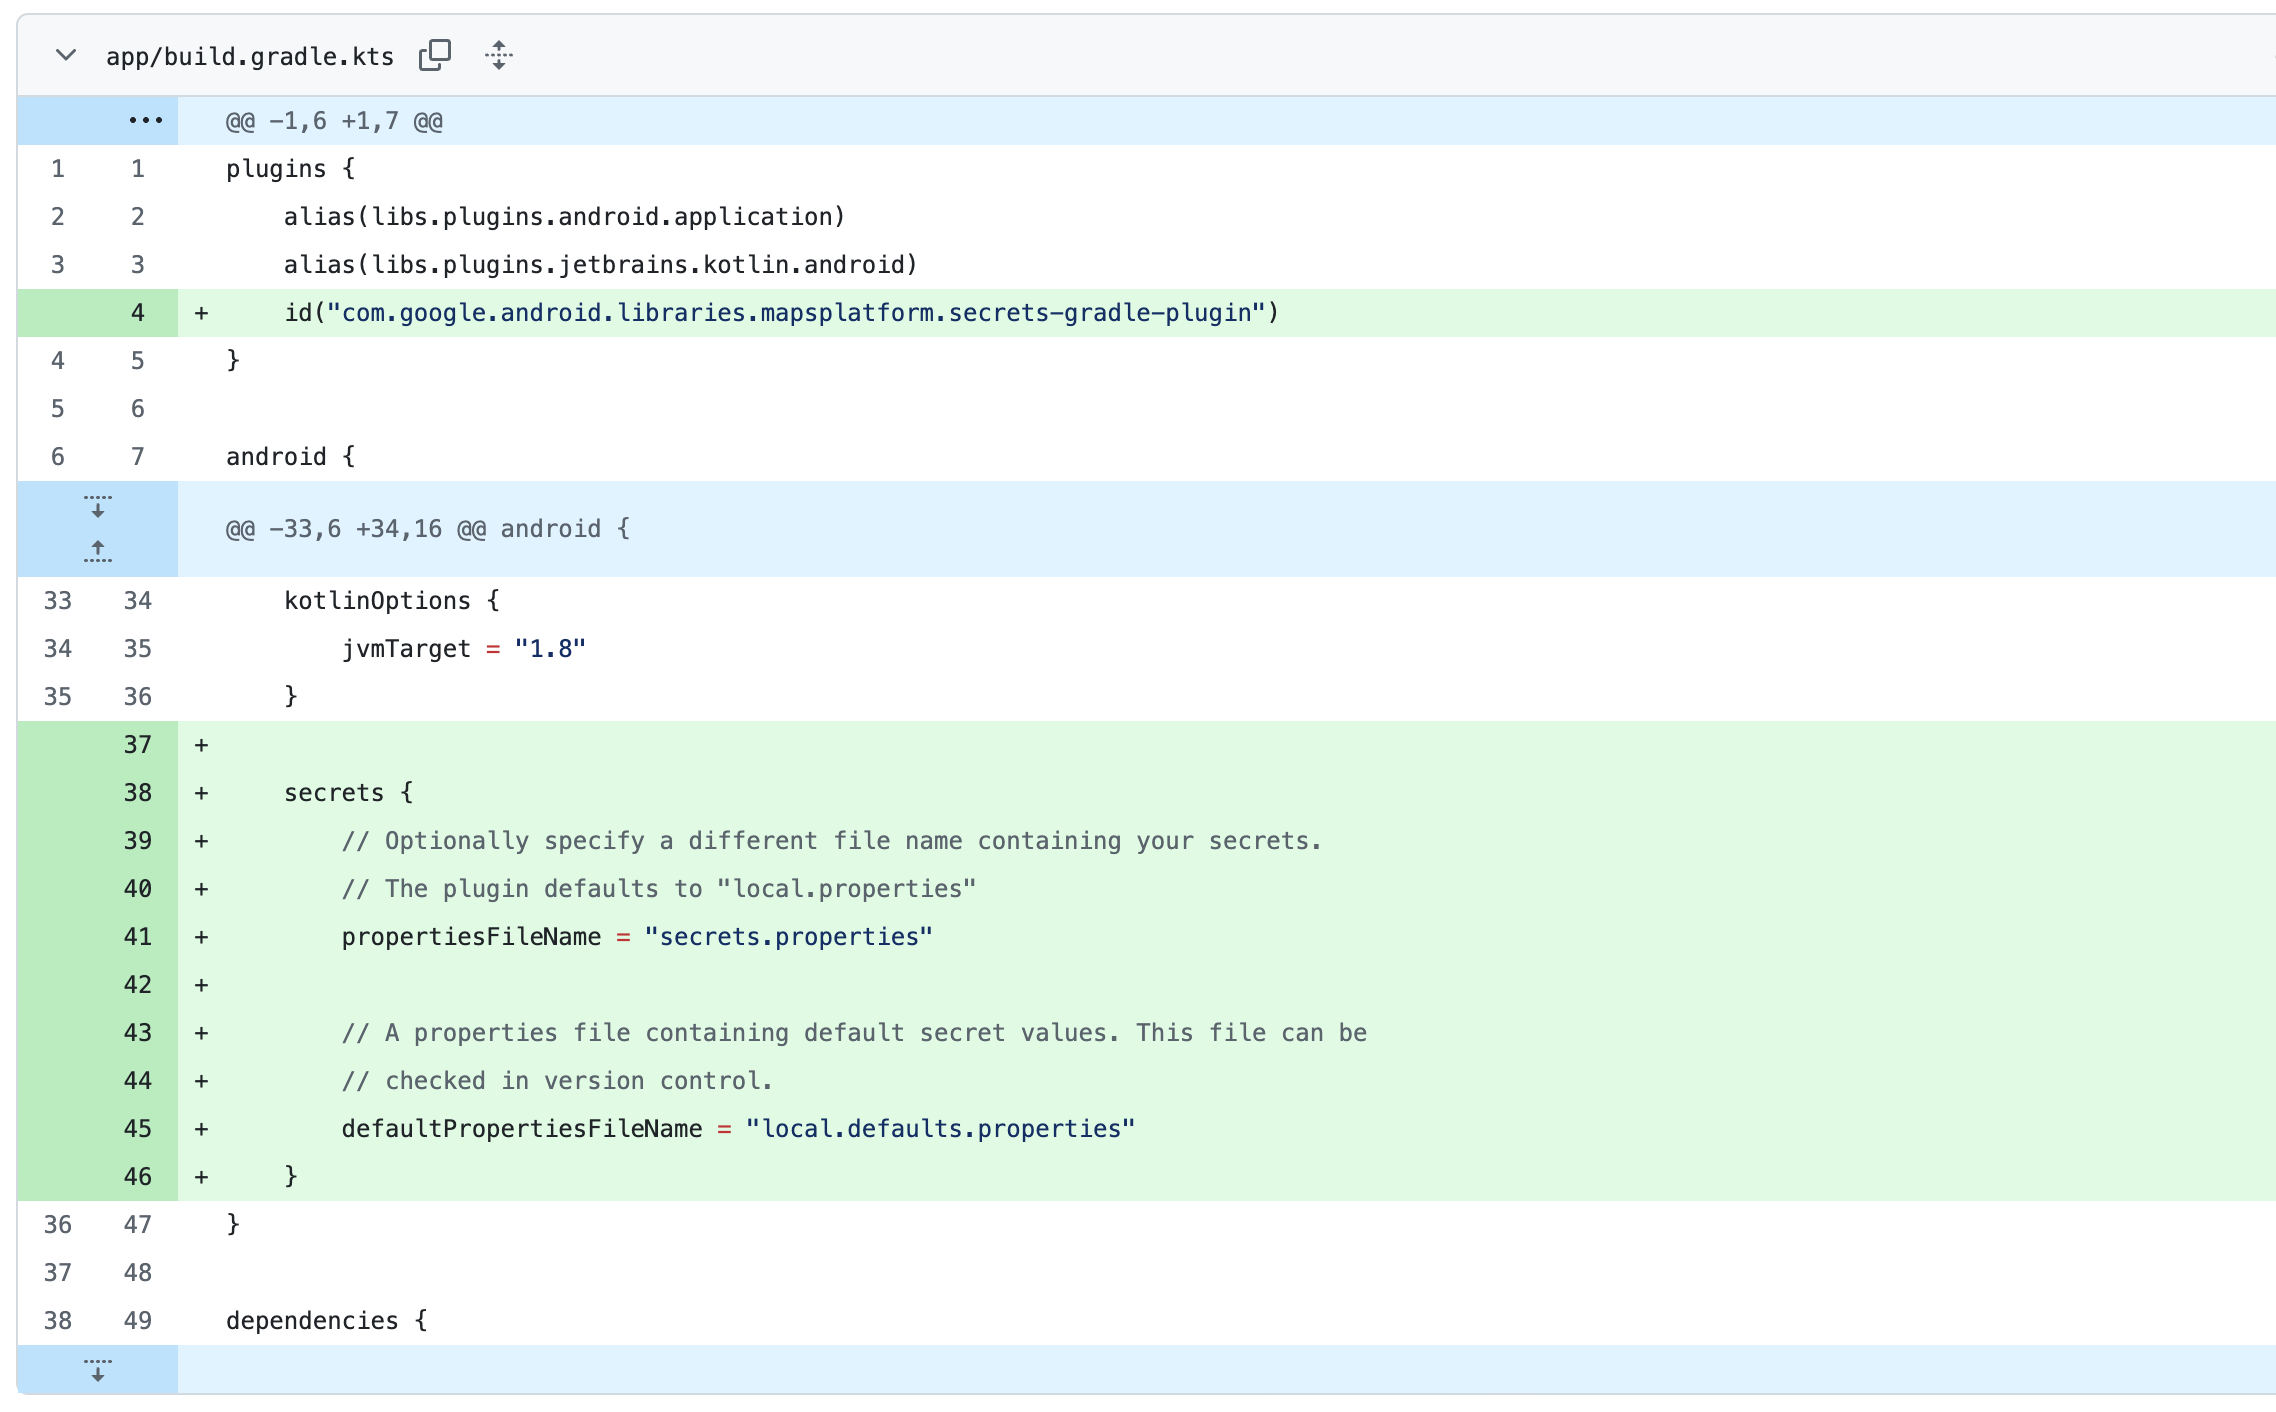
Next, create a new file, `secrets.properties`, and add your Google Maps API key (you don't have to add it to the `local.defaults.properties` file if you are checking this into version control).
```
/*** secrets.properties ***/
MAPS_API_KEY=YOUR_API_KEY
```
Finally, save all your files and sync your project with gradle.
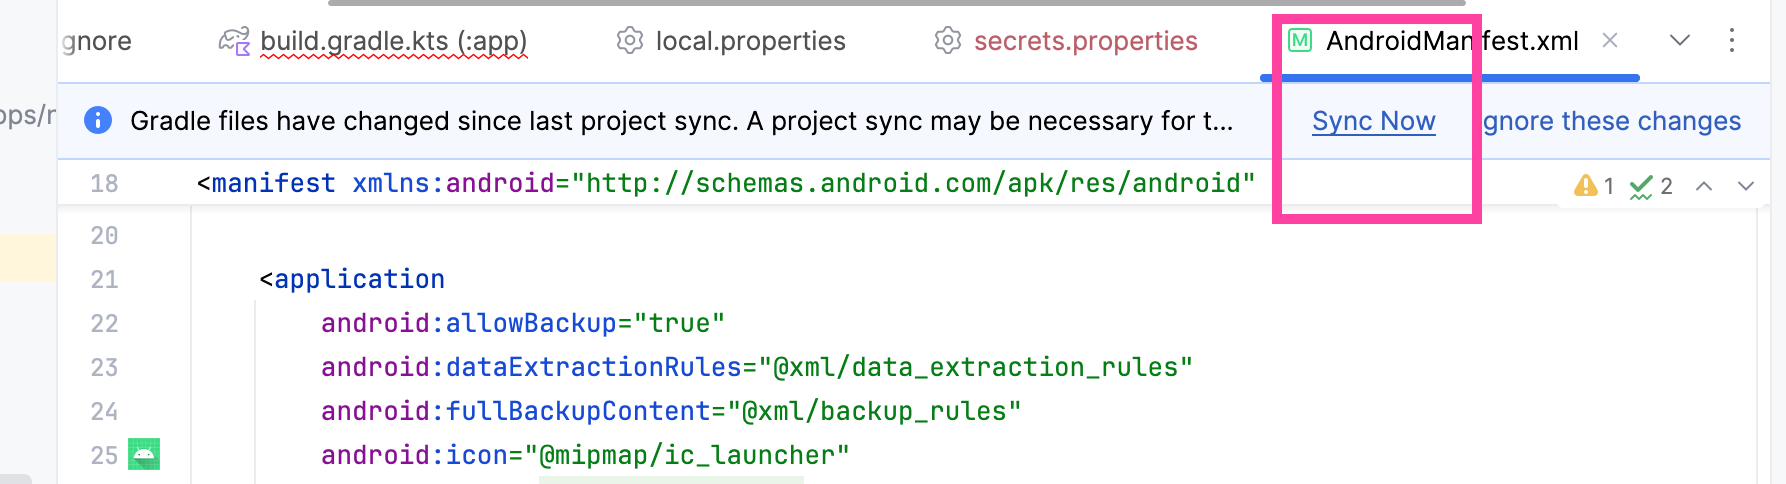
Syncing an Android Studio project with gradle
If you can't see the `secrets.properties` file in Android Studio, it means that your left hand side bar is not using the *Project* view.
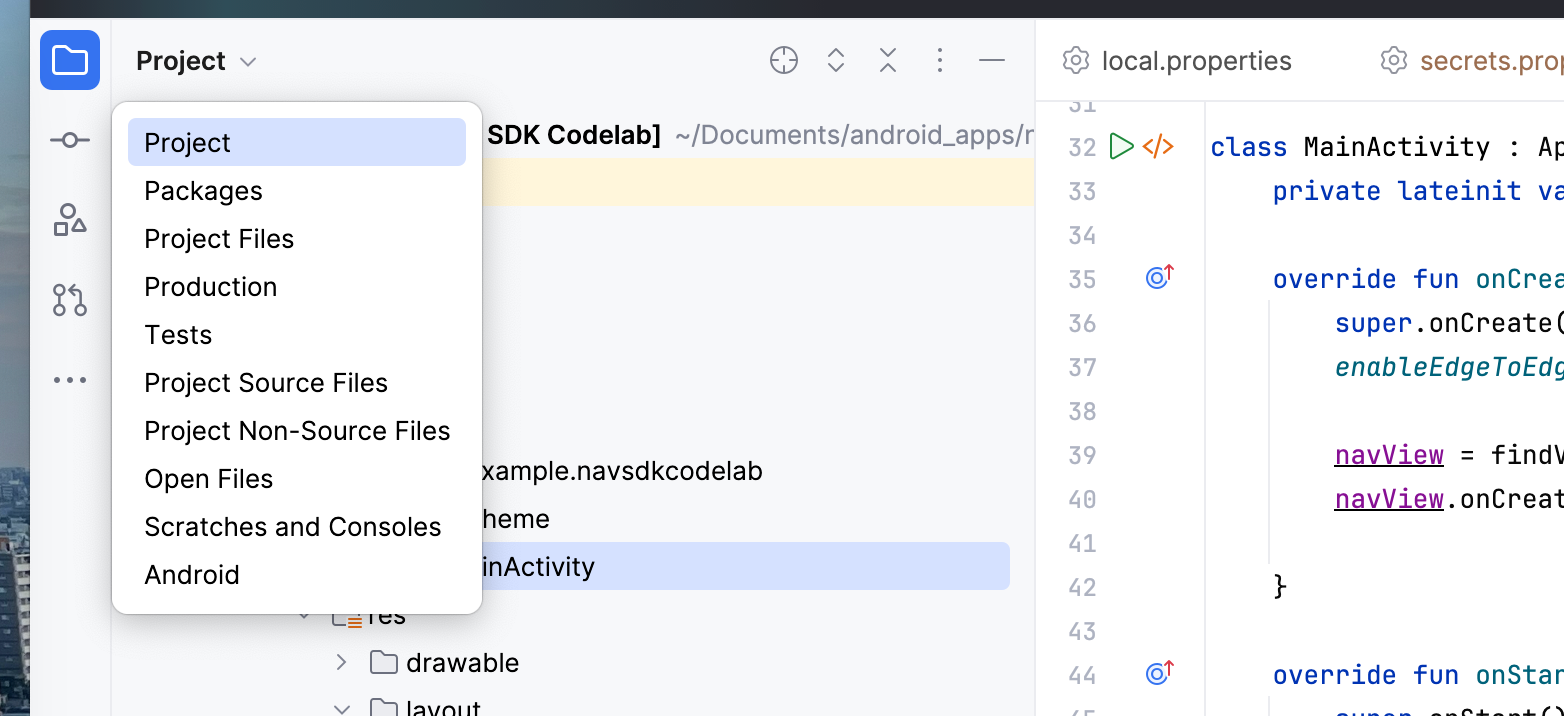
Switching between Project and Android views in Android Studio
The Nav SDK automatically retrieves the API key from the `AndroidManifest.xml` during initialization, so you don't need to include it separately in your code.
### Setup permissions: Declare permissions the app will be using
In `app/src/main/AndroidManifest.xml`, add the following code:
```
/*** app/src/main/AndroidManifest.xml ***/
```
In Android mobile development, the `AndroidManifest.xml` file is serves as a blueprint for our app. It provides essential information to the Android system about your app, including its structure, behavior, and requirements. Here, we are specifying the types of location-related access our Android app requires e.g. we are allowing the app to access location services while running in a foreground service.
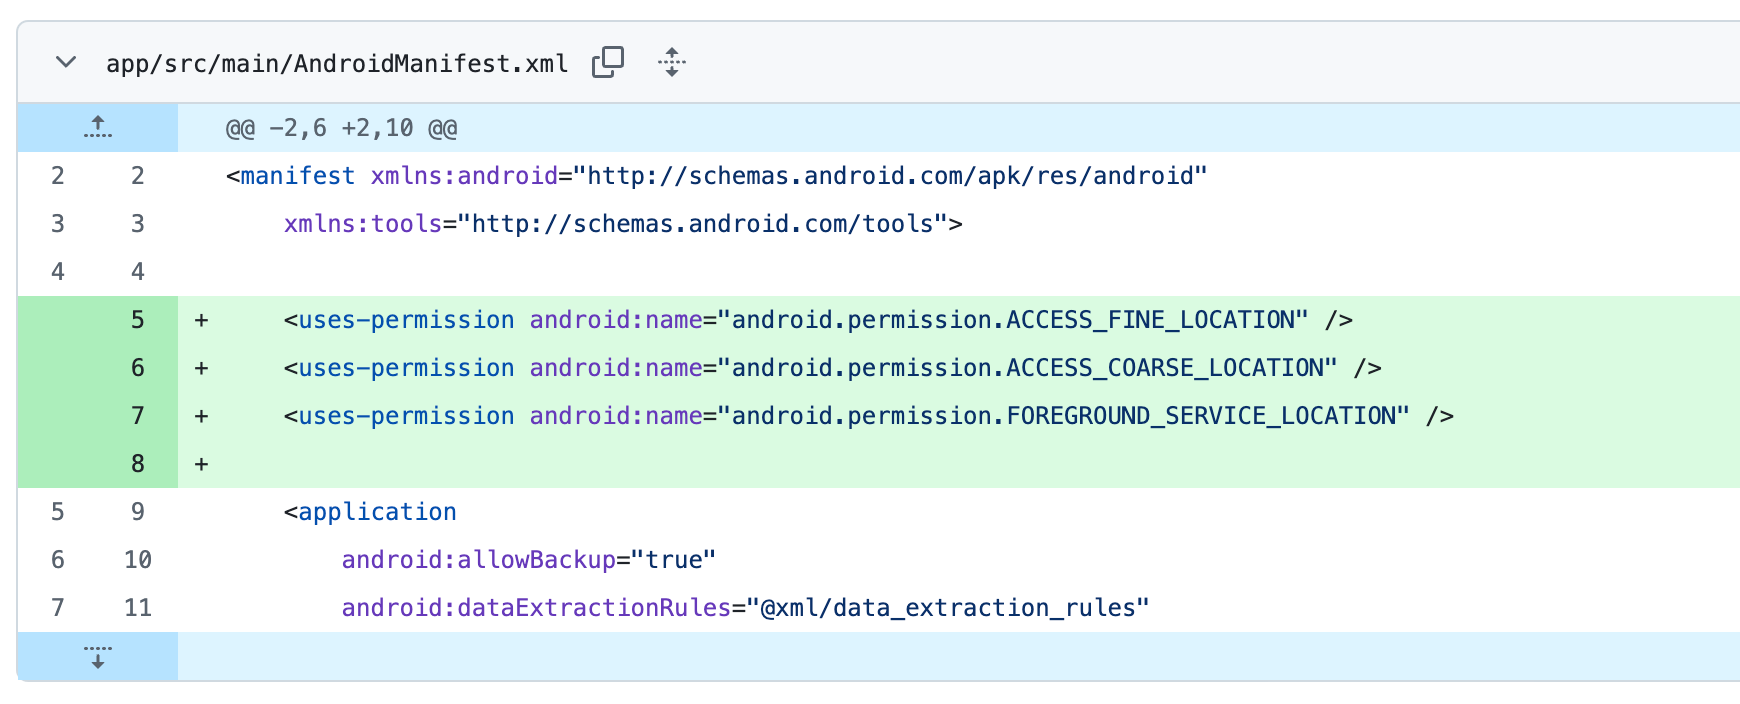
Giving our app access to location services on our phone will allow the Nav SDK to track our real time location and suggest a new route if we deviate from the current one.
### Setup permissions: Request access permissions
After declaring the location permissions our app requires, we must check if they are granted and provide a simple interface for the user to grant access if not.
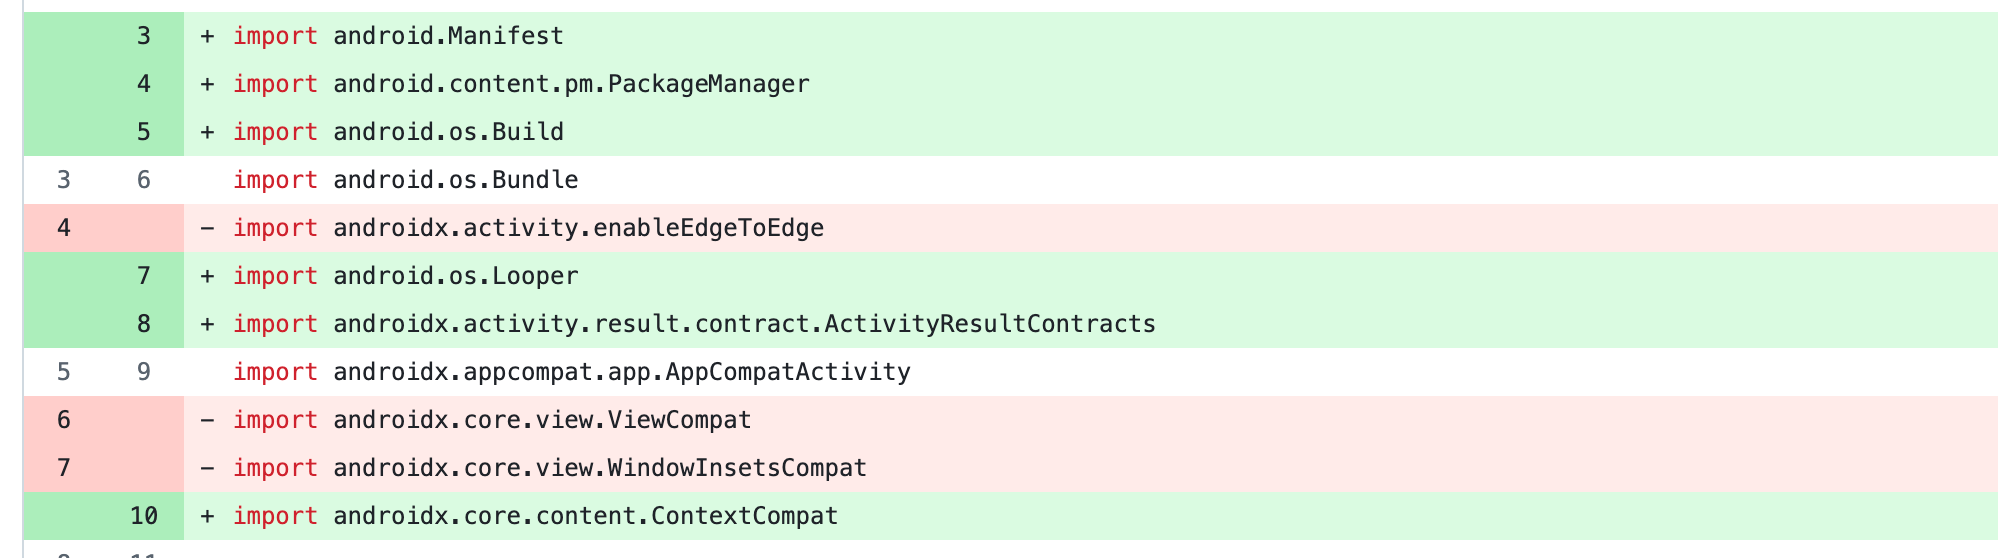
To start, add these import statements to the very beginning of `app/src/main/java/com/example/navsdkcodelab/MainActivity.kt`.
```
/*** app/src/main/java/com/example/navsdkcodelab/MainActivity.kt ***/
import android.Manifest
import android.content.pm.PackageManager
import android.os.Build
import android.os.Looper
import androidx.activity.result.contract.ActivityResultContracts
import androidx.core.content.ContextCompat
```
These libraries to handle permissions, version checks, and background tasks.
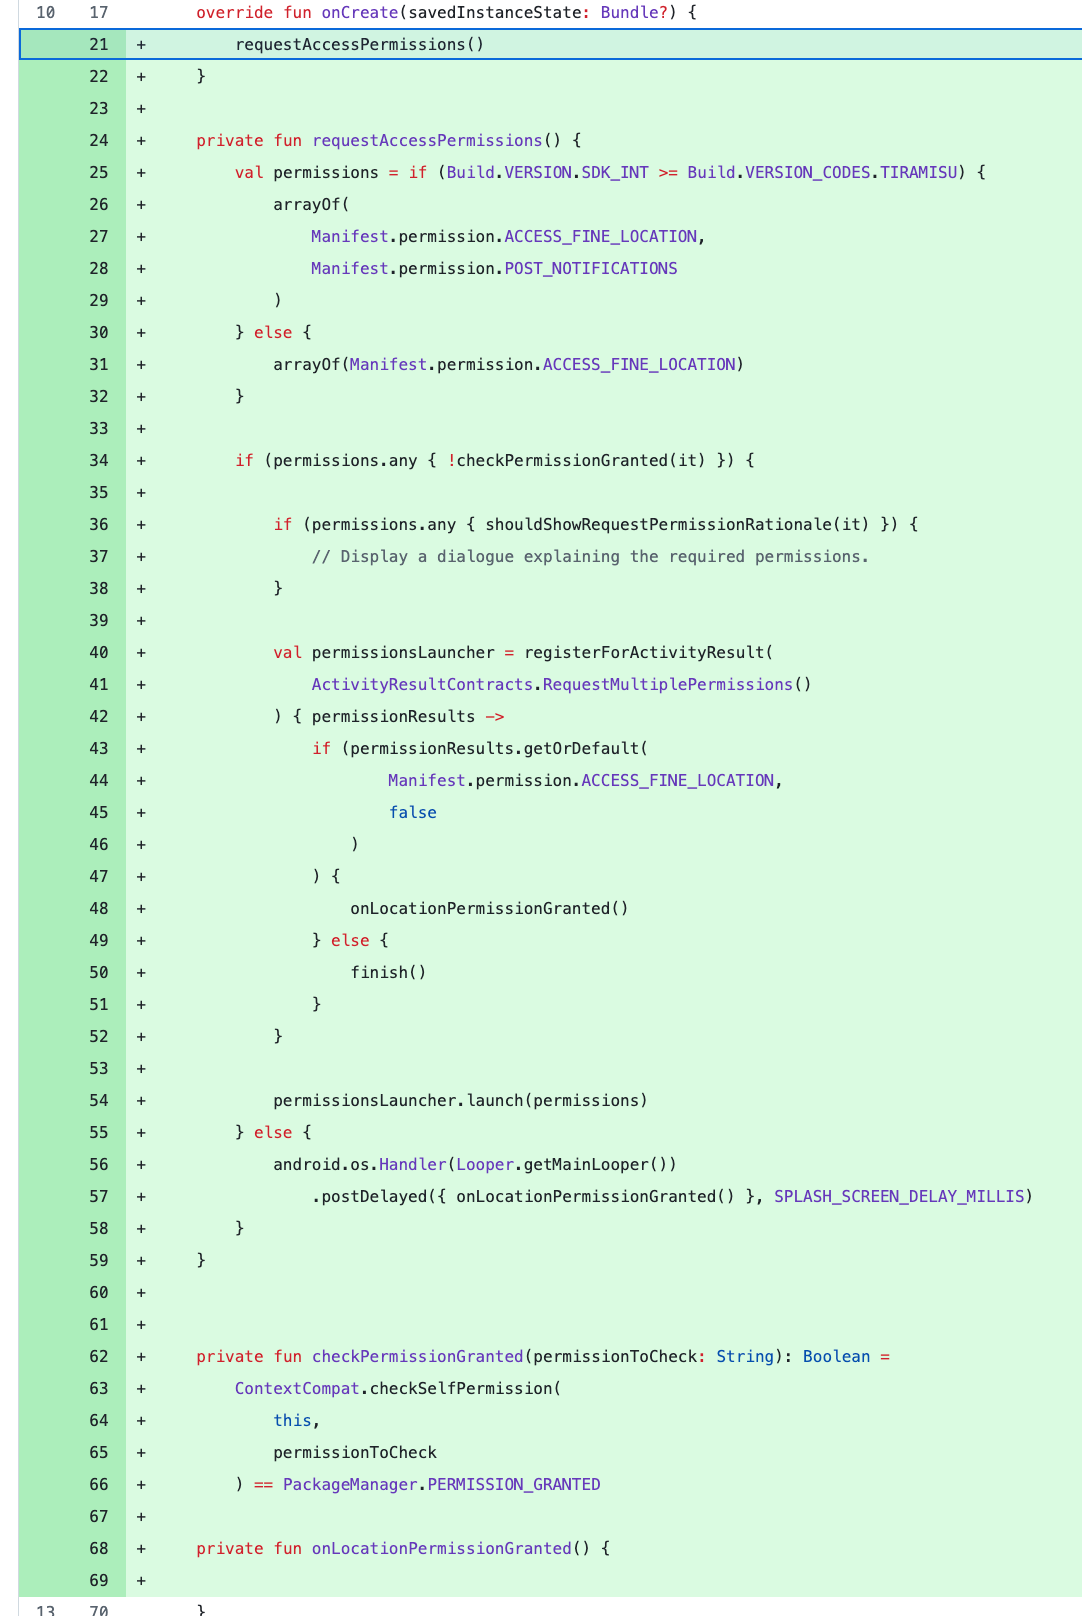
Go ahead and copy the following code into `MainActivity.kt`. It defines a new method, `requestAccessPermissions()`, which checks whether the user has granted location access. The method handles all possible scenarios and requests permission if it hasn't been granted yet.
```
/*** app/src/main/java/com/example/navsdkcodelab/MainActivity.kt ***/
private fun requestAccessPermissions() {
val permissions =
if (Build.VERSION.SDK_INT >= Build.VERSION_CODES.TIRAMISU) {
arrayOf(
Manifest.permission.ACCESS_FINE_LOCATION,
Manifest.permission.POST_NOTIFICATIONS
)
} else {
arrayOf(Manifest.permission.ACCESS_FINE_LOCATION)
}
if (permissions.any { !checkPermissionGranted(it) }) {
if (permissions.any { shouldShowRequestPermissionRationale(it) }) {
// Display a dialogue explaining the required permissions.
}
val permissionsLauncher =
registerForActivityResult(ActivityResultContracts.RequestMultiplePermissions()) {
permissionResults ->
if (
permissionResults.getOrDefault(Manifest.permission.ACCESS_FINE_LOCATION, false)
) {
onLocationPermissionGranted()
} else {
finish()
}
}
permissionsLauncher.launch(permissions)
} else {
android.os
.Handler(Looper.getMainLooper())
.postDelayed({ onLocationPermissionGranted() }, SPLASH_SCREEN_DELAY_MILLIS)
}
}
private fun checkPermissionGranted(permissionToCheck: String): Boolean =
ContextCompat.checkSelfPermission(this, permissionToCheck) == PackageManager.PERMISSION_GRANTED
private fun onLocationPermissionGranted() {}
```
Of course, don't forget to add a call to `requestAccessPermissions()` in the `onCreate()` method.
```
/*** app/src/main/java/com/example/navsdkcodelab/MainActivity.kt ***/
override fun onCreate(savedInstanceState: Bundle?) {
requestAccessPermissions()
}
```
This method will run whenever the app loads.
Lastly, define a constant `SPLASH_SCREEN_DELAY_MILLIS` to define a delay before running the `onLocationPermissionGranted()` method (to be written).
```
/*** app/src/main/java/com/example/navsdkcodelab/MainActivity.kt ***/
companion object {
const val SPLASH_SCREEN_DELAY_MILLIS = 1000L
}
```
This code defines a *companion object* in Kotlin within the `MainActivity` class. It works similar to a static object in Java to define constants.

### Setup user interface: Add navigation view
Now, we are going to add a layout to display the in-app navigation view. In `app/src/main/res/ayout/activity_main.xml`, switch to code view by clicking the hard to find \[code\] button on the top right.
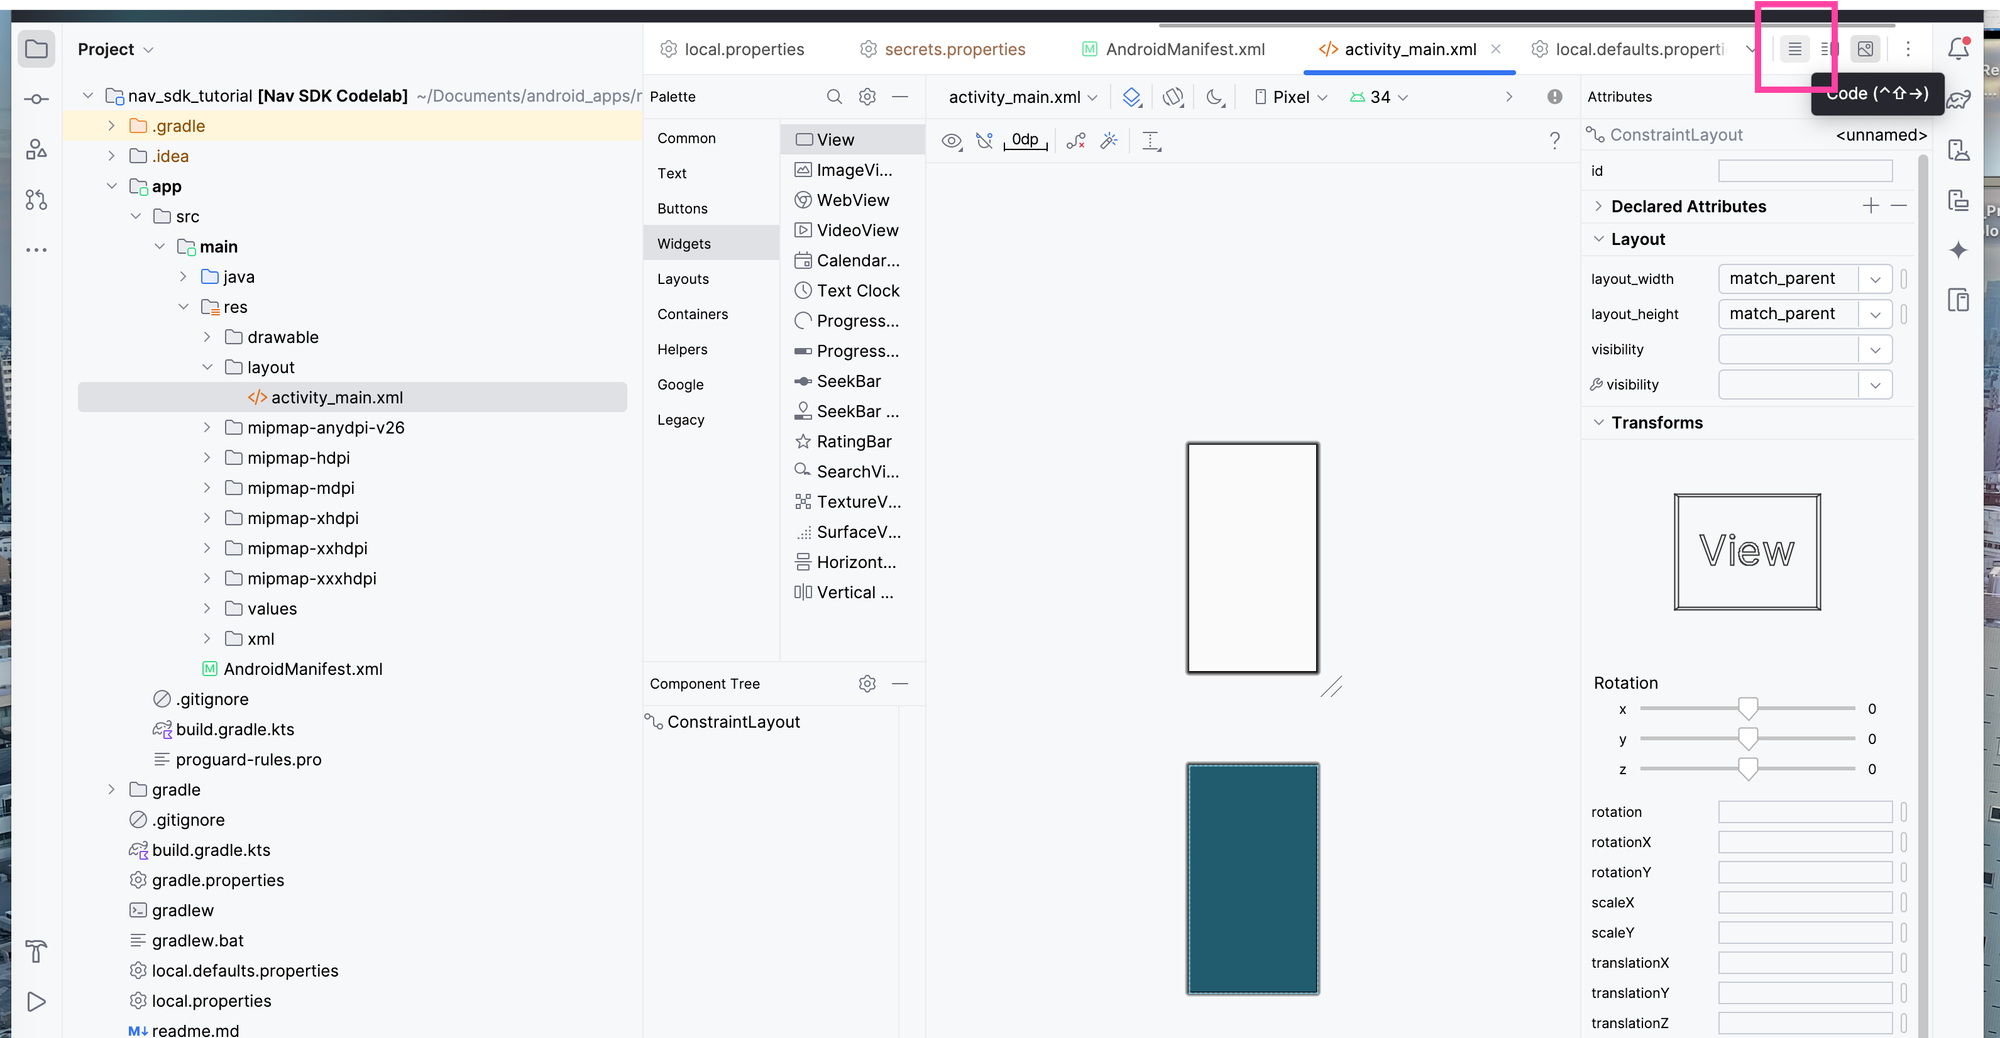
Switching between code and layout view for activity\_main.xml
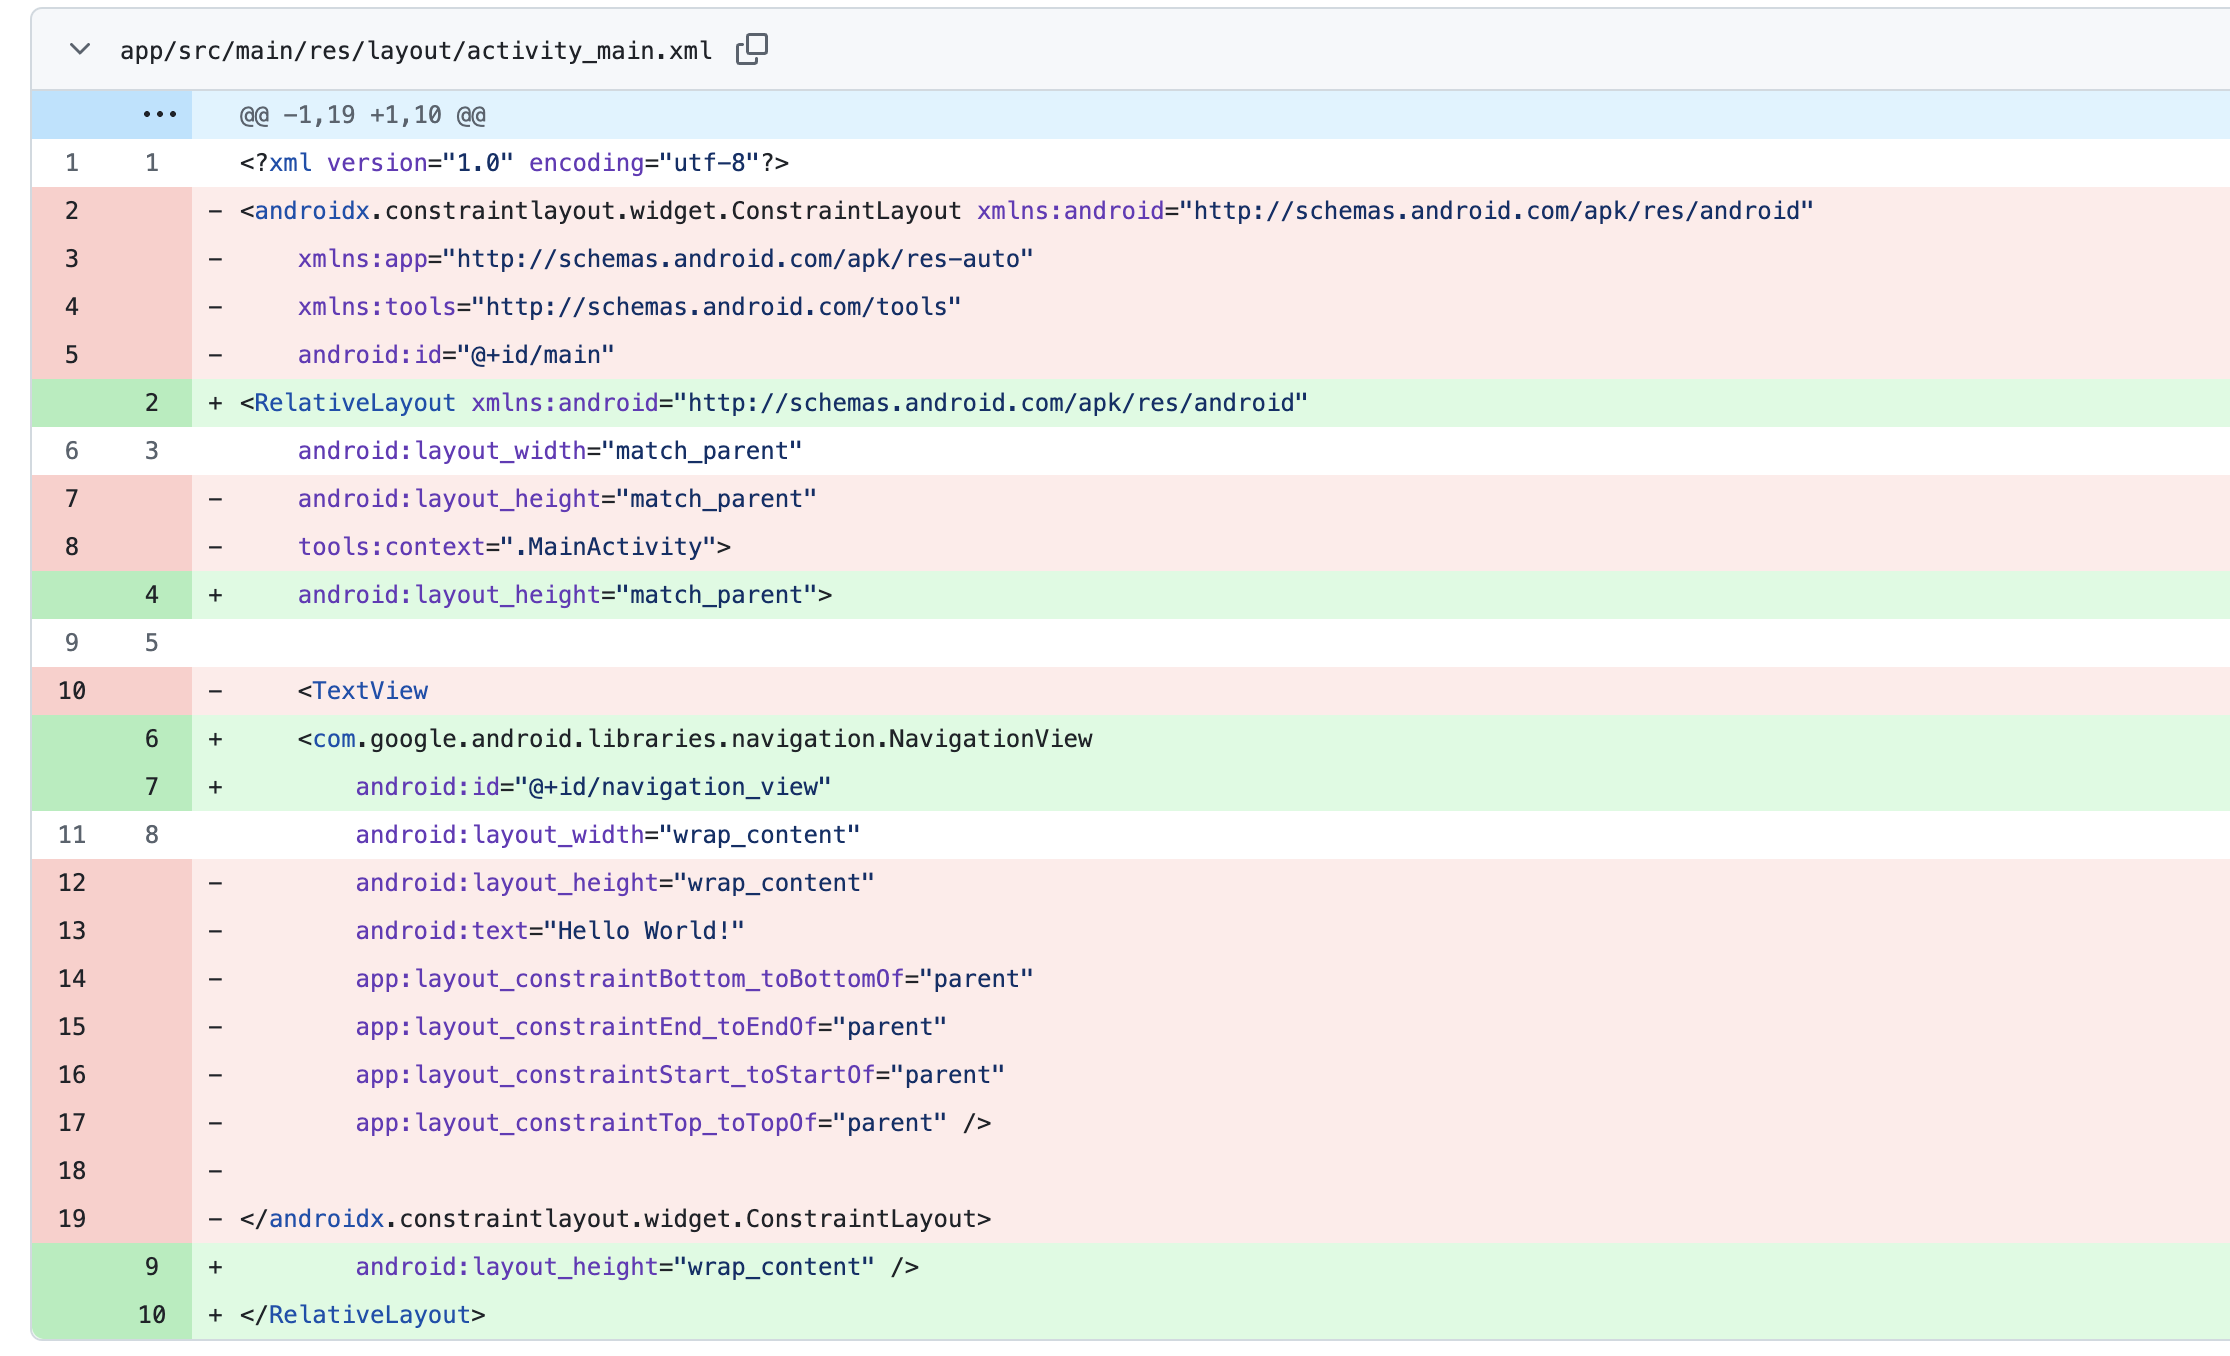
Replace the existing code in `activity_main.xml` with the following:
```
/*** app/src/main/res/ayout/activity_main.xml ***/
```
This adds a parent container with a single child view to hold the Nav SDK `NavigationView`.
### Setup user interface: Setup navigation view lifecycle
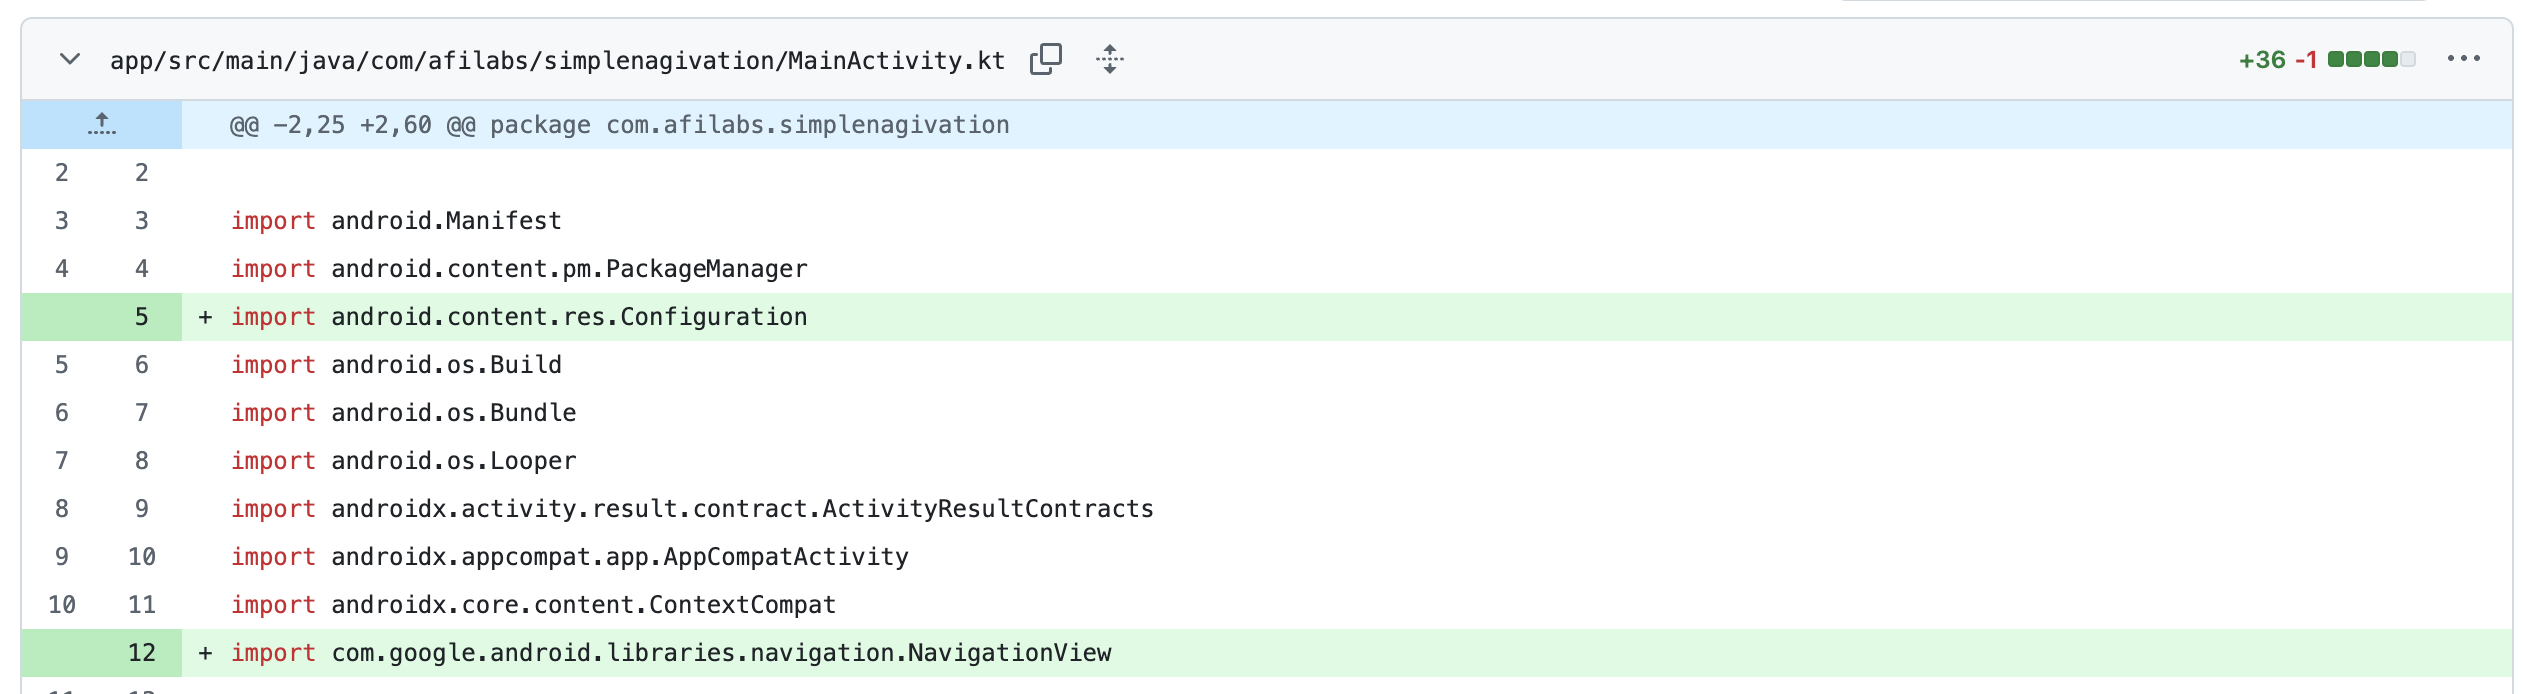
In order to get the Navigation SDK to work, we need to first do some basic setup to tie it into the Android component lifecycle. First, add the following lines of code to the top of `app/src/main/java/com/example/navsdkcodelab/MainActivity.kt`.
```
/*** app/src/main/java/com/example/navsdkcodelab/MainActivity.kt ***/
import android.content.res.Configuration
import com.google.android.libraries.navigation.NavigationView
```
`MainActivity.kt` is the is the entry point for our app and manages the user interface, letting you define what should happen at each point in a UI component's event lifecycle (e.g. `onCreate`, `onStart`, `onResume`, `onPause` and `onDestroy`). These two lines of code import classes responsible for device configuration (portrait or landscape) and navigation-related functionality.
c
Second, declare a variable `navView` in your `MainActivity` class to reference the `NavigationView`, the Nav SDK UI component in the layout that gets initialized later in the `onCreate()` method.
```
/*** app/src/main/java/com/example/navsdkcodelab/MainActivity.kt ***/
private lateinit var navView: NavigationView
```

Third, in the `onCreate()` method, use `setContentView` to set the layout resource file (usually in `res/layout`) that defines our app's user interface to `activity_main.xml`. This turns it into a hierarchy of user interface views (e.g., buttons, text views, etc) that `MainActivity` can use. We also bind the `NavigationView` defined in the `activity_main.xml` file to the `navView` variable and initialize it.
```
/*** app/src/main/java/com/example/navsdkcodelab/MainActivity.kt ***/
setContentView(R.layout.activity_main)
navView = findViewById(R.id.navigation_view)
navView.onCreate(savedInstanceState)
```

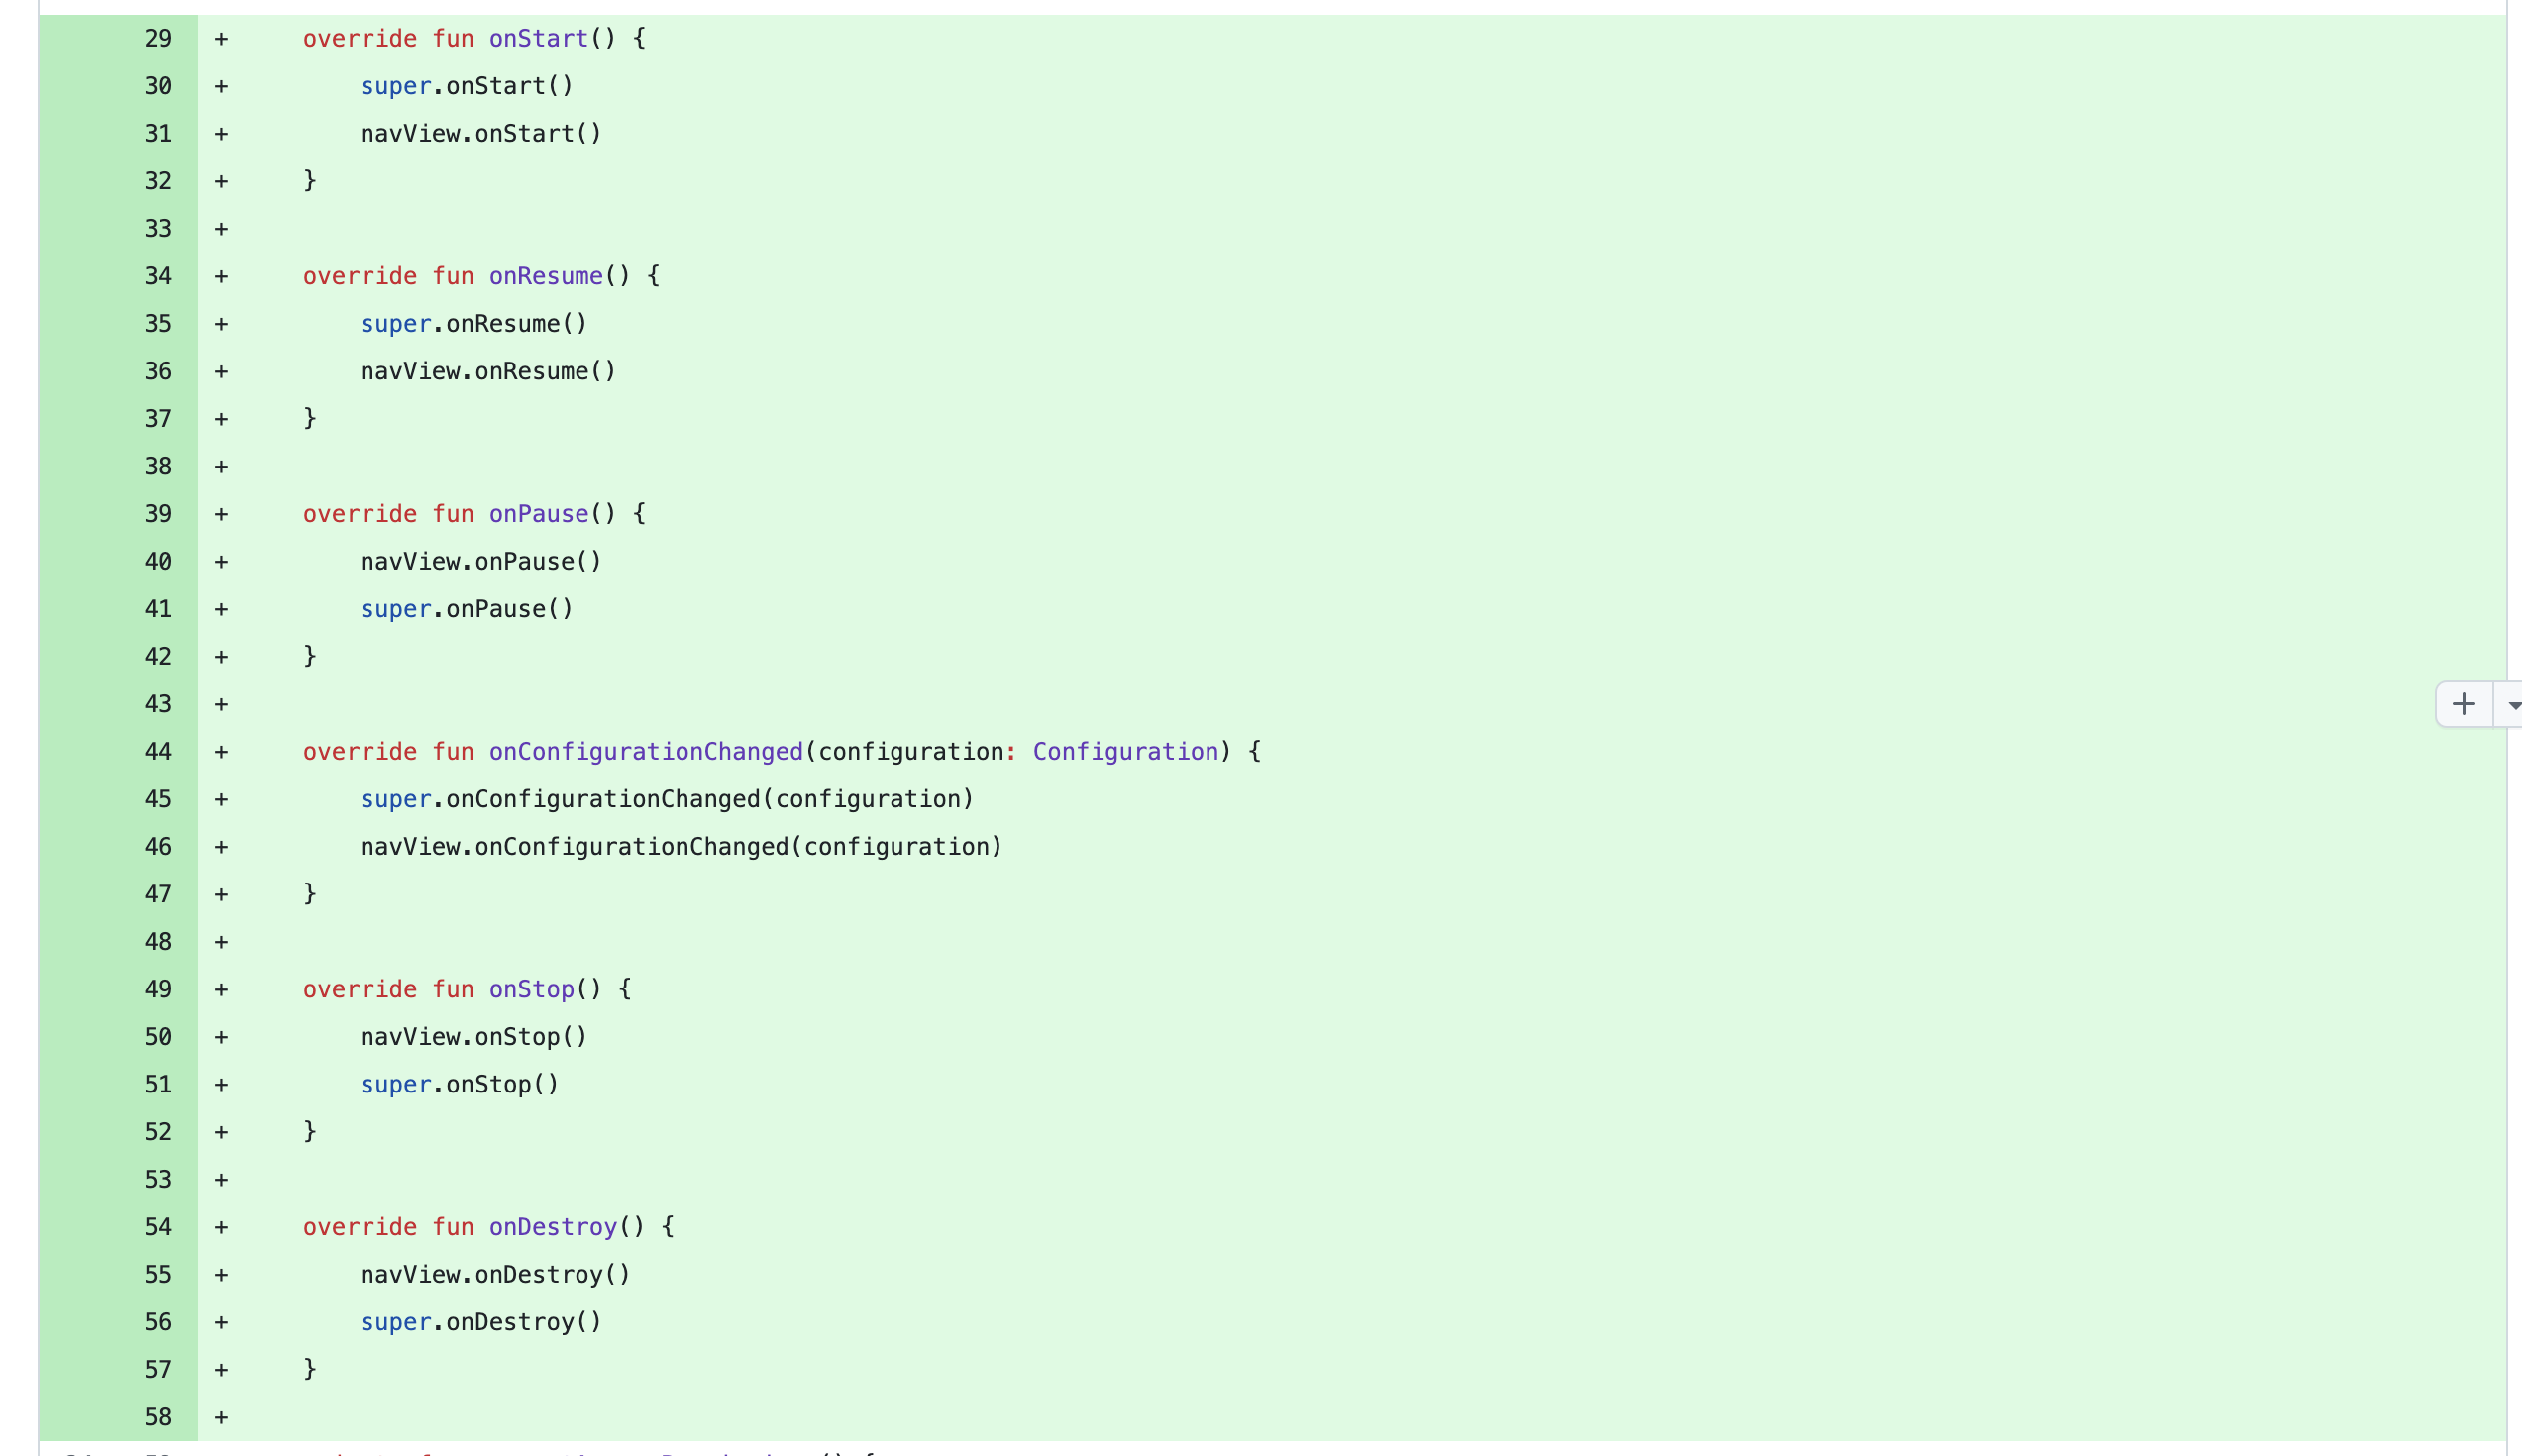
Lastly, add some boilerplate code to manage the event lifecycle of our `navView`.
```
/*** app/src/main/java/com/example/navsdkcodelab/MainActivity.kt ***/
override fun onStart() {
super.onStart()
navView.onStart()
}
override fun onResume() {
super.onResume()
navView.onResume()
}
override fun onPause() {
navView.onPause()
super.onPause()
}
override fun onConfigurationChanged(configuration: Configuration) {
super.onConfigurationChanged(configuration)
navView.onConfigurationChanged(configuration)
}
override fun onStop() {
navView.onStop()
super.onStop()
}
override fun onDestroy() {
navView.onDestroy()
super.onDestroy()
}
```
This ensures that `navView` is notified of key lifecycle changes as they happen. Each overridden method corresponds to a specific stage of the `NavigationView` (`onStart()`, `onStop()`, `onResume()` etc), and the `navView` object is being notified of these lifecycle events so that it can perform its own operations and run custom code during these stages.
If you run the app now you'll see a Google Map centered on Google World Headquarters at 1600 Amphitheatre Pkwy, Mountain View, CA 94043, USA. By default, the map will be either styled in "day mode" or "night mode" depending on the time on your computer. To force the map to always use day mode, add the line:
```
/*** app/src/main/java/com/example/navsdkcodelab/MainActivity.kt ***/
navView.setForceNightMode(ForceNightMode.FORCE_DAY)
```
to the `onCreate` method. The other options are:
- `ForceNightMode.AUTO`, to specify that the Navigation SDK should determine the appropriate day or night mode according to user's location and local time.
- `ForceNightMode.FORCE_NIGHT`, to force night mode.
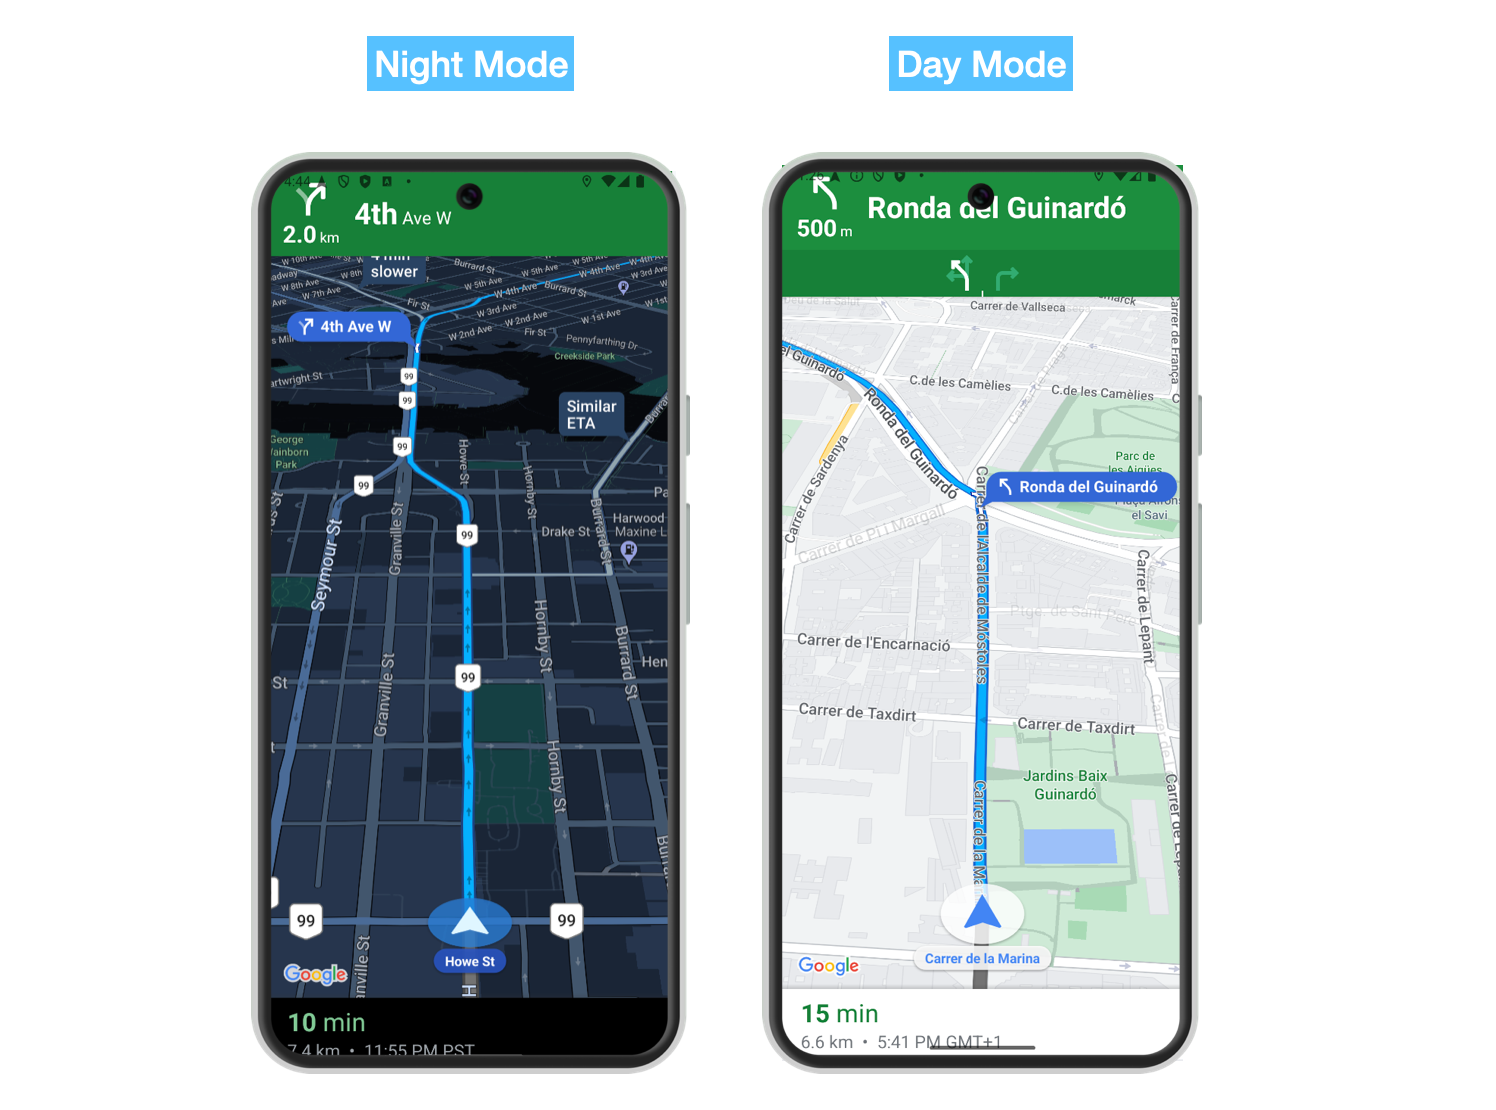
Night Mode and Day Mode on the Google Navigation SDK
### Setup user interface: Config the screen stays on during navigation guidance
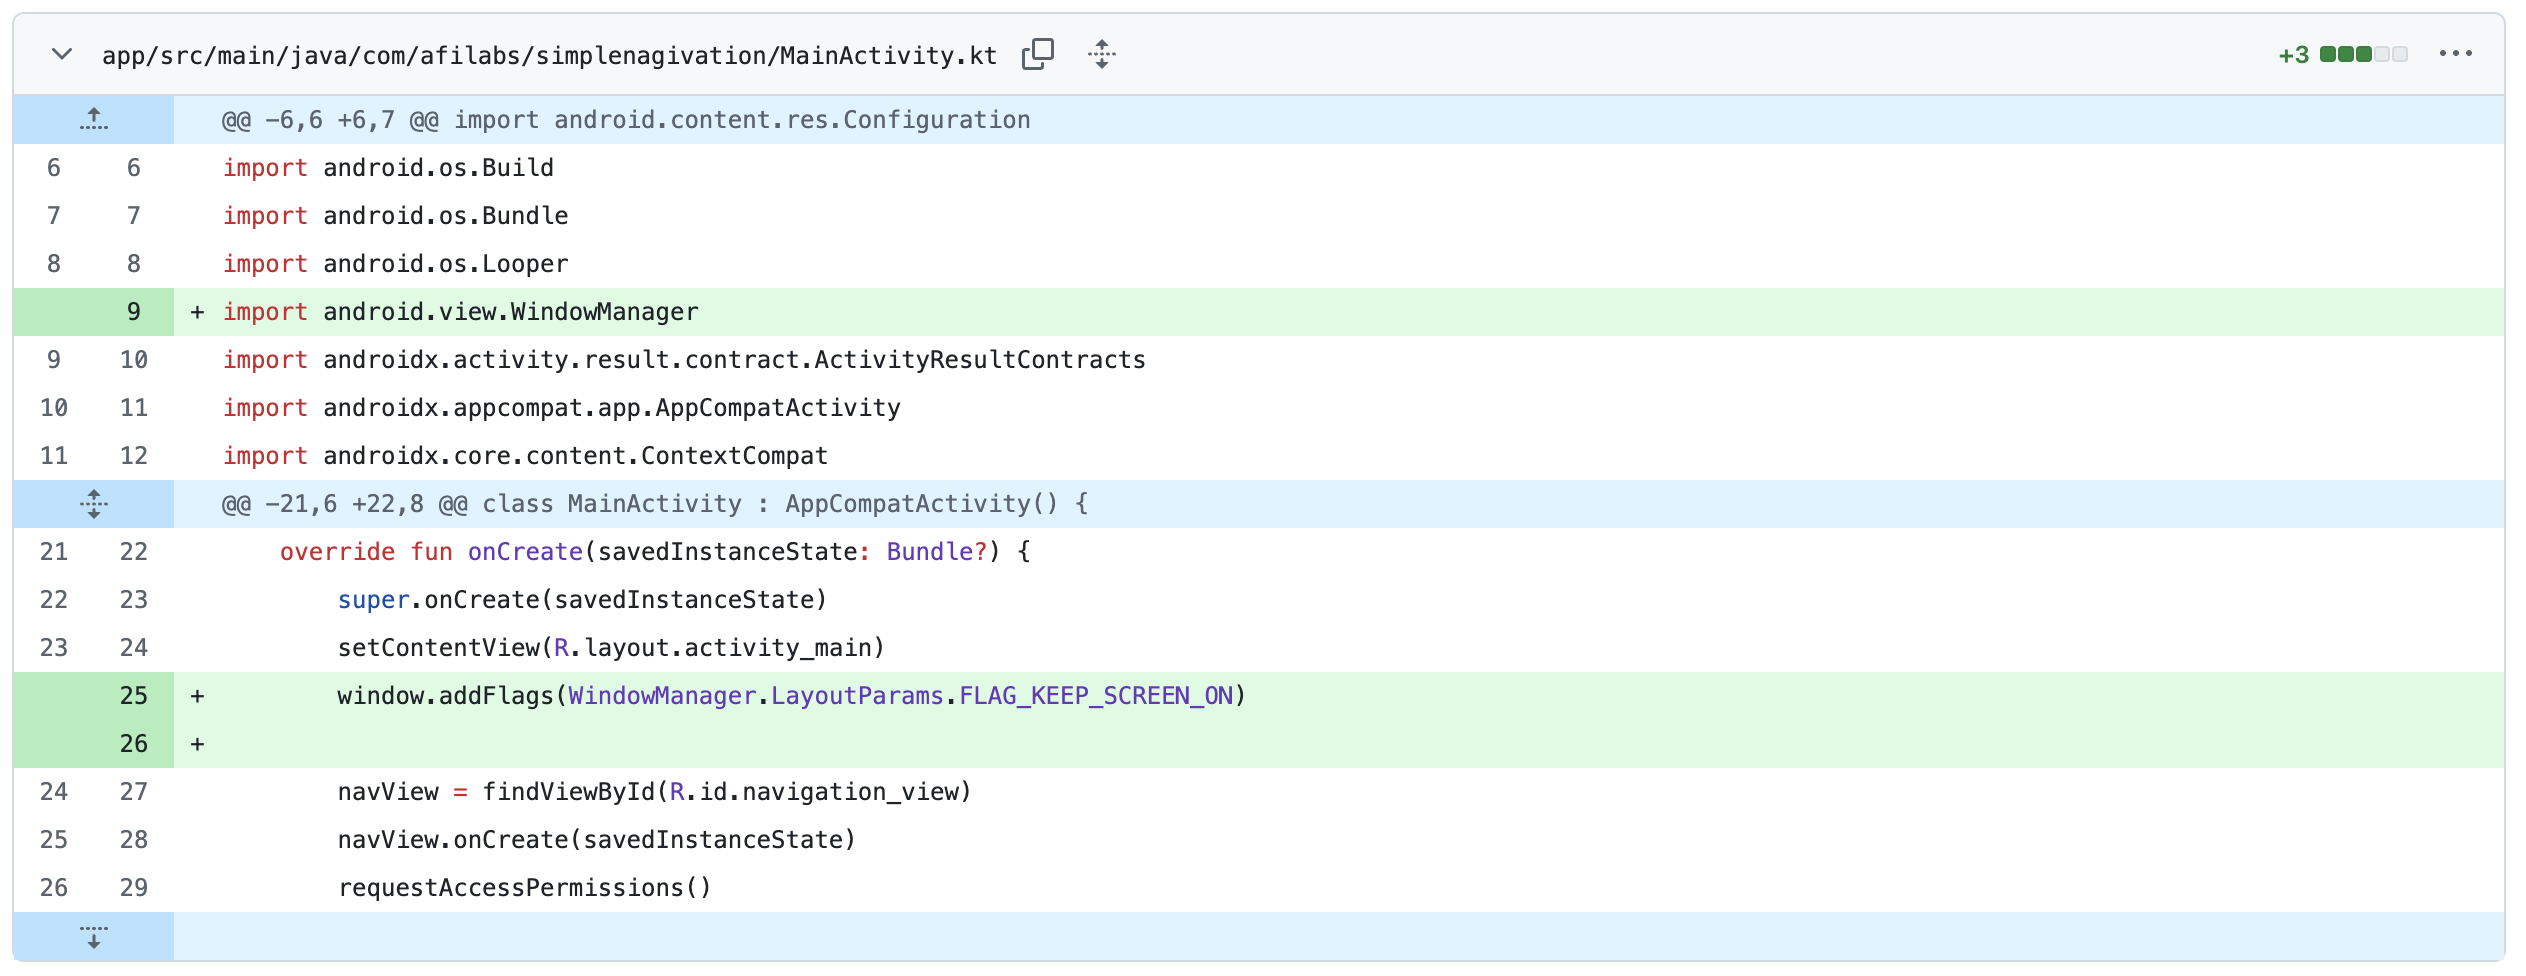
One of the key features of any in-app navigation system is that the screen stays on while the app is in use. To do this in Android, import the `WindowManager` class from the `android.view` package in `MainActivity.kt`.
```
/*** app/src/main/java/com/example/navsdkcodelab/MainActivity.kt ***/
import android.view.WindowManager
```
Further down in the `onCreate()` method, add:
```
override fun onCreate(savedInstanceState: Bundle?) {
window.addFlags(WindowManager.LayoutParams.FLAG_KEEP_SCREEN_ON)
}
```
When `FLAG_KEEP_SCREEN_ON` flag is added to the app's window properties, it prevents the screen from turning off after a few minutes of inactivity.
### Init Navigation SDK: Verify Navigation SDK availability when permission is accessible
Now that we've completed the basic Navigation activity setup, let's get ready to call the Navigation SDK proper. But before we can do that, we need to import the correct libraries. At the very top of `MainActivity.kt` add:
```
/*** app/src/main/java/com/example/navsdkcodelab/MainActivity.kt ***/
import com.google.android.libraries.navigation.NavigationApi
import com.google.android.libraries.navigation.Navigator
import android.widget.Toast
import android.annotation.SuppressLint
```
This brings navigation related functionality (`NavigationApi` and `Navigator`) for managing the Nav SDK, user notifications (`Toast`) for providing brief messages to the user during app interactions and peace of mind (`SuppressLint`) to avoid annoying lint warnings at build time.
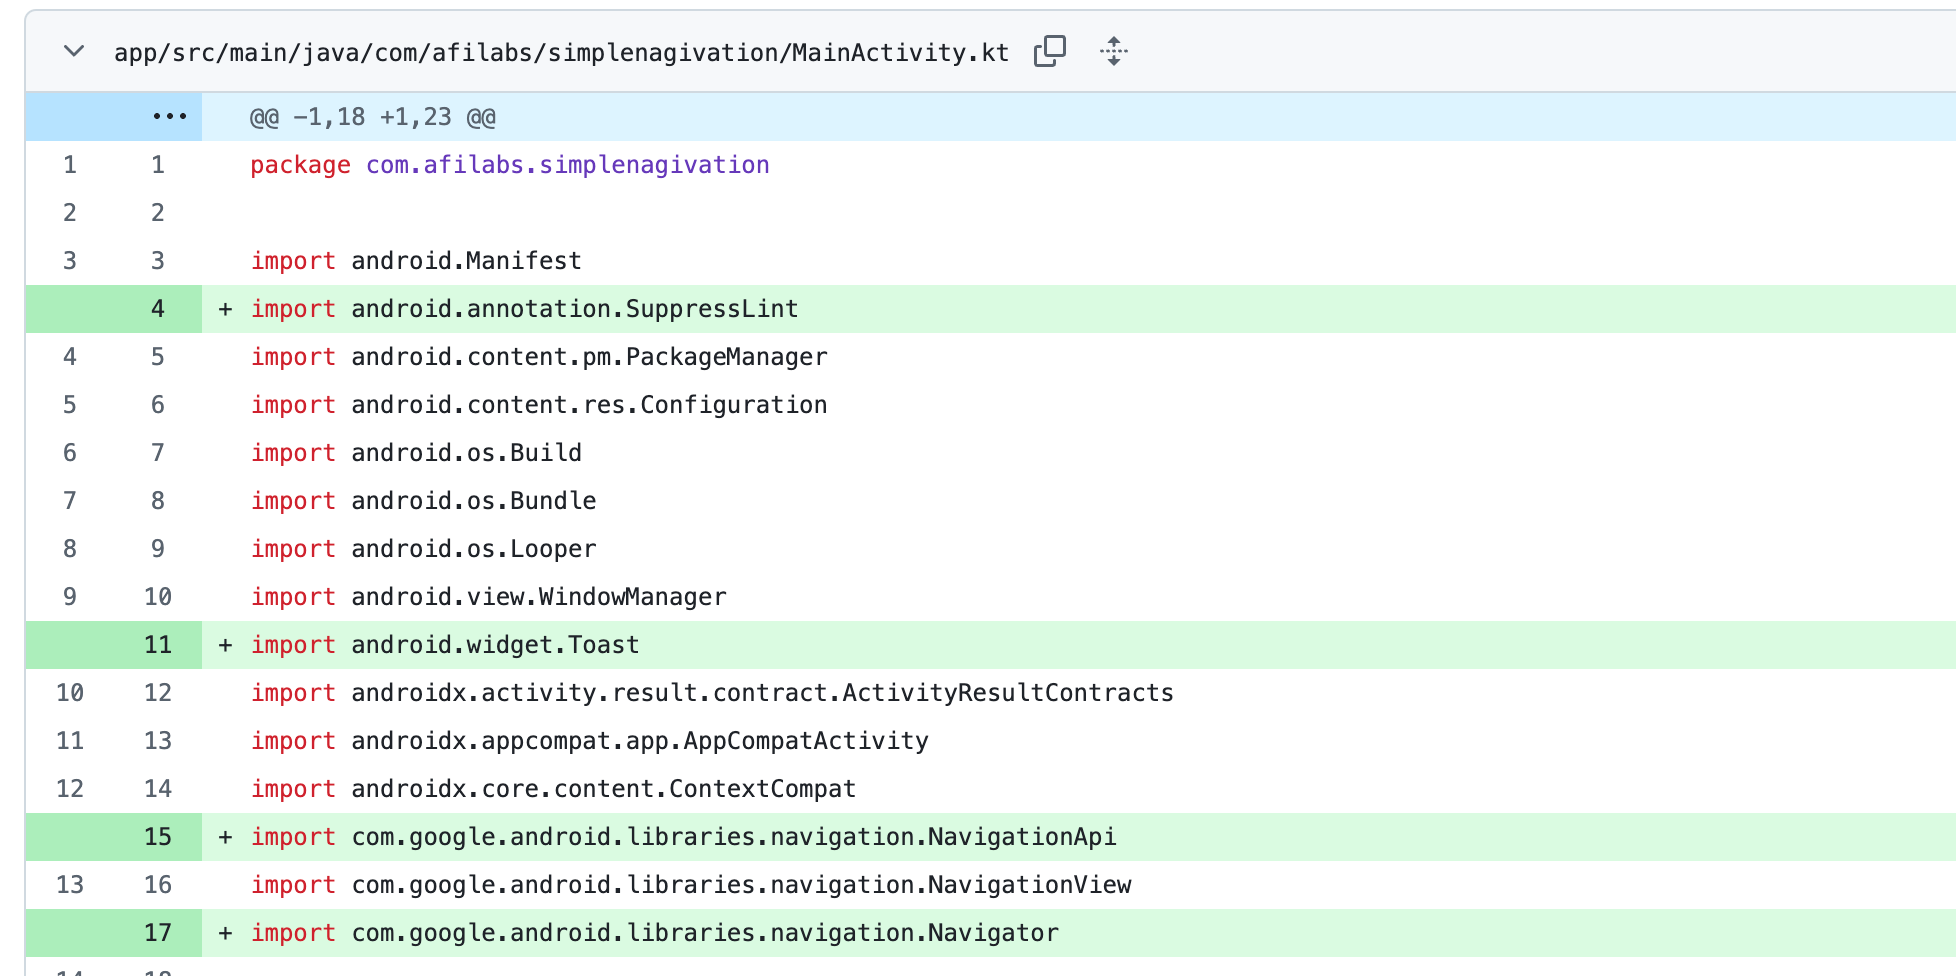
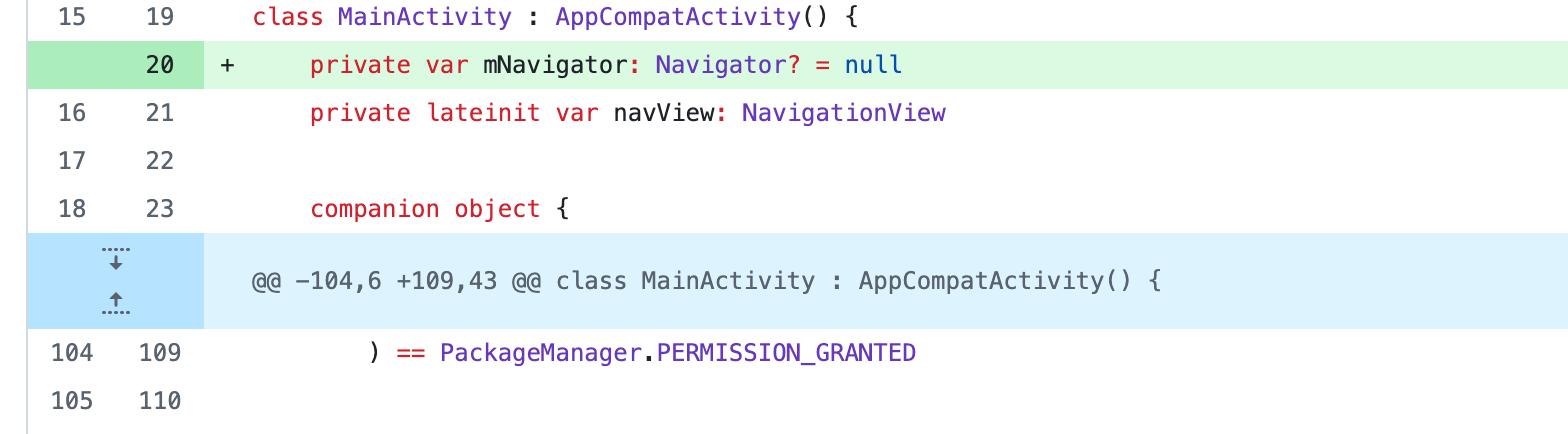
From here, create a reference (`mNavigator`) to the `Navigator` object.
```
/*** app/src/main/java/com/example/navsdkcodelab/MainActivity.kt ***/
private var mNavigator: Navigator? = null
```
The line above uses delayed initialization so that the `Navigator` instance is only created when the navigation process starts.
You'll now want to create a new method called `initializeNavigationApi()` which both references the `Navigator` object with the line `mNavigator = navigator` and implements a `NavigatorListener` to handle the callback.
```
/*** app/src/main/java/com/example/navsdkcodelab/MainActivity.kt ***/
private fun onLocationPermissionGranted() {
initializeNavigationApi()
}
@SuppressLint("MissingPermission")
private fun initializeNavigationApi() {
val listener =
object : NavigationApi.NavigatorListener {
override fun onNavigatorReady(navigator: Navigator) {
mNavigator = navigator
}
override fun onError(@NavigationApi.ErrorCode errorCode: Int) {
when (errorCode) {
NavigationApi.ErrorCode.NOT_AUTHORIZED -> {
// Note: If this message is displayed, you may need to check that
// your API_KEY is specified correctly in AndroidManifest.xml
// and is been enabled to access the Navigation API
showToast(
"Error loading Navigation API: Your API key is " +
"invalid or not authorized to use Navigation."
)
}
NavigationApi.ErrorCode.TERMS_NOT_ACCEPTED -> {
showToast(
"Error loading Navigation API: User did not " +
"accept the Navigation Terms of Use."
)
}
else -> showToast("Error loading Navigation API: $errorCode")
}
}
}
NavigationApi.getNavigator(this, listener)
}
```
`initializeNavigationApi()` is called when location permissions are granted by the user.
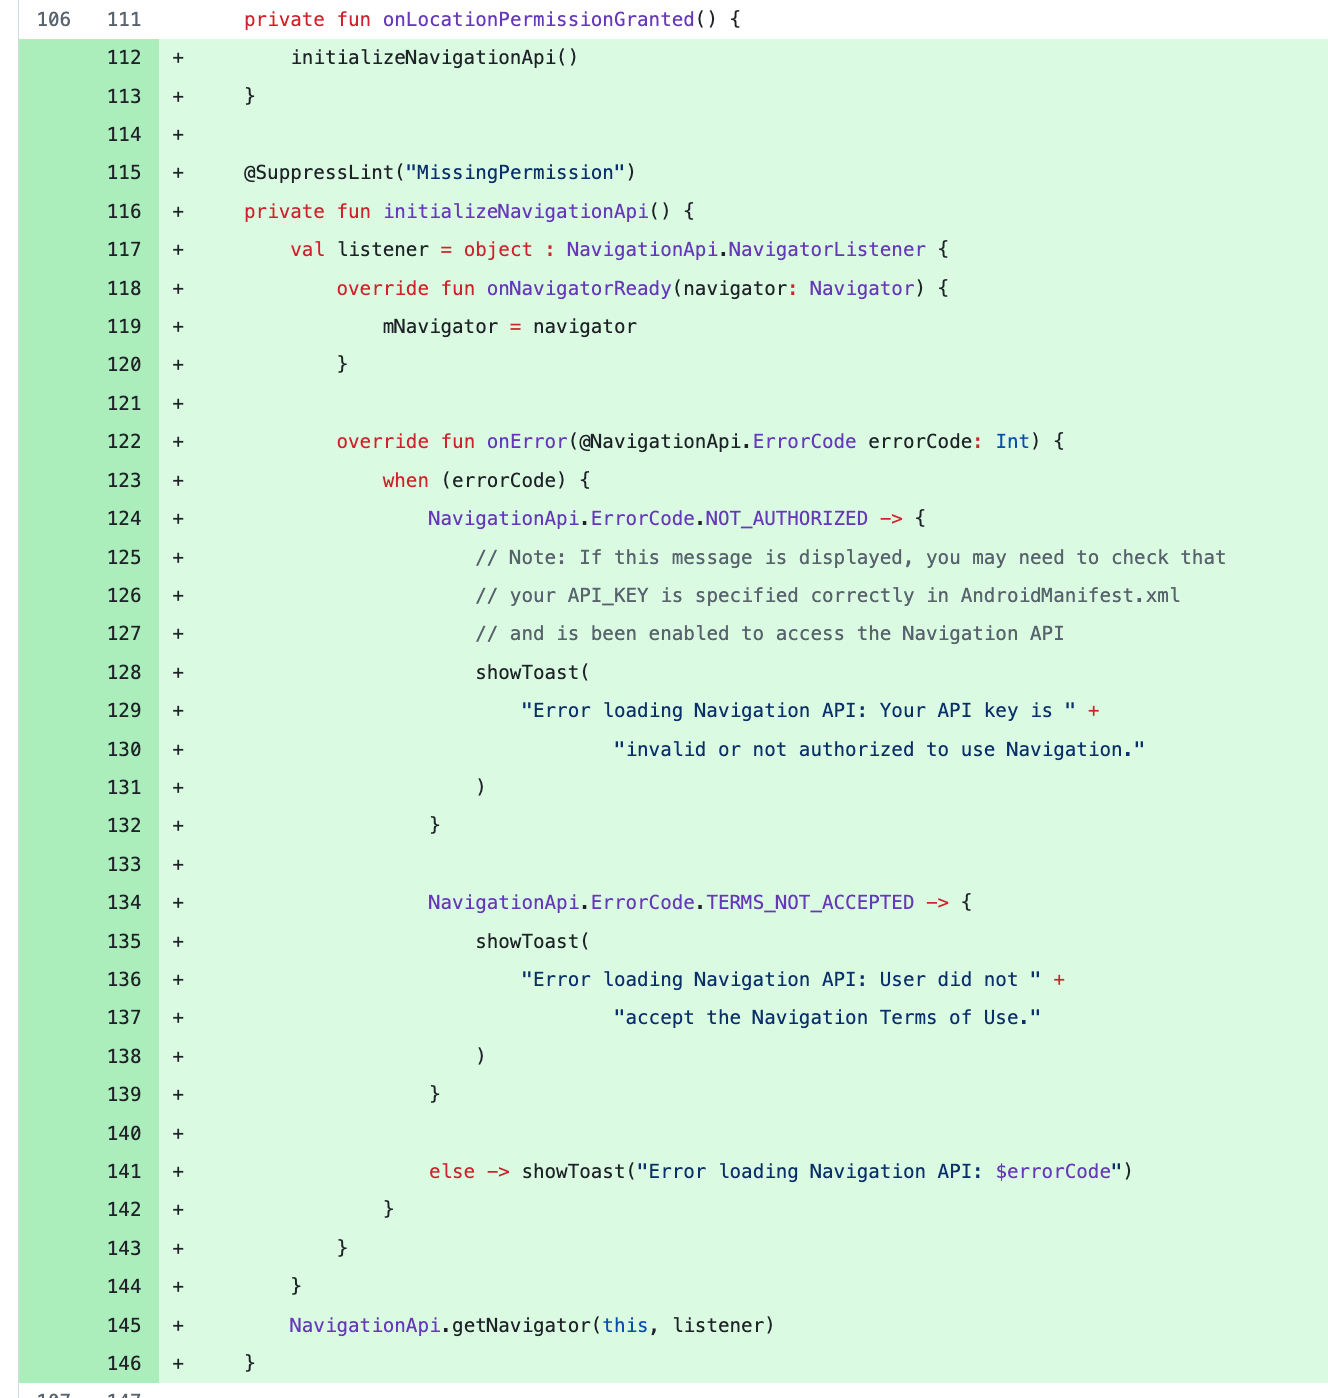
The last thing we do is add a function to display error messages using Android's [Toasts feature](https://developer.android.com/guide/topics/ui/notifiers/toasts?ref=blog.afi.io).
```
private fun showToast(errorMessage: String) {
Toast.makeText(this@MainActivity, errorMessage, Toast.LENGTH_LONG).show()
}
```
This provides a helpful popup with an error message should anything go wrong.

Now's a good time to test that the app works. In Android Studio, first run *build* (Build > Make Project). If the code compiles without errors, go ahead and press the *run* button ▶️ to start the app in the simulator.
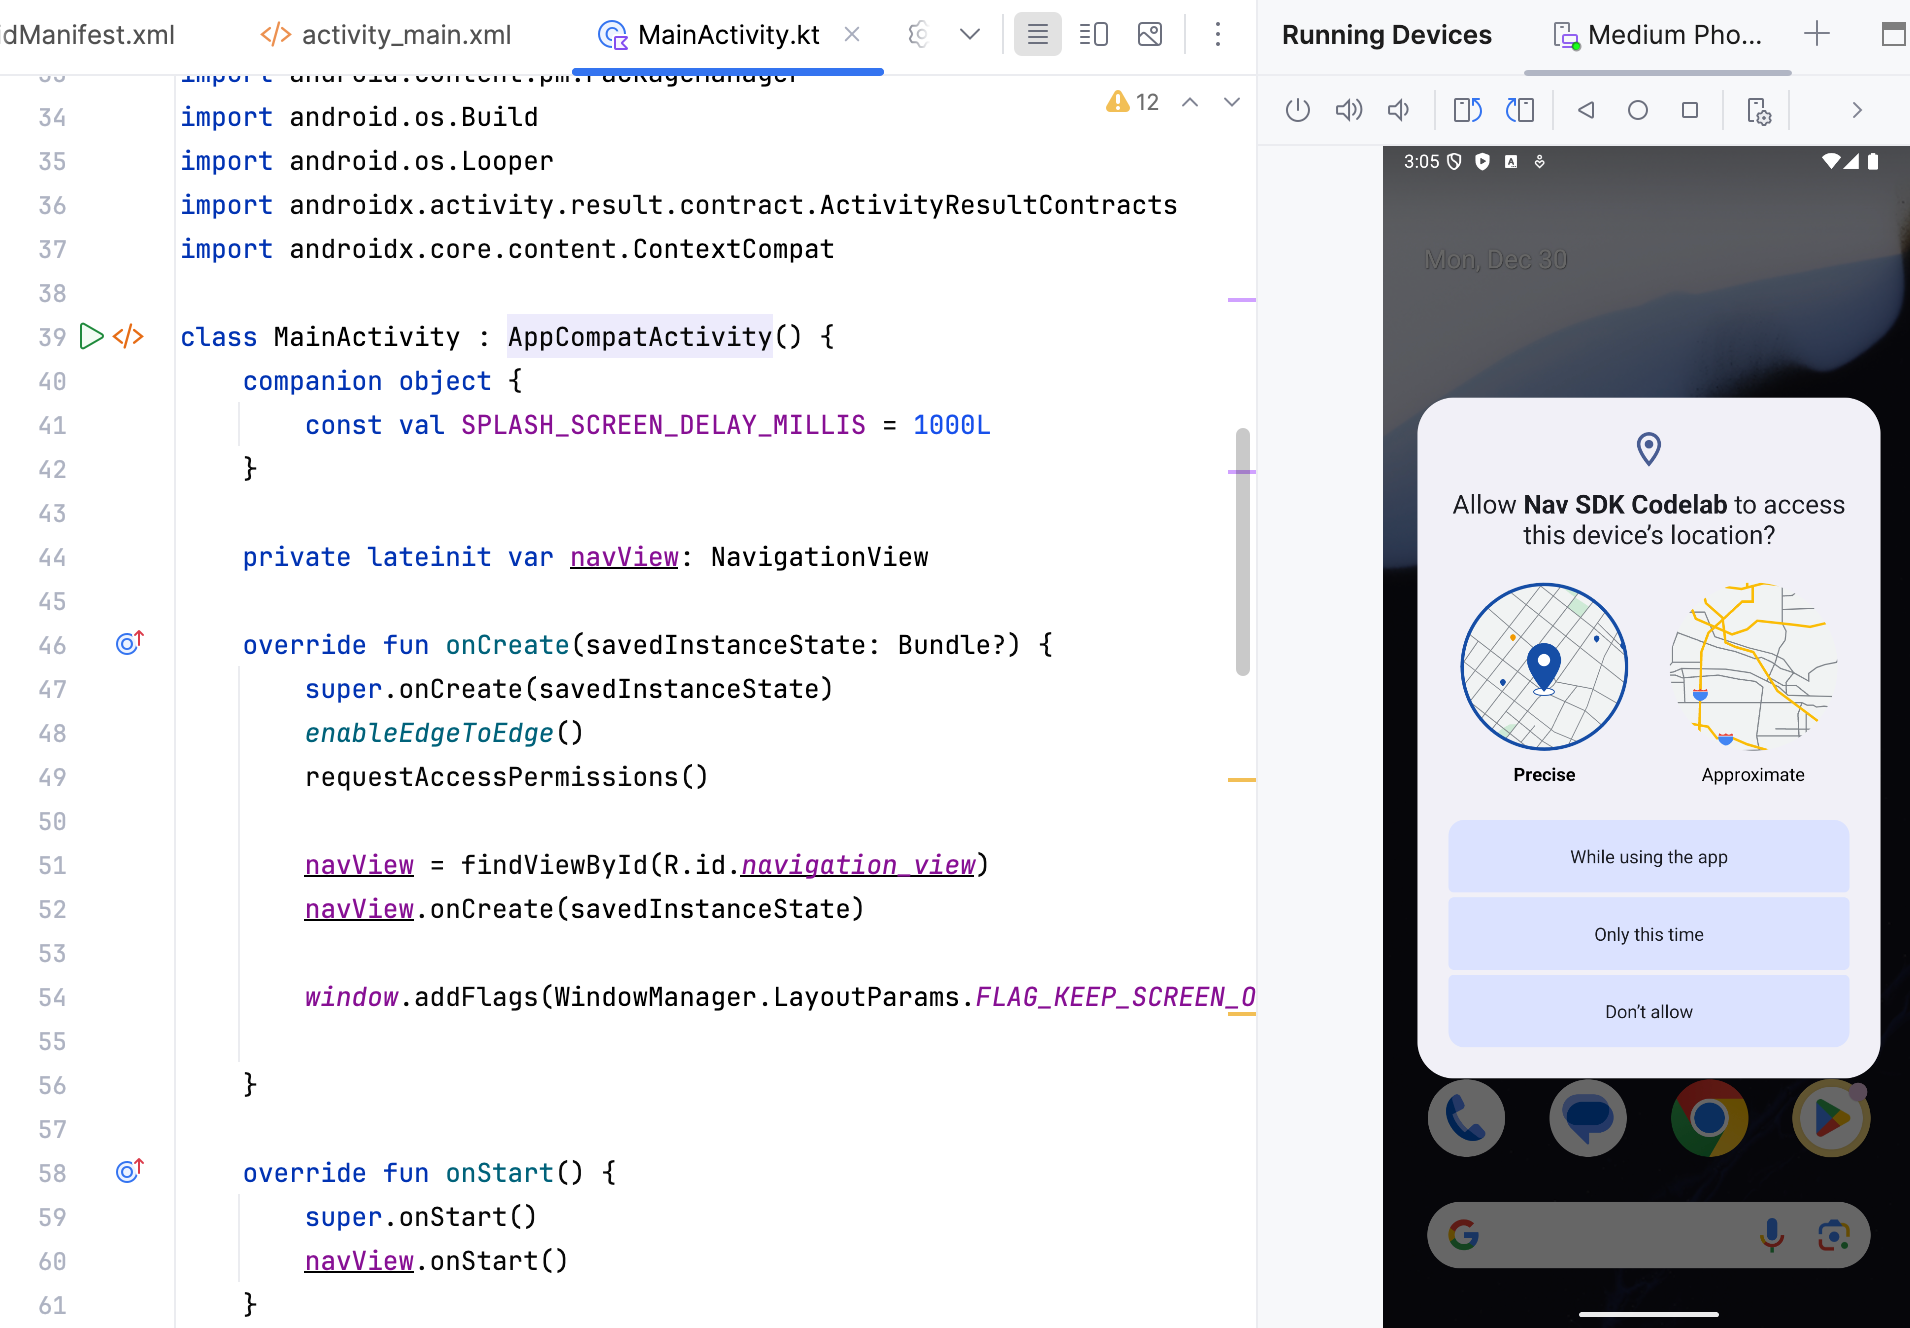
Testing location permission in our navigation app
If things go as planned, you'll see a pop up asking for location permissions (above).
### Implement logic: register navigation event changes
Throughout the in-app navigation process, the Navigation SDK triggers events to notify the app of important state changes along the route, such as when the user deviates from the route or reaches their destination. In this section, we are going to implement listeners to handle these event.
To begin, declare two variables in `MainActivity.kt` to refer to event listener objects.
```
/*** app/src/main/java/com/example/navsdkcodelab/MainActivity.kt ***/
private var arrivalListener: Navigator.ArrivalListener? = null
private var routeChangedListener: Navigator.RouteChangedListener? = null
```
Here, we use the popular *observer* design pattern to decouple the `Navigator` class (which triggers on arrival and route change events) from the code that reacts to those events (the listener implementation).

After that, add a `registerNavigationListeners()` method to set up the listeners when the Navigator is initialized. This method calls `Navigator.clearDestinations()` to reset the `NavigationView` when the arrival event is fired:
```
/*** app/src/main/java/com/example/navsdkcodelab/MainActivity.kt ***/
private fun registerNavigationListeners() {
arrivalListener =
Navigator.ArrivalListener { // Show an onscreen message
showToast("User has arrived at the destination!")
mNavigator?.clearDestinations()
}
mNavigator?.addArrivalListener(arrivalListener)
routeChangedListener =
Navigator.RouteChangedListener { // Show an onscreen message when the route changes
showToast("onRouteChanged: the driver's route changed")
}
mNavigator?.addRouteChangedListener(routeChangedListener)
}
```
Finally, add a call to `registerNavigationListeners()` in the `NavigationListener` object we created earlier.
```
/*** app/src/main/java/com/example/navsdkcodelab/MainActivity.kt ***/
override fun onNavigatorReady(navigator: Navigator) {
registerNavigationListeners()
}
```
With this in place, we are now ready to add code to handle these events.
### Implement logic: Close navigation service when app is removed from recent tasks
With most of the work needed to implement the Navigation SDK now behind us, the following sections will be brief and focus on ensuring the in-app navigation module runs smoothly and remains free of issues.
To the `onNavigatorReady()` method of `MainActivity.kt`, add:
```
/*** app/src/main/java/com/example/navsdkcodelab/MainActivity.kt ***/
override fun onNavigatorReady(navigator: Navigator) { navigator.setTaskRemovedBehavior(Navigator.TaskRemovedBehavior.QUIT_SERVICE)
}
```
This line of code tells Android that when the app's task is removed (e.g., the user swipes it away from the recent apps screen), the `Navigator` should stop any services it is running and terminate itself.

### Implement logic: Setup map camera following my location
A key feature of the Navigation SDK, and one of the reasons for its popularity, is its ability to provide users with a tilted 3D view of their route. To enable this, create a custom `setupCameraFollowMyLocation()` method and call it within the `onNavigatorReady()` method in `MainActivity.kt`.
```
/*** app/src/main/java/com/example/navsdkcodelab/MainActivity.kt ***/
import com.google.android.gms.maps.GoogleMap
override fun onNavigatorReady(navigator: Navigator) {
setupCameraFollowMyLocation()
}
@SuppressLint("MissingPermission")
private fun setupCameraFollowMyLocation() {
navView.getMapAsync { googleMap ->
googleMap.followMyLocation(GoogleMap.CameraPerspective.TILTED)
}
}
```
The code inside `setupCameraFollowMyLocation()`, as the name suggests, adjusts the camera's position to center on the user's current location as they move. Passing the `GoogleMap.CameraPerspective.TILTED` parameter displays the map in a tilted 3D perspective, providing an enhanced visual representation of the navigation route.
There are three popular camera angles:
- `CameraPerspective.TILTED` offers the familiar and beloved 3D tilted view.
- `CameraPerspective.TOP_DOWN_NORTH_UP` pins the camera at the vehicle's location, with the map facing north.
- `CameraPerspective.TOP_DOWN_HEADING_UP` pins the camera at the vehicle's location, with the map facing the direction of travel.
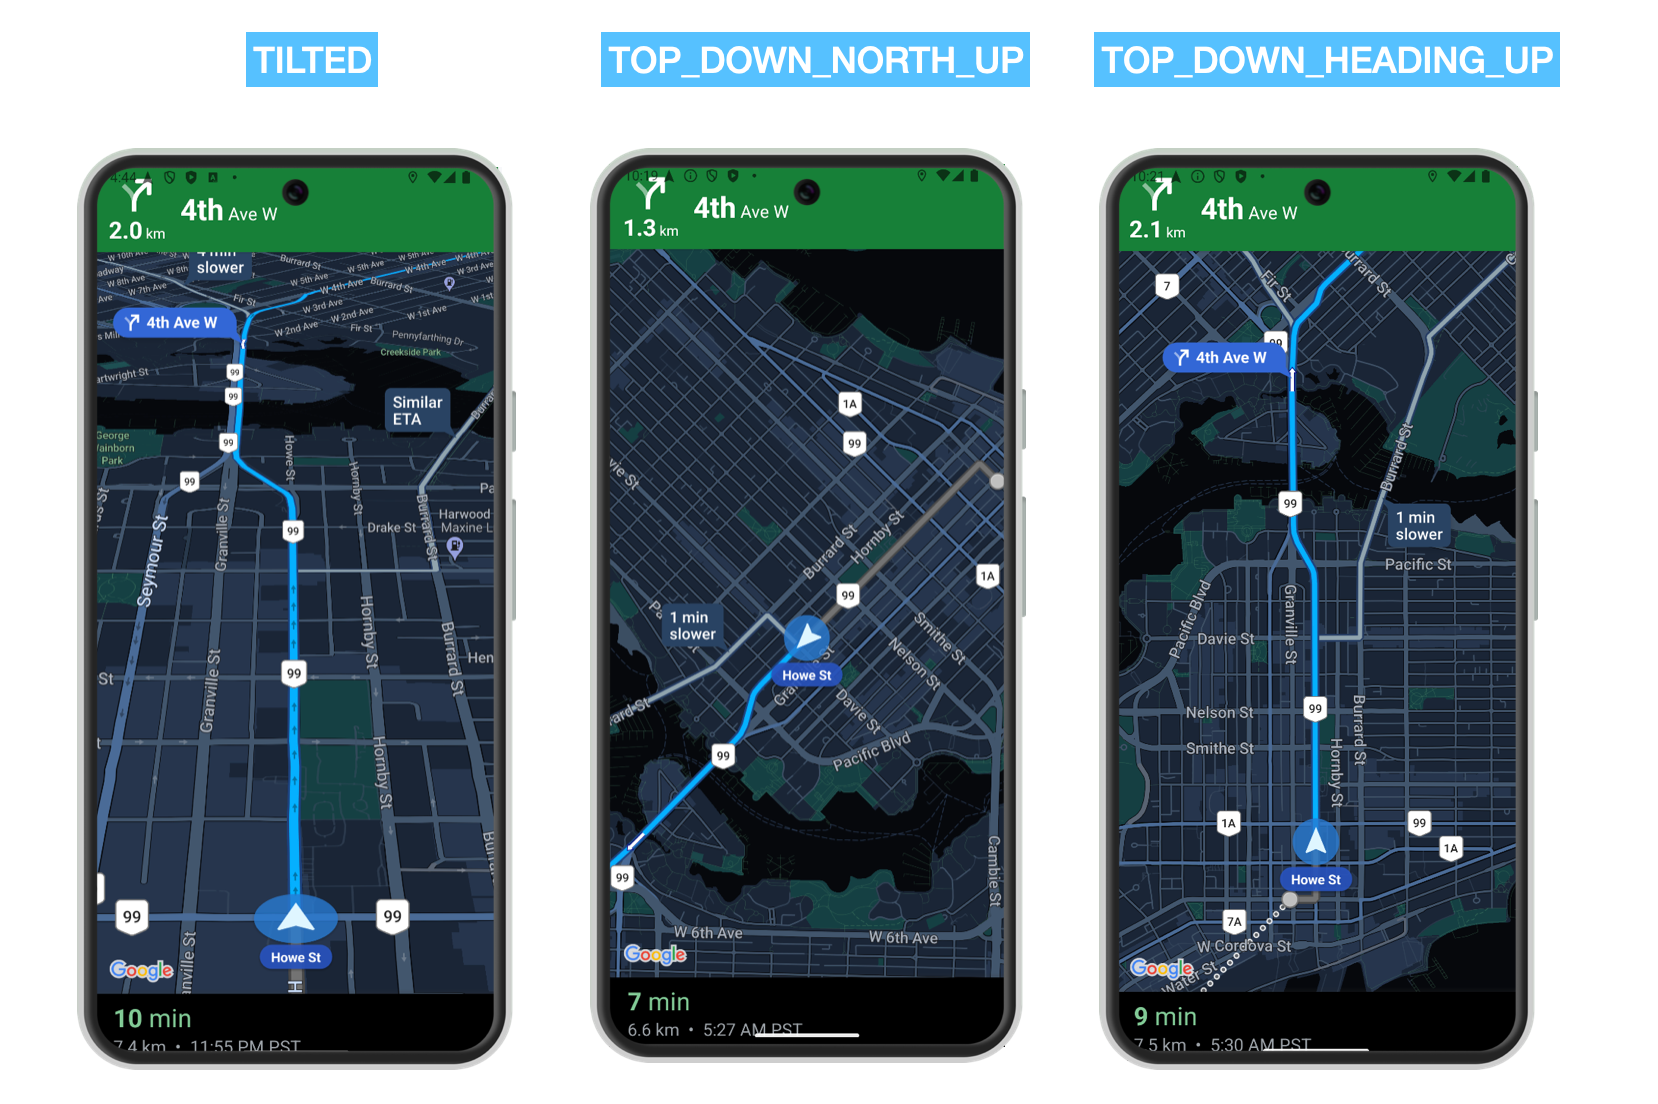
`TILTED`, `TOP_DOWN_NORTH_UP` and `TOP_DOWN_HEADING_UP` on the Google Navigation SDK
### Implement logic: Setup user location start with simulation mode
Almost there! To effectively test the Navigation SDK on your local machine, it's essential to simulate user driving behavior. To do this we'll use the `Simulator` interface provided within the SDK, which allows you to emulate user location and simulate travel along predefined routes.
Still in `MainActivity.kt`, import the `LatLng` class from the Google Maps Android API. This class represents a geographical point with a latitude and longitude, expressed as degrees, and is commonly used when working with Google Maps to specify locations.
```
/*** app/src/main/java/com/example/navsdkcodelab/MainActivity.kt ***/
import com.google.android.gms.maps.model.LatLng
```
Next, inside the `MainActivity` class, define a read-only property named `isSimulationMode` that (for now) always returns true.
```
/*** app/src/main/java/com/example/navsdkcodelab/MainActivity.kt ***/
class MainActivity : AppCompatActivity() {
private val isSimulationMode get() = true
}
```
This way, `isSimulationMode` evaluates to `true` whenever it is accessed within the `MainActivity` class, triggering the driving simulation within the Nav SDK. Why not simply set `isSimulationMode` to `true`? Well, by using the `get()` custom getter, we can make future modifications to `isSimulationMode` without altering the property's basic interface. For example, we might want to set the value of `isSimulationMode` to follow a configuration setting or an environment variable e.g. `private val isSimulationMode: Boolean get() = AppConfig.isSimulationEnabled` will follow the value of `isSimulationEnabled` in the `AppConfig` file.
After that, add a constant `val startLocation = LatLng(49.2846992,-123.1138264)` to the `companion object` so that we can pass the Nav SDK the start location coordinates taken from an address in downtown Vancouver, BC.
```
/*** app/src/main/java/com/example/navsdkcodelab/MainActivity.kt ***/
companion object {
val startLocation = LatLng(49.2847001, -123.1145098)
}
```
Lastly, in the `onNavigatorReady()` listener, add the code to emulate the user's position at a specific location without requiring physical movement or a mobile device with GPS enabled.
```
/*** app/src/main/java/com/example/navsdkcodelab/MainActivity.kt ***/
override fun onNavigatorReady(navigator: Navigator) {
if (isSimulationMode) {
mNavigator?.simulator?.setUserLocation(startLocation)
}
}
```
Recall that at the start of this tutorial, I said that the Navigation SDK needs both an origin and a destination. We've added the start location (origin) in this section. Let's add the end location (destination) in the next.
### Implement logic: Start navigate to destination
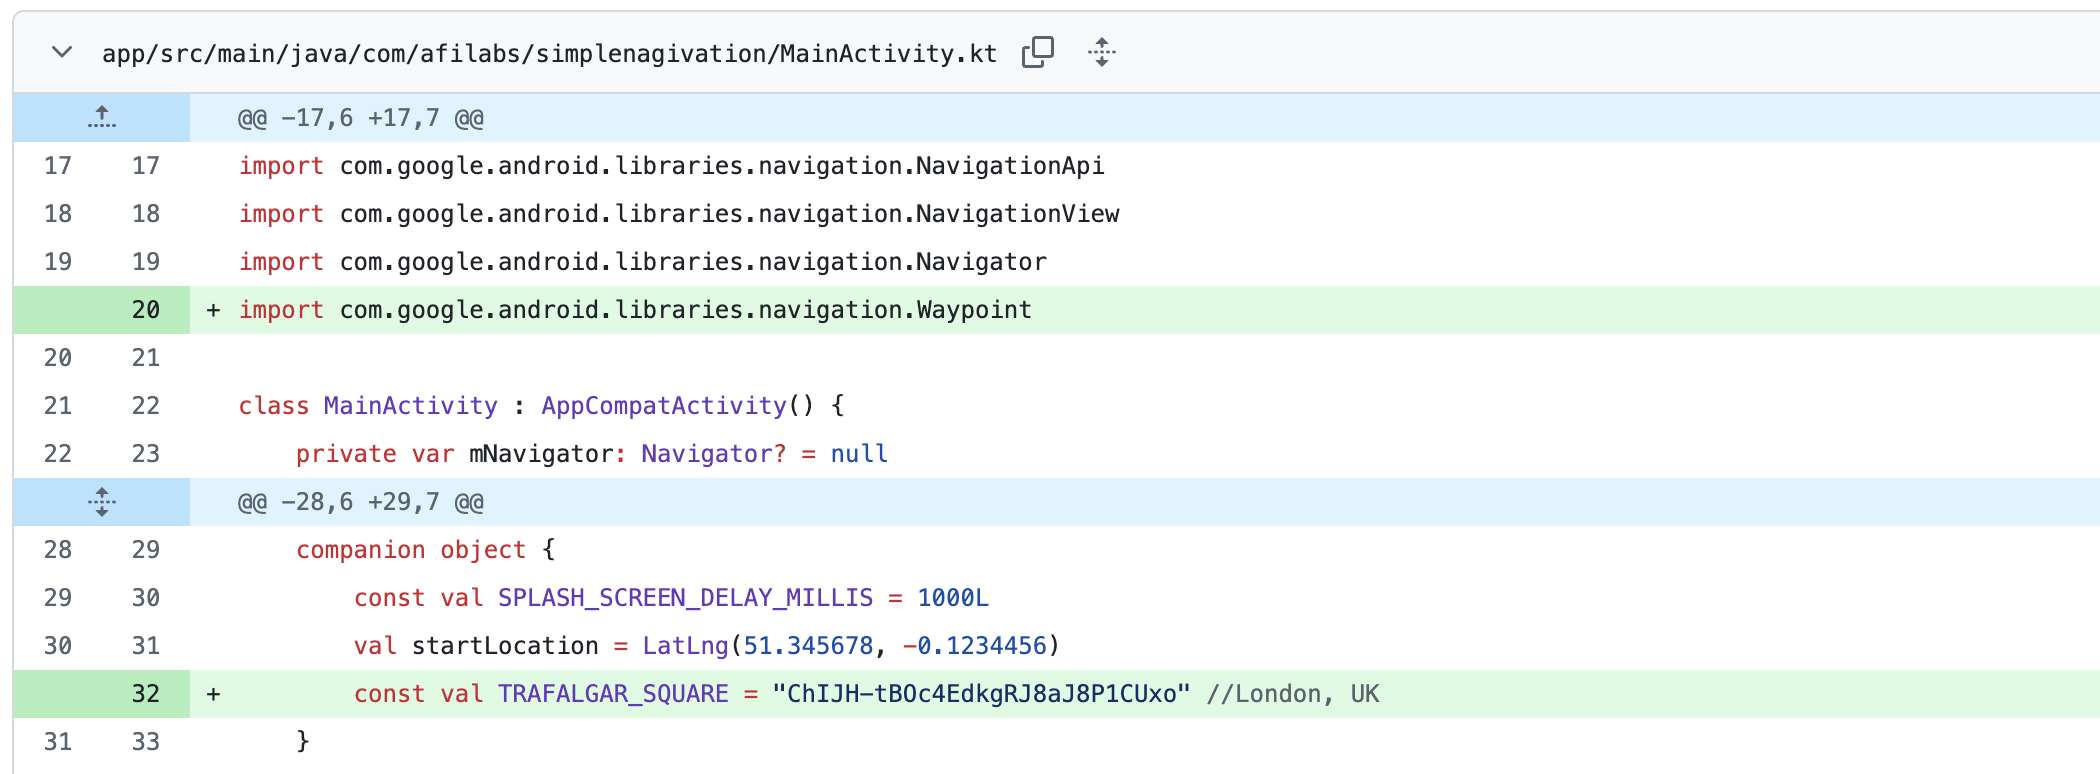
You are now ready to set a destination and start navigation guidance. In the `MainActivity.kt` file, make the following changes.
At the top of `MainActivity.kt`, import the `Waypoint` class from the Google Maps Navigation SDK. We will use the `Waypoint` class to convert a Google Maps `place_id` to a valid destination that can be fed to the Nav SDK.
```
/*** app/src/main/java/com/example/navsdkcodelab/MainActivity.kt ***/
import com.google.android.libraries.navigation.Waypoint
```
In the `companion object`, add `const val WEST_POINT_GREY = "ChIJS09_Ne5yhlQRK1JX6bCnfn0"` to define our end location.
```
/*** app/src/main/java/com/example/navsdkcodelab/MainActivity.kt ***/
companion object {
const val WEST_POINT_GREY = "ChIJS09_Ne5yhlQRK1JX6bCnfn0"
}
```
We could have used latitude and longitude coordinates just as we did for the start location, but I wanted to show that you can use a [Google Maps place\_id](https://developers.google.com/maps/documentation/places/web-service/place-id?ref=blog.afi.io) as well.
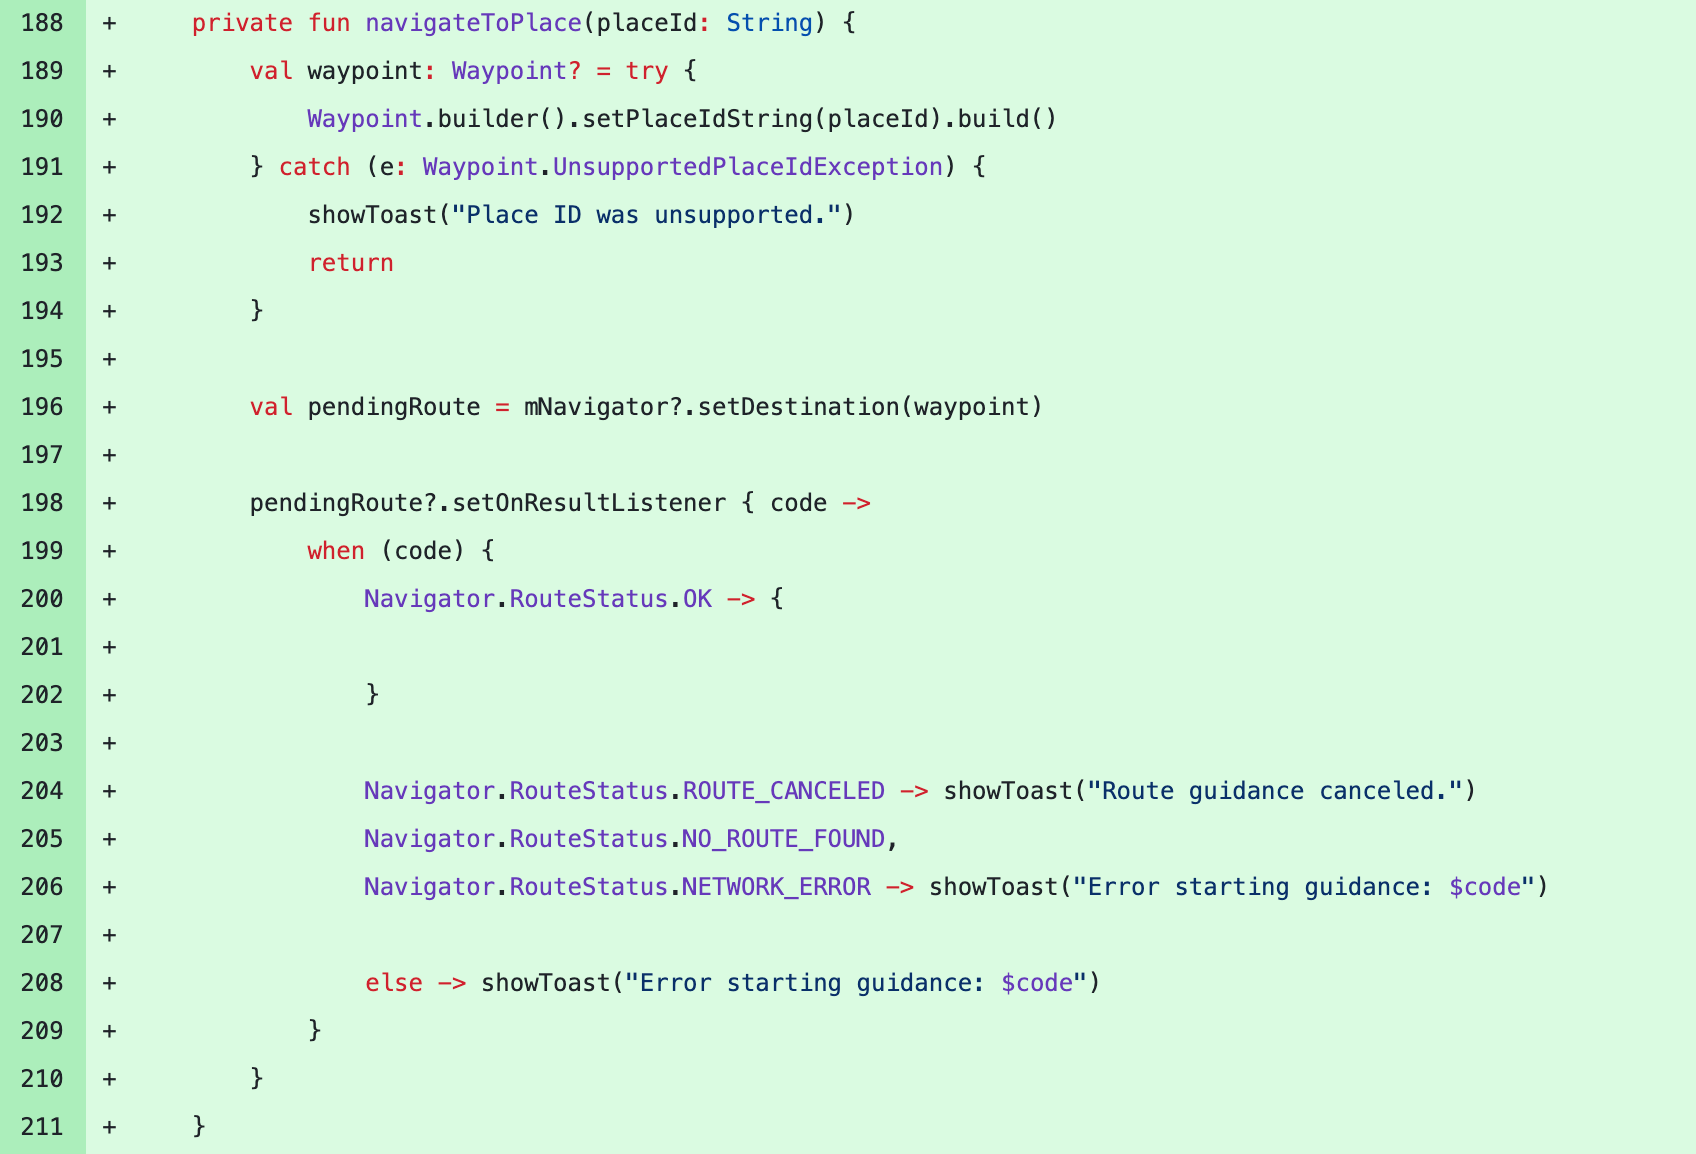
We follow this up by writing a new method, `navigateToPlace()` to initiate navigation to the specified destination.
```
/*** app/src/main/java/com/example/navsdkcodelab/MainActivity.kt ***/
private fun navigateToPlace(placeId: String) {
val waypoint: Waypoint? =
try {
Waypoint.builder().setPlaceIdString(placeId).build()
} catch (e: Waypoint.UnsupportedPlaceIdException) {
showToast("Place ID was unsupported.")
return
}
val pendingRoute = mNavigator?.setDestination(waypoint)
pendingRoute?.setOnResultListener { code ->
when (code) {
Navigator.RouteStatus.OK -> {}
Navigator.RouteStatus.ROUTE_CANCELED -> showToast("Route guidance canceled.")
Navigator.RouteStatus.NO_ROUTE_FOUND,
Navigator.RouteStatus.NETWORK_ERROR -> showToast("Error starting guidance: $code")
else -> showToast("Error starting guidance: $code")
}
}
}
```
`navigateToPlace()` accepts a `place_id` as input and starts navigation to the destination (the start location would have been set before calling `navigateToPlace()`).
Here's a detailed explanation of how this method works:
1. A `Waypoint` representation of the destination is created. If the `placeId` is invalid or unsupported, the error is handled gracefully and the error message is shown on a toast message.
```
val waypoint: Waypoint? =
try {
Waypoint.builder().setPlaceIdString(placeId).build()
} catch (e: Waypoint.UnsupportedPlaceIdException) {
showToast("Place ID was unsupported.")
return
}
```
1. The `setDestination` method of the `Navigator` object (`mNavigator`) is called with the created `Waypoint`. It returns a `pendingRoute`, which is an object representing the status of the route calculation process.
```
val pendingRoute = mNavigator?.setDestination(waypoint)
```
1. `pendingRoute` is actually a `ListenableResultFuture` object ([docs](https://developers.google.com/maps/documentation/navigation/android-sdk/reference/com/google/android/libraries/navigation/ListenableResultFuture?ref=blog.afi.io)) containing a `RouteStatus` object. The `RouteStatus` indicates whether a route was found to the destination and allow you to handle various error states if not.
```
pendingRoute?.setOnResultListener { code ->
when (code) {
Navigator.RouteStatus.OK -> {}
Navigator.RouteStatus.ROUTE_CANCELED -> showToast("Route guidance canceled.")
Navigator.RouteStatus.NO_ROUTE_FOUND,
Navigator.RouteStatus.NETWORK_ERROR -> showToast("Error starting guidance: $code")
else -> showToast("Error starting guidance: $code")
}
}
```
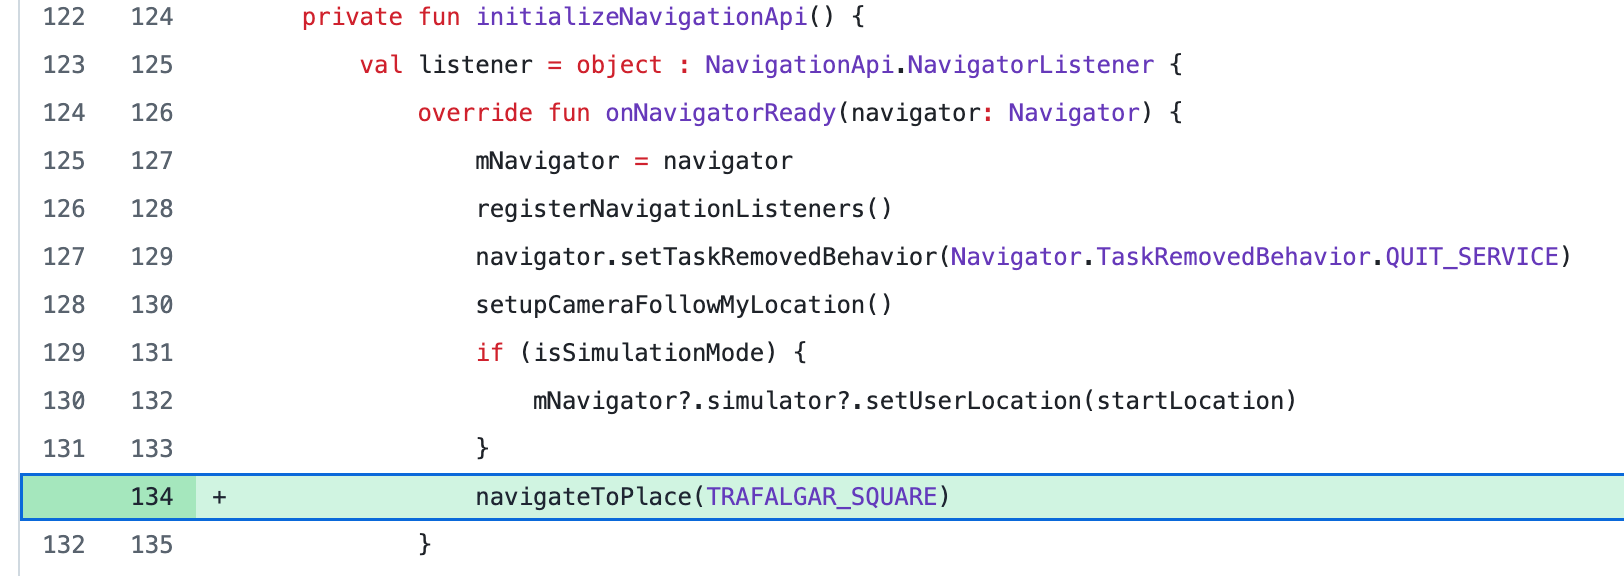
Lastly, call `navigateToPlace()` in the `onNavigatorReady()` method after setting the start location.
```
/*** app/src/main/java/com/example/navsdkcodelab/MainActivity.kt ***/
override fun onNavigatorReady(navigator: Navigator) {
if (isSimulationMode) {
mNavigator?.simulator?.setUserLocation(startLocation)
}
navigateToPlace(STANLEY_PARK)
}
```
The code in this section is an excellent example (not written by me) of gracefully handling errors in an Android app while giving users clear feedback about what went wrong.
### Implement logic: On start navigate - hide top action bar
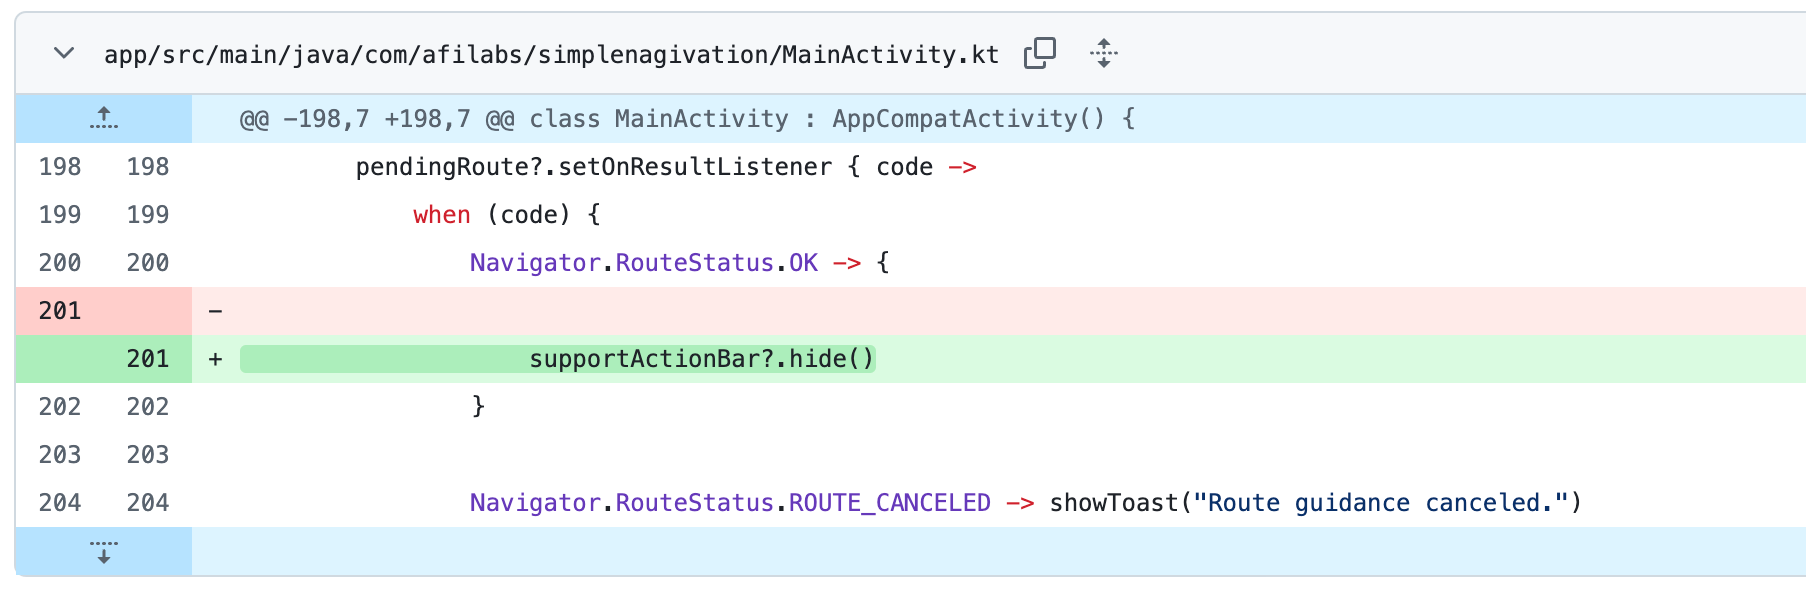
To make sure our in-app navigation screen is free from distractions, we are going to hide the top action bar. In the `Navigator.RouteStatus.OK` case which is currently empty, add the line:
```
/*** app/src/main/java/com/example/navsdkcodelab/MainActivity.kt ***/
when (code) {
Navigator.RouteStatus.OK -> {
supportActionBar?.hide()
}
}
```
This is useful when you want to create a full-screen experience.
### Implement logic: On start navigate - enable voice and guidance
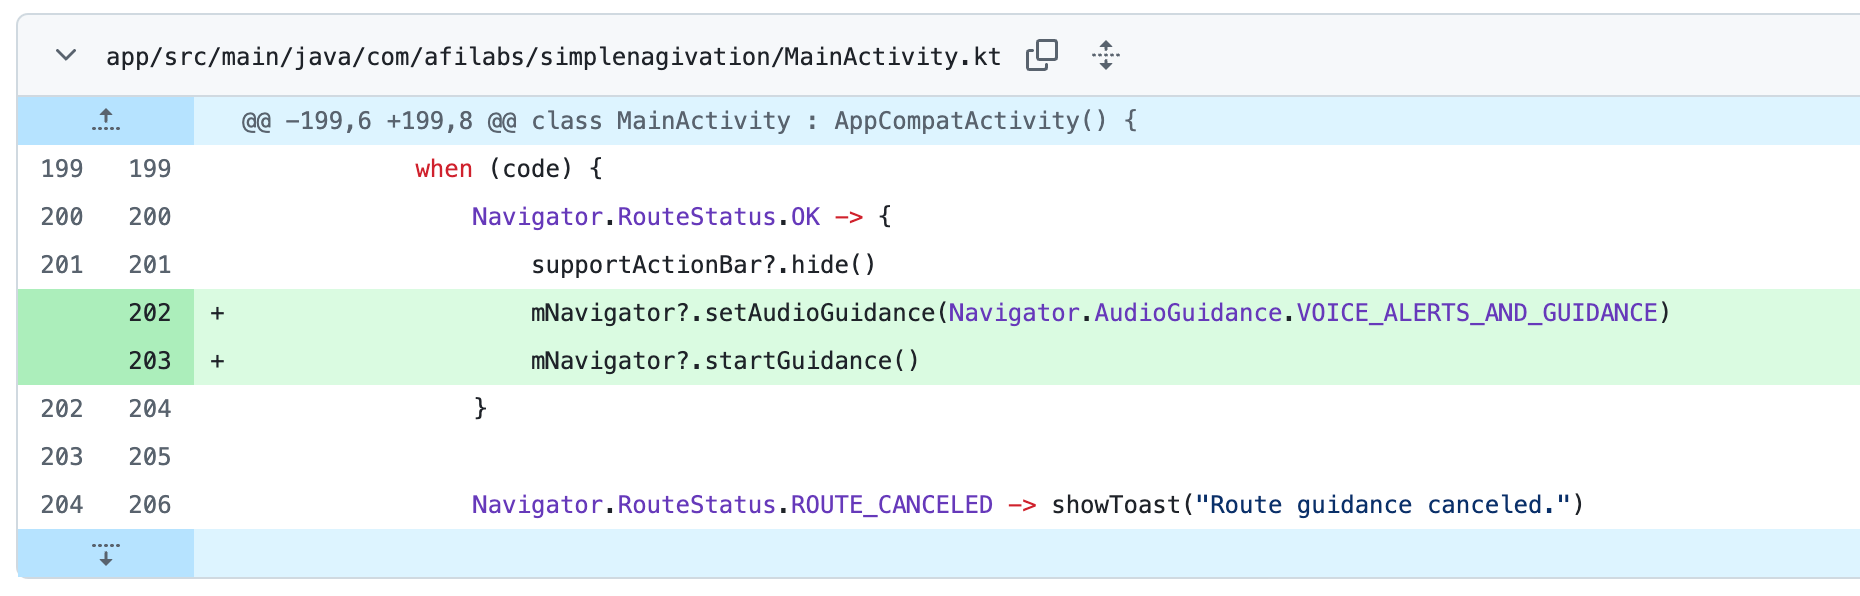
Now we need to turn the in-app navigation "on". In the `Navigator.RouteStatus.OK` case add the line `mNavigator?.startGuidance()` to start the turn-by-turn navigation process.
```
/*** app/src/main/java/com/example/navsdkcodelab/MainActivity.kt ***/
when (code) {
Navigator.RouteStatus.OK -> {
mNavigator?.setAudioGuidance(Navigator.AudioGuidance.VOICE_ALERTS_AND_GUIDANCE)
mNavigator?.startGuidance()
}
}
```
With the Nav SDK activated, it can now use the device's GPS location to guide the user along the calculated route.
### Implement logic: On start navigate - simulate moving if simulation mode
Even with the Navigation SDK correctly set up and initialized, testing it fully on a local machine isn't feasible since there is no actual movement. To address this, we’ll use the `SimulationOptions` package to configure and manage navigation simulations, enabling us to test navigation behavior without physical movement or GPS data.
To get started, import the `SimulationOptions` library in `MainActivity.kt`.
```
/*** app/src/main/java/com/example/navsdkcodelab/MainActivity.kt ***/
import com.google.android.libraries.navigation.SimulationOptions
```
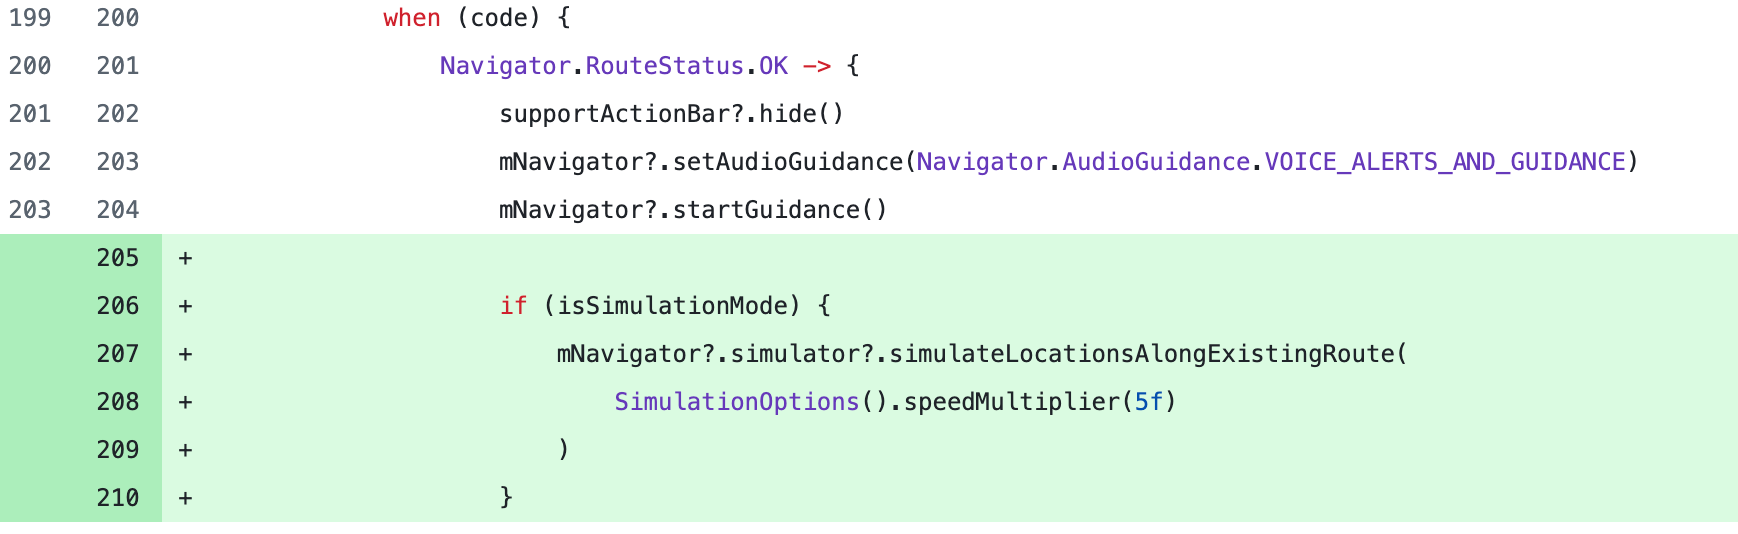
Then, in the `Navigator.RouteStatus.OK` case add the `simulateLocationsAlongExistingRoute()` method to simulate the user driving along the route.
```
/*** app/src/main/java/com/example/navsdkcodelab/MainActivity.kt ***/
if (isSimulationMode) {
mNavigator
?.simulator
?.simulateLocationsAlongExistingRoute(SimulationOptions().speedMultiplier(5f))
}
```
Here we tag on a `speedMultiplier(5f)` to adjust the simulation speed to be **5x faster** than real-world speed. For example, a 15-minute route would take approximately 3 minutes to simulate. This makes it easier to rerun your code for debugging and testing.
This is probably a good time to make sure that your code compiles without errors and that the Nav SDK works. Run the app by pressing the ▶️ button on the top nav bar, you should see the camera centered on a moving vehicle indicated with a blue arrow.
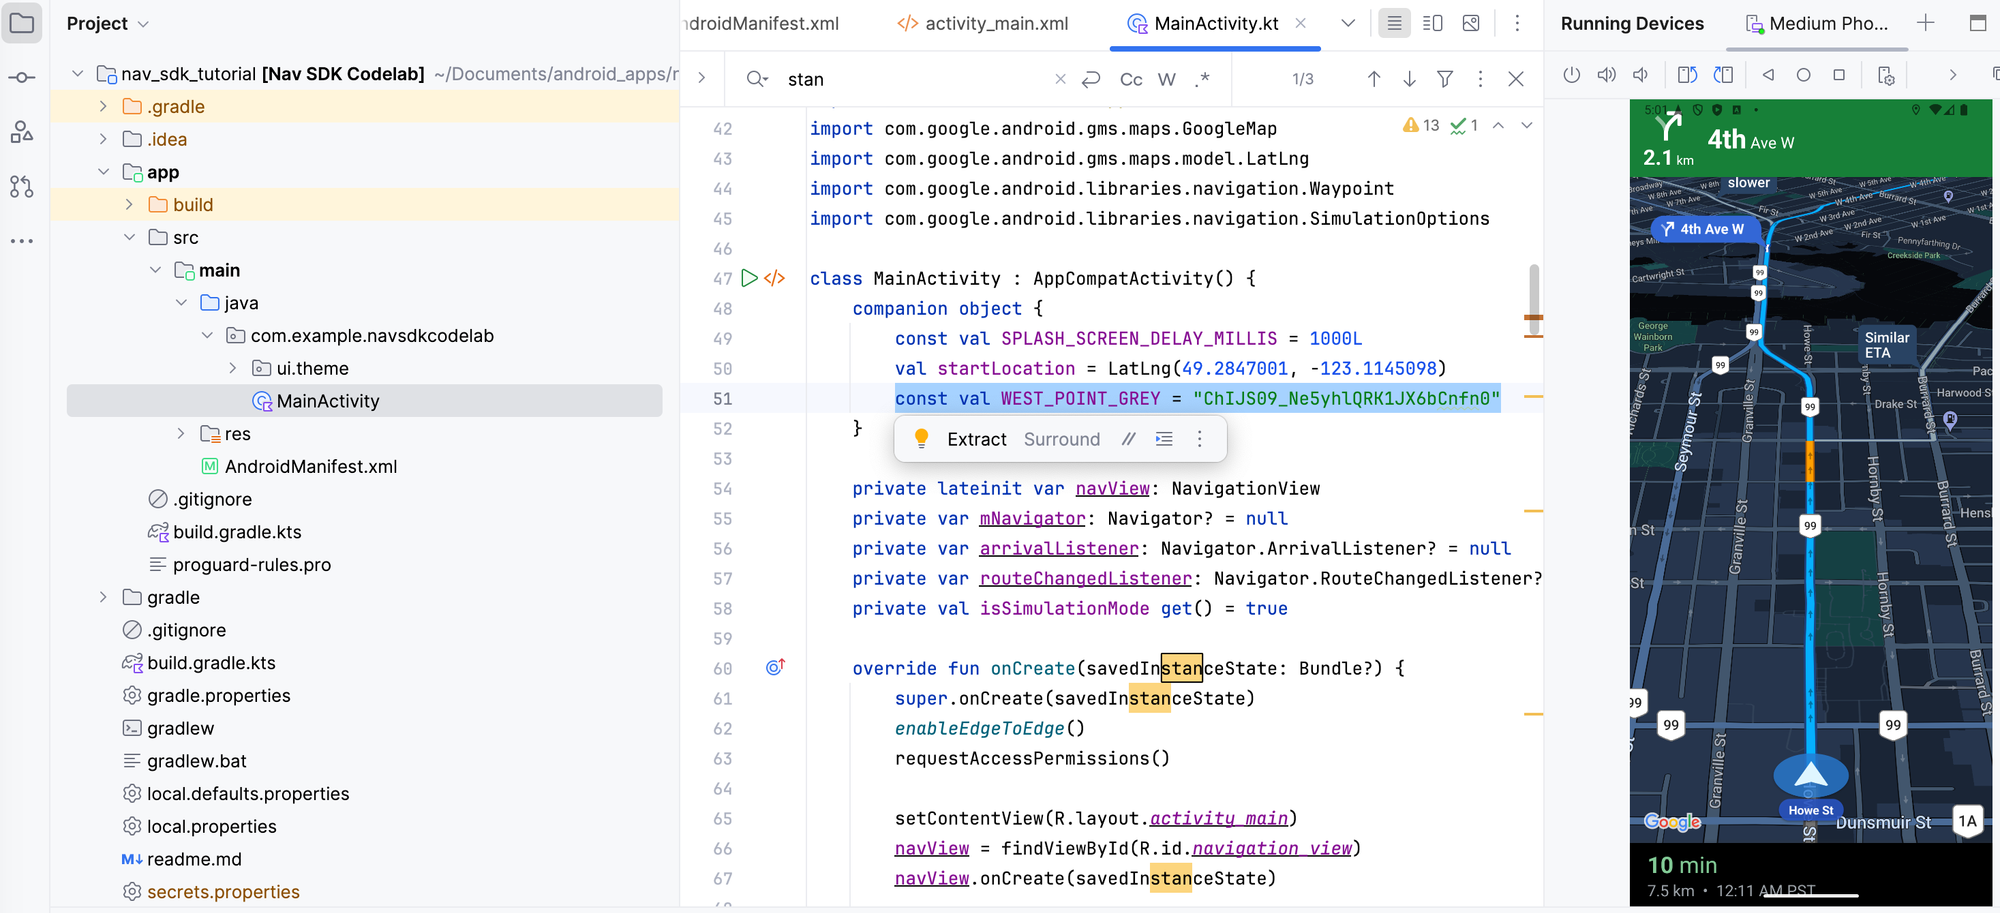
Testing in-app navigation using the simulation options package in the Navigation SDK
### Implement logic: Cleanup navigation when app is closing
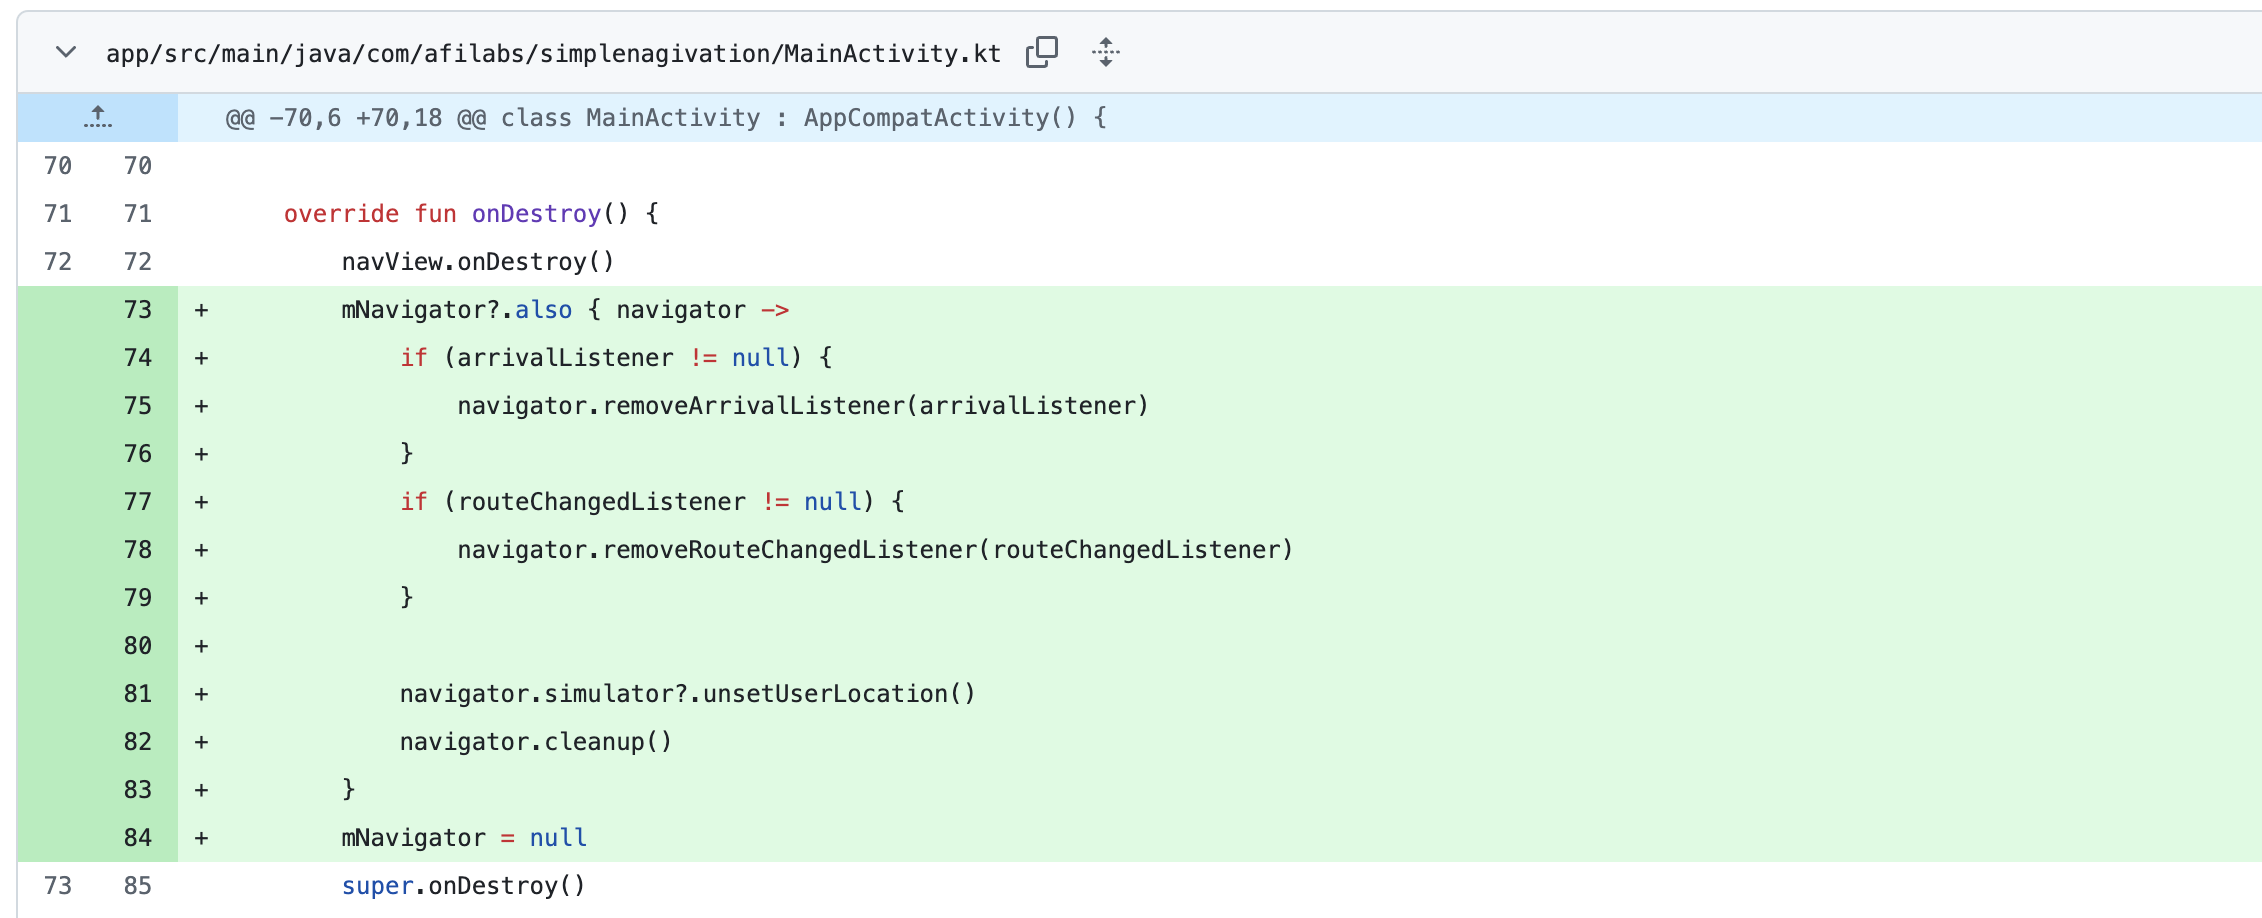
Lastly, we do some cleanup to prevents memory leaks and release resources. In the `onDestroy()` method of `MainActivity.kt` add:
```
/*** app/src/main/java/com/example/navsdkcodelab/MainActivity.kt ***/
override fun onDestroy() {
mNavigator?.also { navigator ->
if (arrivalListener != null) {
navigator.removeArrivalListener(arrivalListener)
}
if (routeChangedListener != null) {
navigator.removeRouteChangedListener(routeChangedListener)
}
navigator.simulator?.unsetUserLocation()
navigator.cleanup()
}
mNavigator = null
}
```
This ensures the app releases references to objects that are no longer needed, preventing memory leaks. Additionally, if a simulator was used for navigation (e.g., during testing), it resets the user location to ensure the closed Nav SDK does not affect future operations.
⚠️
If you keep getting `NO_ROUTE_FOUND` errors, try checking your API key to make sure that both the [Navigation SDK](https://developers.google.com/maps/documentation/navigation/android-sdk?ref=blog.afi.io) and [Maps SDK for Android ](https://developers.google.com/maps/documentation/android-sdk/overview?ref=blog.afi.io)APIs are enabled.
### What comes next
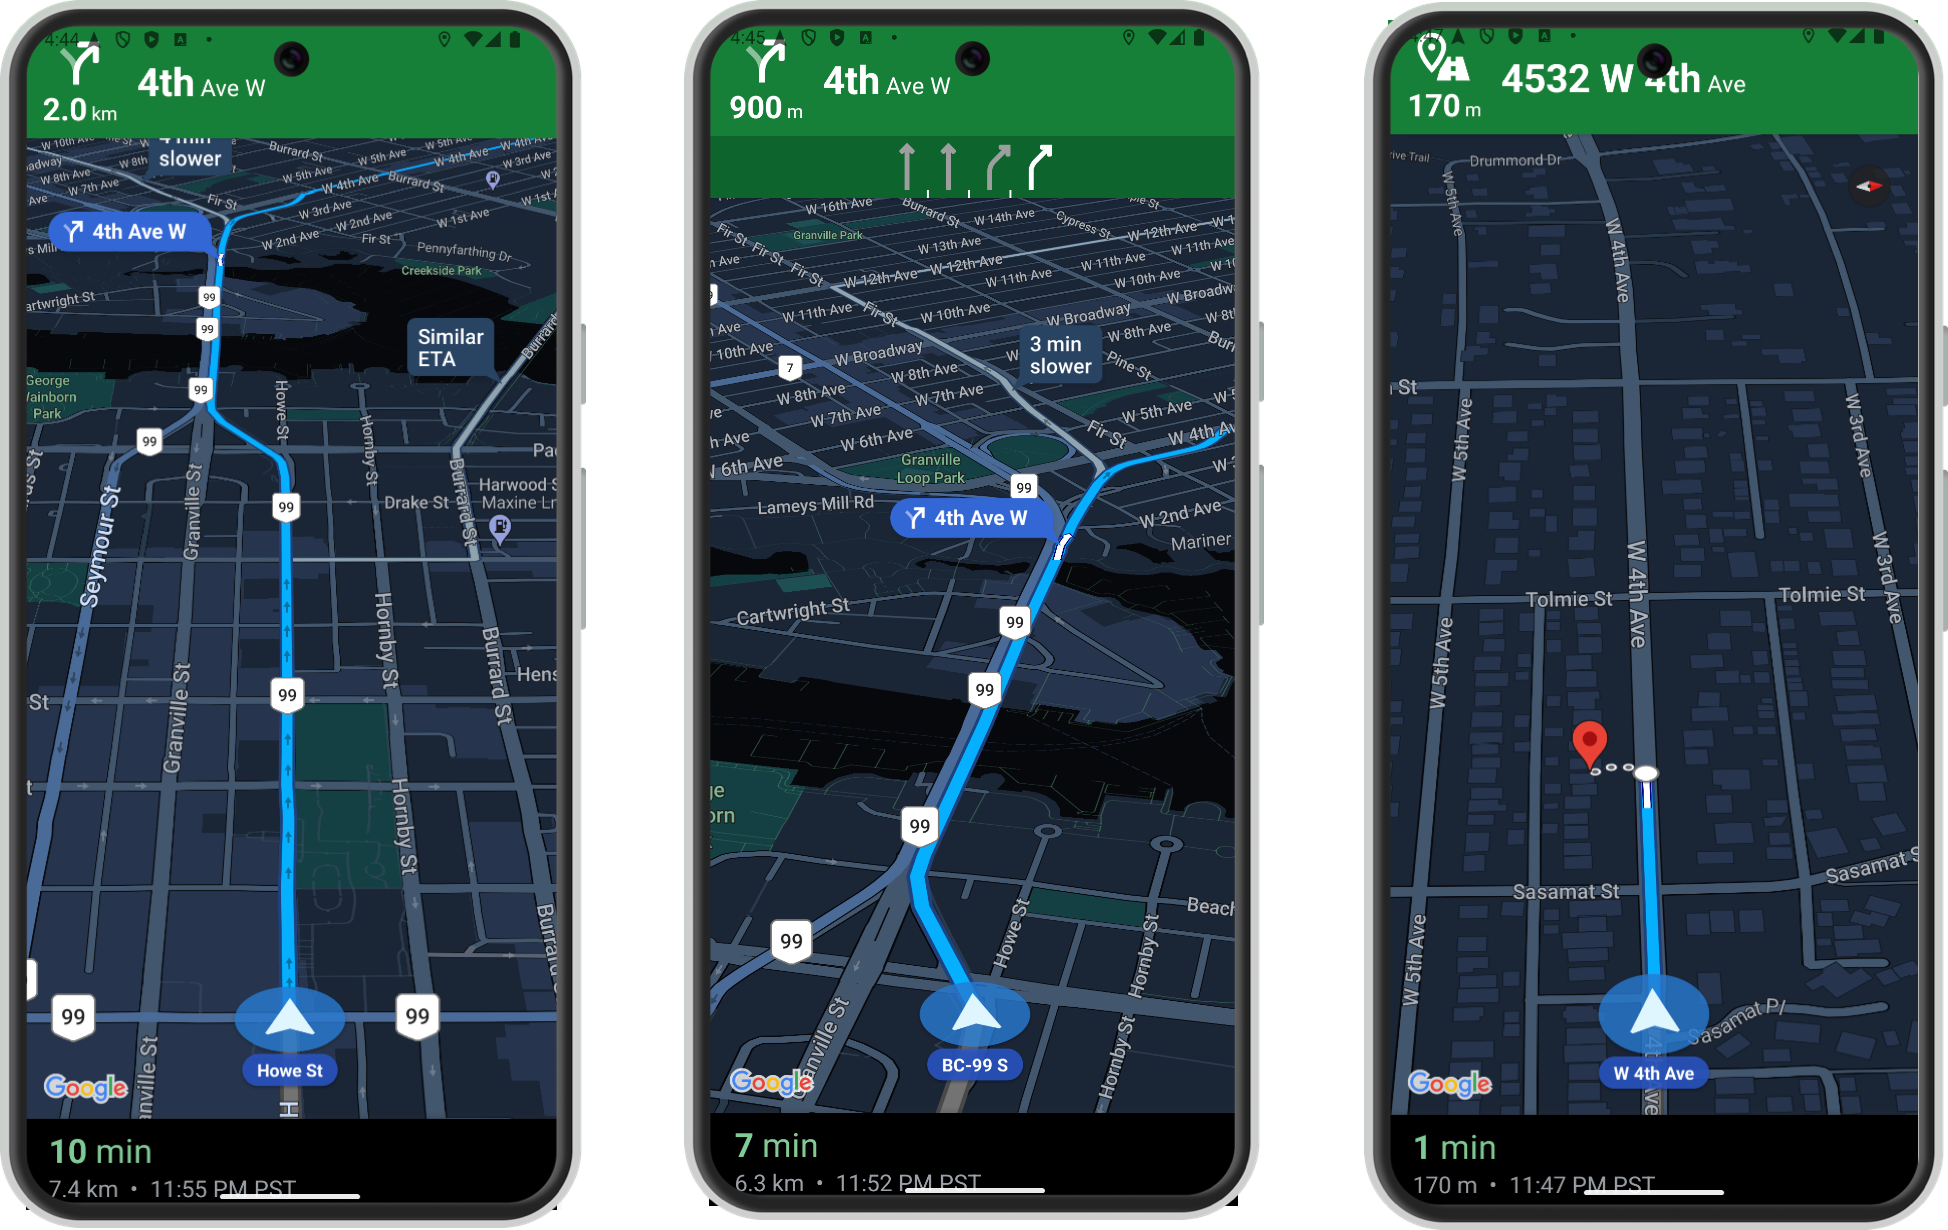
What we've built - a simple navigation app powered by the Google Navigation SDK
Congratulations on building your first app with the [Google Navigation SDK](https://mapsplatform.google.com/resources/blog/introducing-navigation-sdk-deliver-seamless-customized-in-app-google-maps/?ref=blog.afi.io) \- this is a significant achievement! Instead of directing your users to a third-party service for navigation, you can now keep them within your app, enhancing the user experience with custom branding and features tailored to your workflow. In the upcoming tutorials, I’ll show you how!
**This article was written by** [**Afi Labs**](https://afi.io/?ref=blog.afi.io)**, a** [**Google Maps Premier Partner**](https://www.afi.io/?ref=blog.afi.io) **and reseller. We build route optimization, navigation, and fleet tracking software on Google Maps, and offer volume pricing on GMP licensing.** [**Talk to an engineer**](https://afi.iohttps//www.afi.io/contact%5Fus?ref=blog.afi.io) **or** [**follow Afian on LinkedIn**](https://www.linkedin.com/in/afian-anwar/?ref=blog.afi.io)**.**