> ## Content Index
> Fetch the complete content index at: https://blog.afi.io/llms.txt
> Use this file to discover other available public pages before exploring further.
# Google Maps Weather: Add a weather layer to Google Maps
- URL: https://blog.afi.io/blog/google-maps-weather-add-a-weather-layer-to-google-maps/
- Published: 2025-07-02T13:44:43.000Z
- Updated: 2026-08-21T05:16:45.000Z
- Description: Learn how to add a real time weather layer to Google Maps using the Google Weather API. Great for travel, logistics, or outdoor apps.
- Author: Afian Anwar
- Tags: googlemaps
In this blog post, we're going to use the [Google Weather API](https://mapsplatform.google.com/resources/blog/introducing-the-google-maps-platform-weather-api-build-weather-aware-solutions?ref=blog.afi.io) to bring back the 2011 Google Maps weather layer, refreshed for the modern web! As always, full source code (both [frontend](https://github.com/afilabs/google%5Fmaps%5Fweather?ref=blog.afi.io) and [backend](https://github.com/afilabs/google%5Fweather%5Fbackend?ref=blog.afi.io)) is available on GitHub, along with a live demo at [https://google-maps-weather.afi.dev/](https://google-maps-weather.afi.dev/?ref=blog.afi.io).
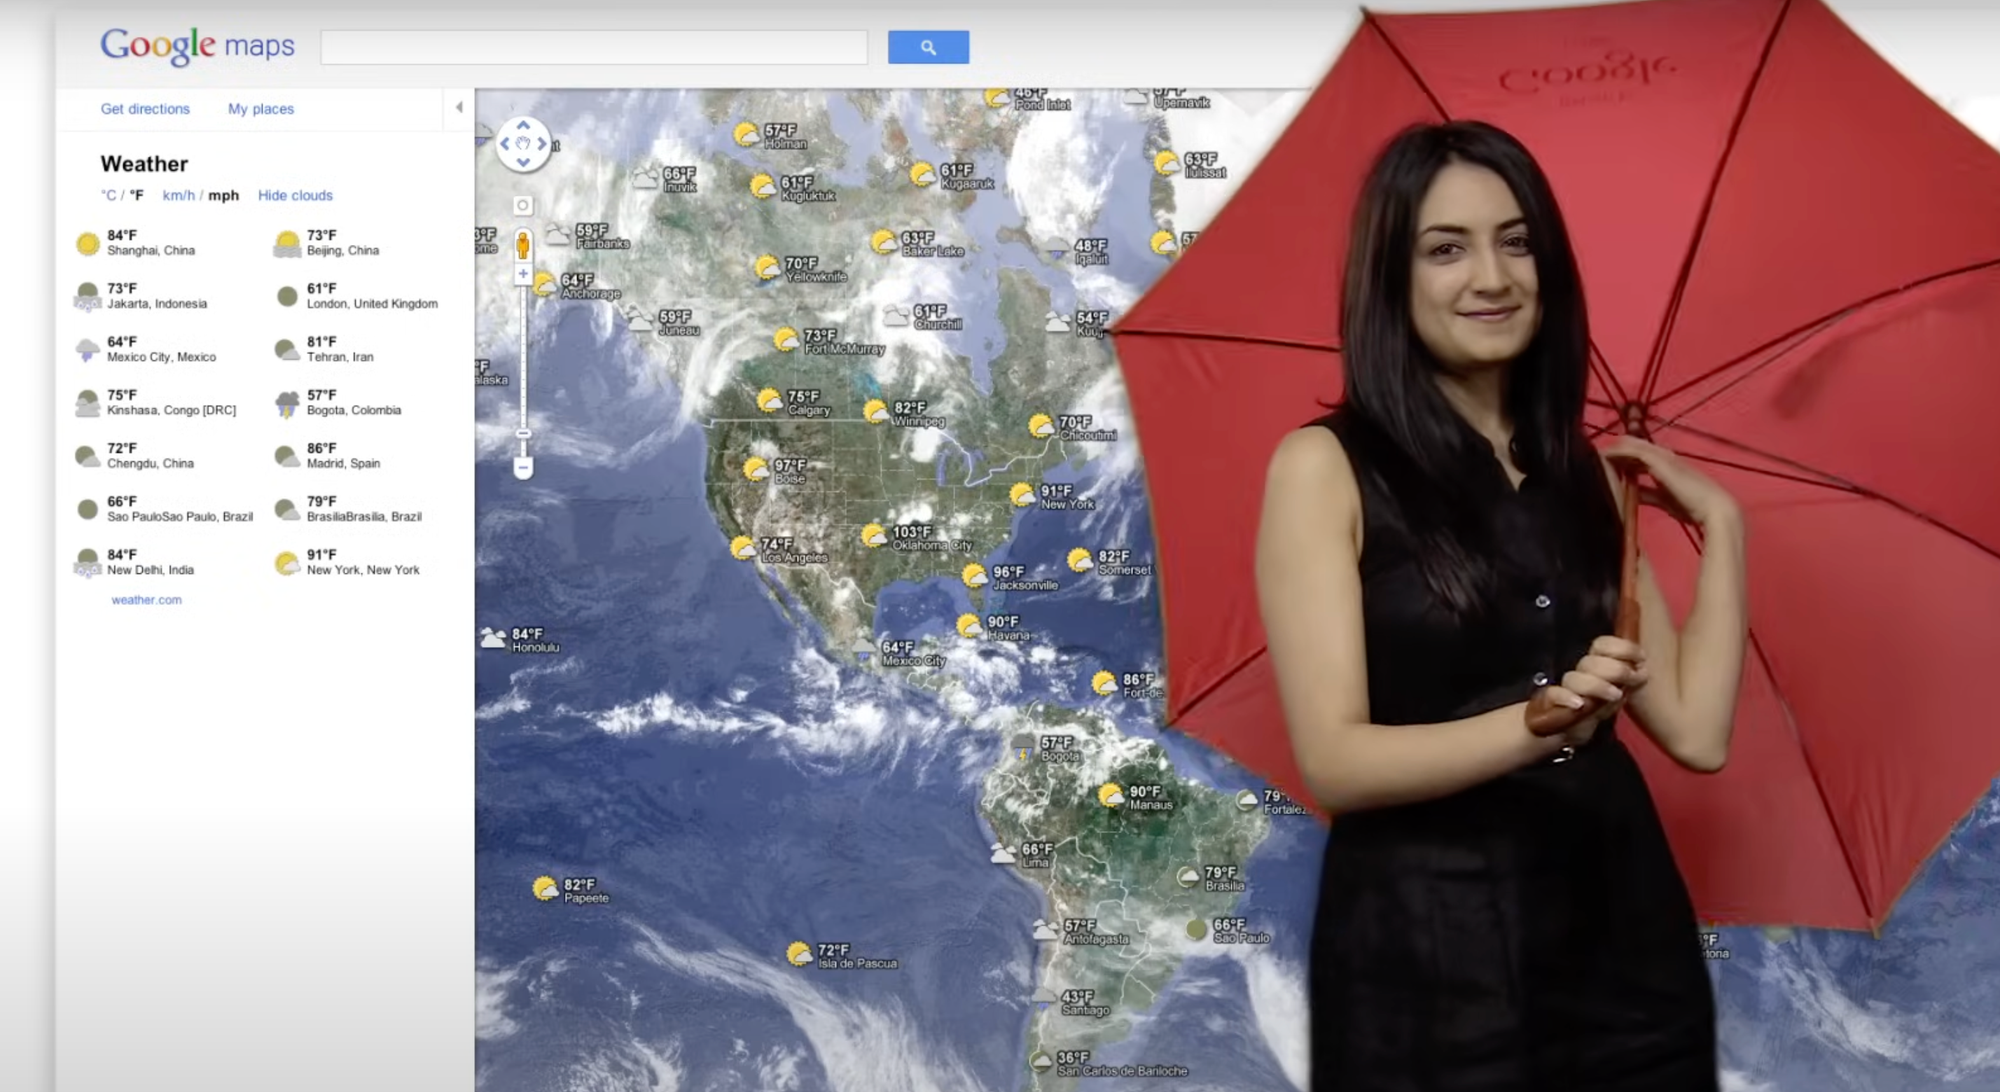
What the Google Maps weather layer looked like in 2011
Part 1: [Meet the Google Weather API: Real time weather for maps](https://blog.afi.io/blog/meet-the-google-weather-api-real-time-weather-for-maps/)
Part 2: [Build a weather app with the Google Weather API ](https://blog.afi.io/blog/build-a-weather-app-with-the-google-weather-api/)
Part 3: [Google Maps weather along route: Weather aware route planner](https://blog.afi.io/blog/google-maps-weather-along-route-weather-aware-planner/)
**Part 4: Google Maps Weather: Add a weather layer to Google Maps (this article)**
[Check the weather for any location on Google MapsHow to use the Google Weather API to check the current and forecasted weather for any location in the world.](https://google-maps-weather.afi.dev/?ref=blog.afi.io)
### Can I see weather on Google Maps?
Yes, you can - but you'll need to look closely. When you search for a major city or neighborhood (e.g. "Vancouver"), the current temperature and a weather icon will appear in the top left corner, next to the location name. Weather is only shown for search results that return a `locality` (as defined by [Google Place Types](https://developers.google.com/maps/documentation/places/web-service/place-types?ref=blog.afi.io)).
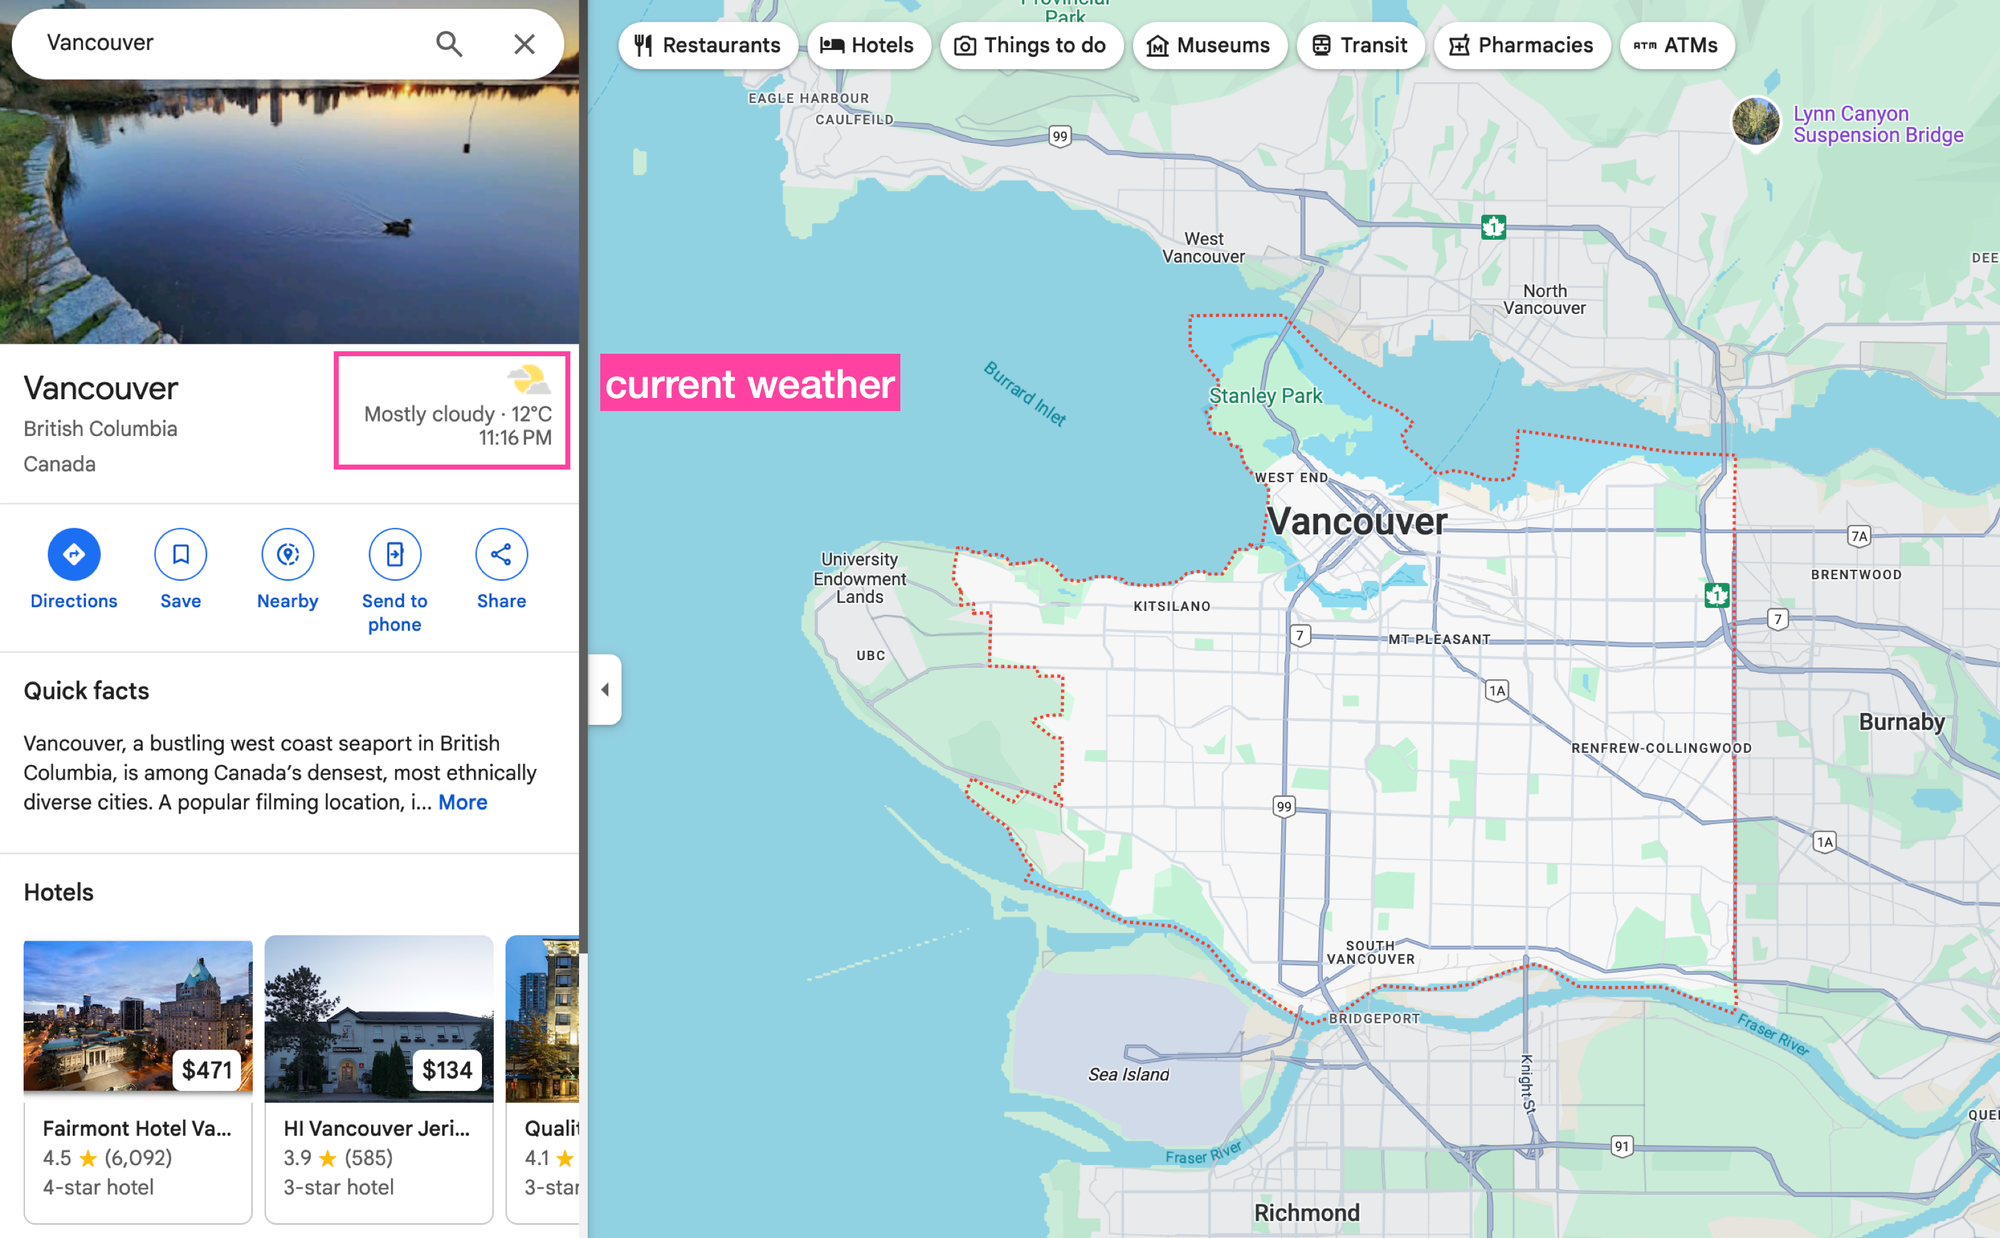
How to see the weather on Google Maps
You can still view the weather for any location on the map by clicking the empty search bar. The weather will then appear in a separate info box.
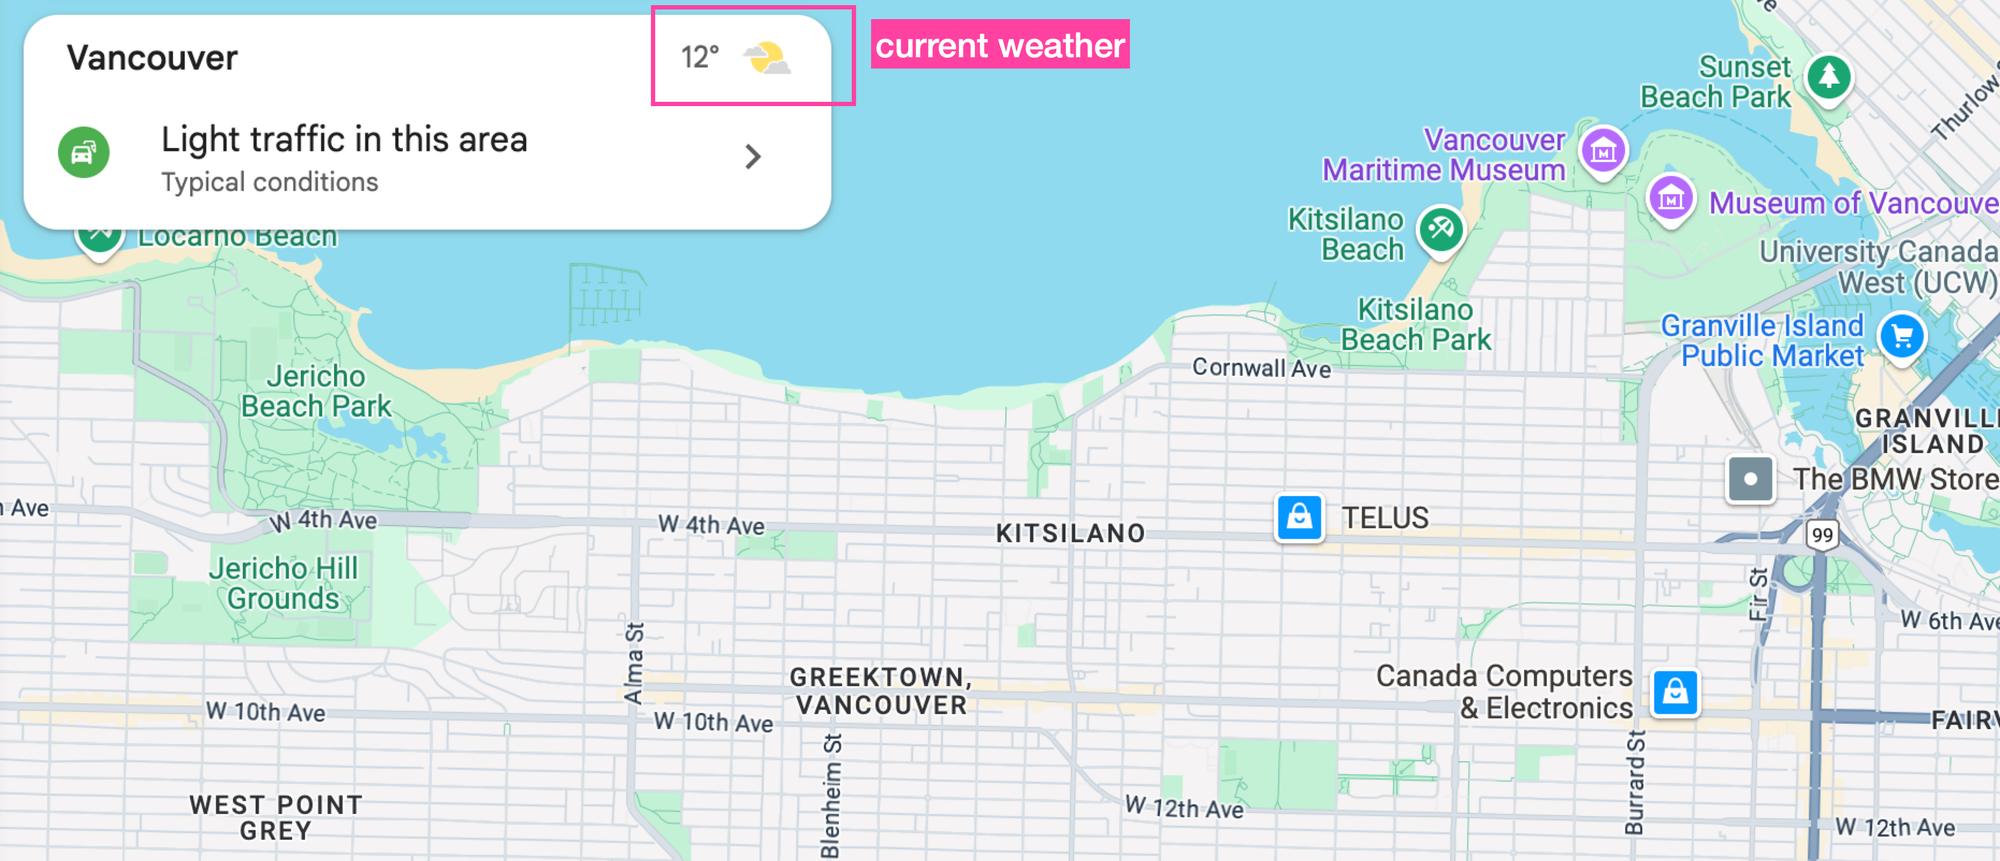
How to see the weather on Google Maps for any location
What is missing though is the 2011 Google Maps weather layer ([Rain or shine, see the weather in Google Maps](https://maps.googleblog.com/2011/08/rain-or-shine-see-weather-in-google.html?ref=blog.afi.io)) that came with a 1990s news show weather board. The weather layer was quietly discontinued around mid 2015\. Google never issued a formal announcement, but it was one of several features removed during the transition from Classic Maps to the newer Maps interface.
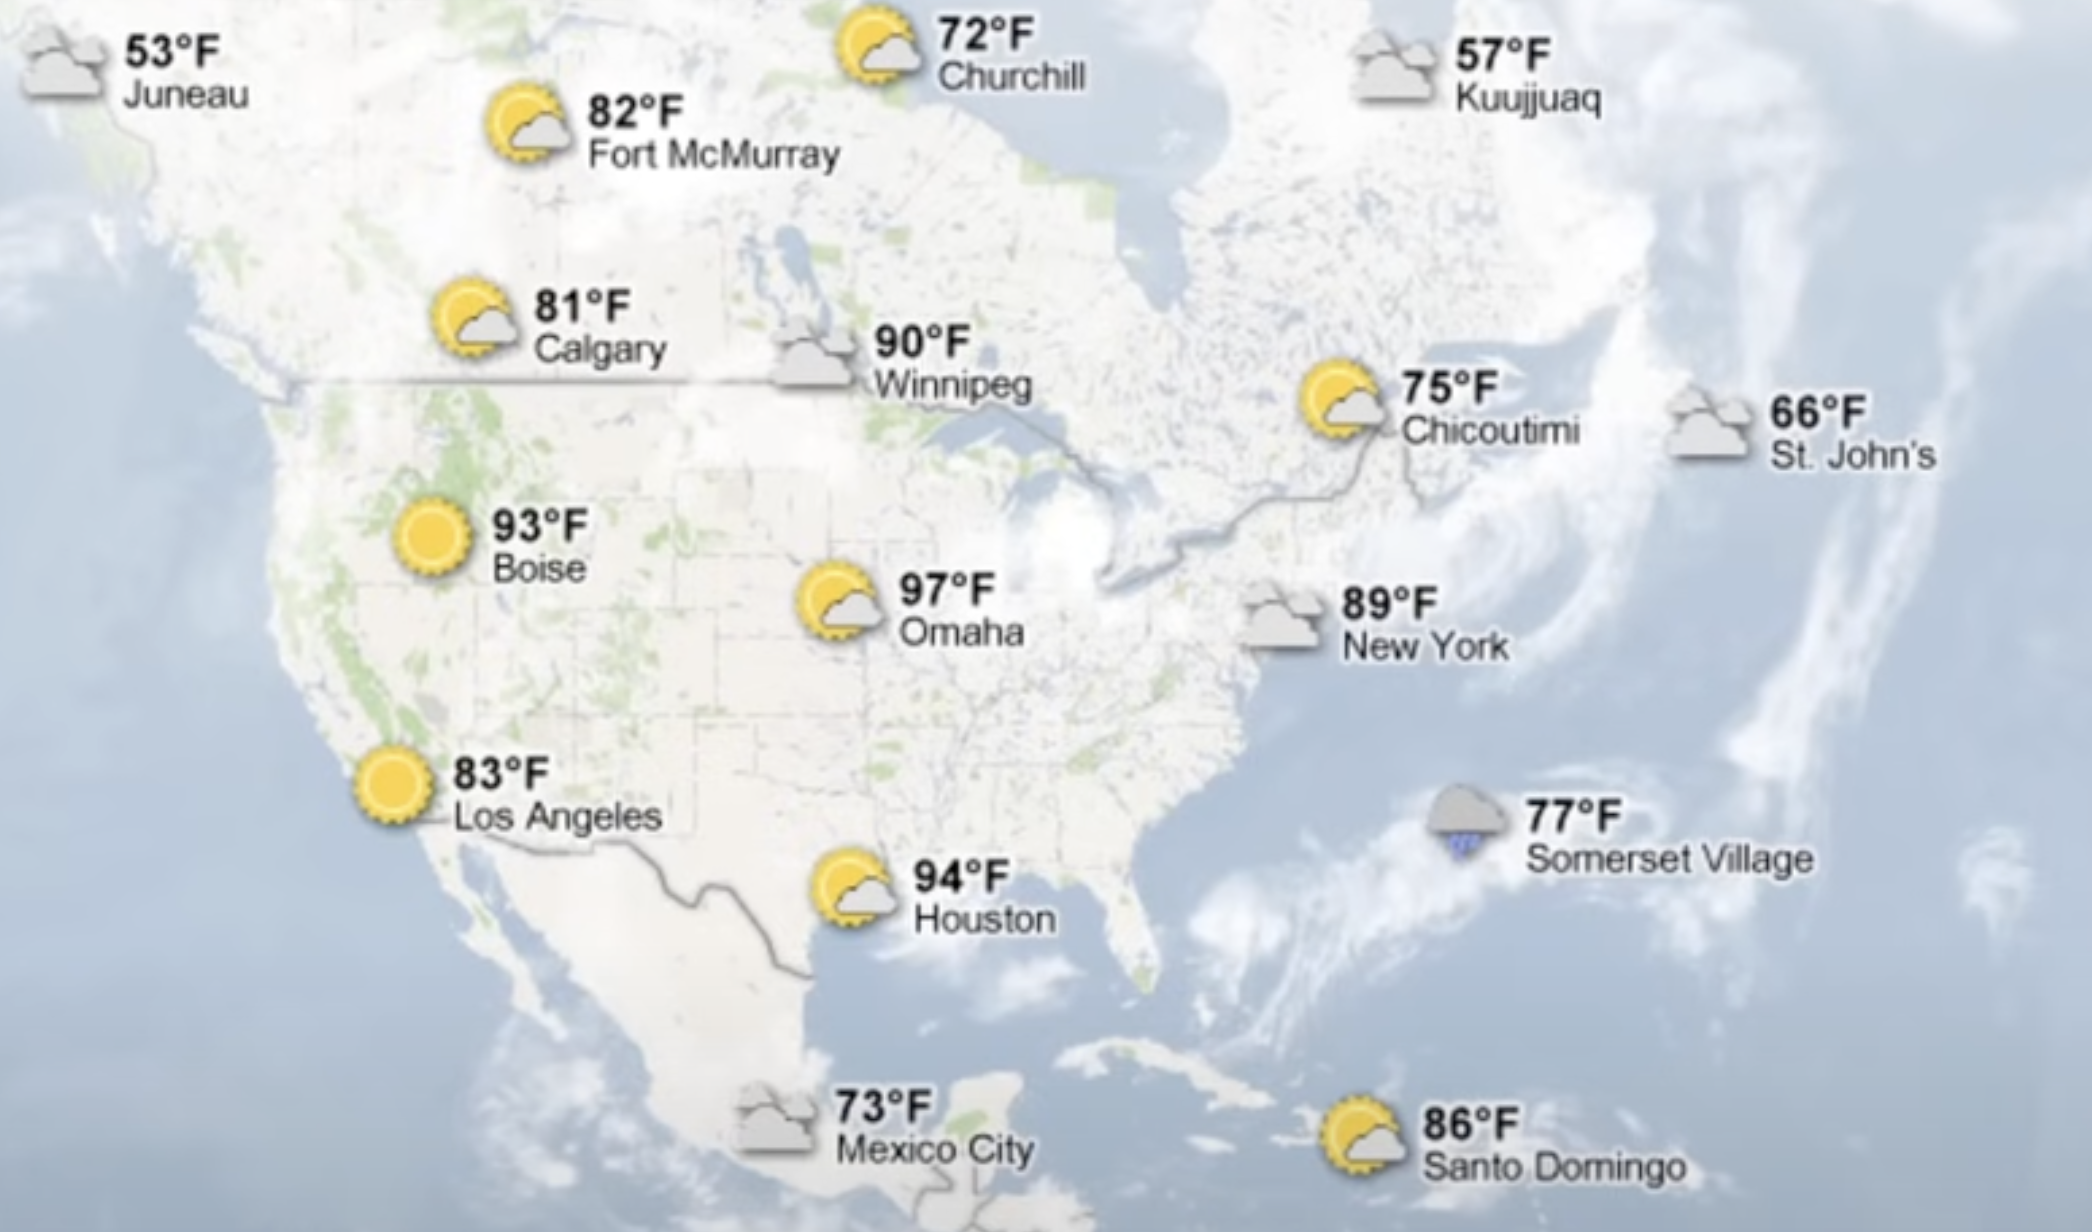
The Google Maps weather layer with cloud cover data overlay
Now, more than a decade later, we are going to use the [Current Conditions](https://developers.google.com/maps/documentation/weather/current-conditions?ref=blog.afi.io) and [Forecast Days](https://developers.google.com/maps/documentation/weather/daily-forecast?hl=en&ref=blog.afi.io) endpoint of the [Google Weather API](https://developers.google.com/maps/documentation/weather?ref=blog.afi.io) to recreate it.
### What we are going to build: A Google Maps Weather app
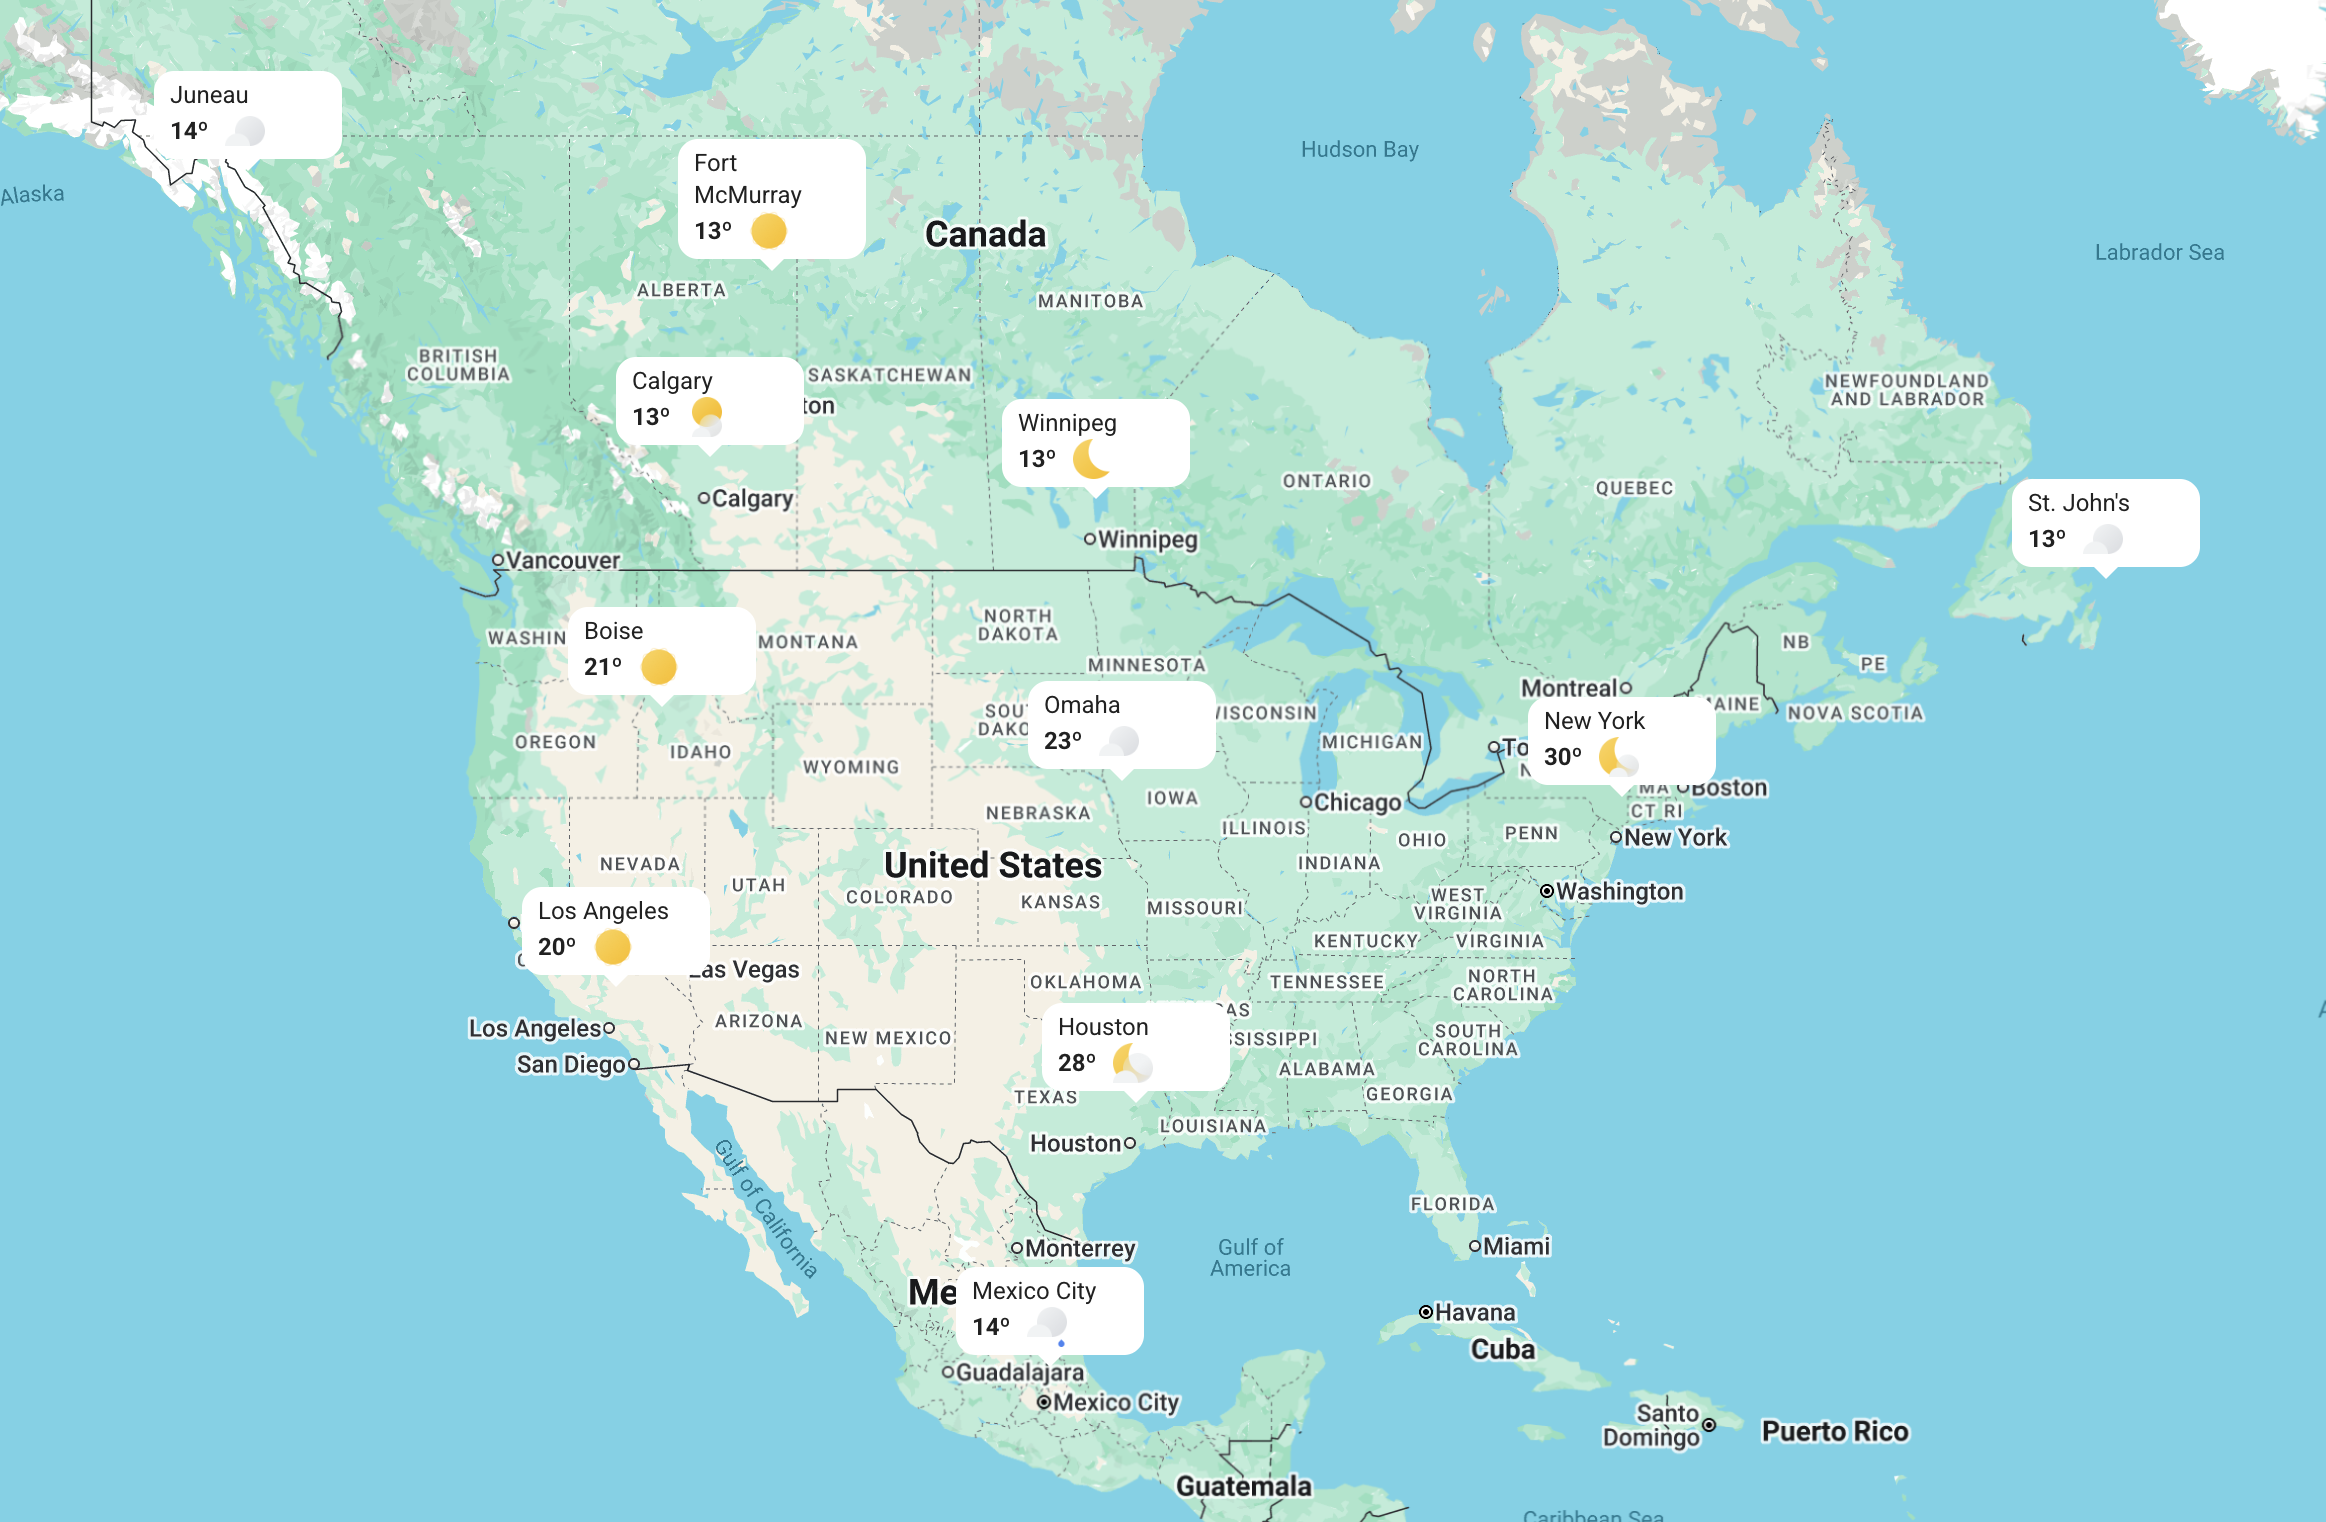
The Google Maps Weather app built on the Google Weather API
[Google Maps Weather](https://google-maps-weather.afi.dev/?ref=blog.afi.io) allows users to search for and add locations using a Google Place Autocomplete search box. When a user selects a location, the app retrieves its coordinates and uses the Google Weather API to display the current weather and a 7-day forecast. Each added location appears on a map with a weather icon, and detailed forecast information is shown in the right sidebar. Users can add multiple locations to compare weather conditions across different places.
A hotel chain could use it to offer guests real time local weather updates, while a travel agency might add it to their website to highlight sunny weekend destinations and boost bookings.
I’m personally using the app to plan my camping trips this summer. As a software engineer with a flexible schedule, I often have a few days plus the weekend to get out of Vancouver and explore the outdoors. I’m not particular about most things - but I do try to avoid rain because it can make the drive through mountain passes a little spicy. With the [Google Maps Weather](https://google-maps-weather.afi.dev/?ref=blog.afi.io) app, I can add several potential camping spots to the map and easily choose the one with the best chance of sunny weather. Or failing that, pack and [plan my route](https://weather-along-route.afi.dev/?ref=blog.afi.io) accordingly.
### Adding a weather overlay to Google Maps Weather
To build the weather layer, we'll use two key endpoints from the Google Weather API:
- [Current Conditions](https://developers.google.com/maps/documentation/weather/current-conditions?ref=blog.afi.io) – Provides the latest weather data for a specific location. This information will appear on that location's map marker.
- [Forecast](https://developers.google.com/maps/documentation/weather/daily-forecast?ref=blog.afi.io) – Returns weather forecasts for up to 10 days, starting from today. We'll display this in a sidebar on the right.
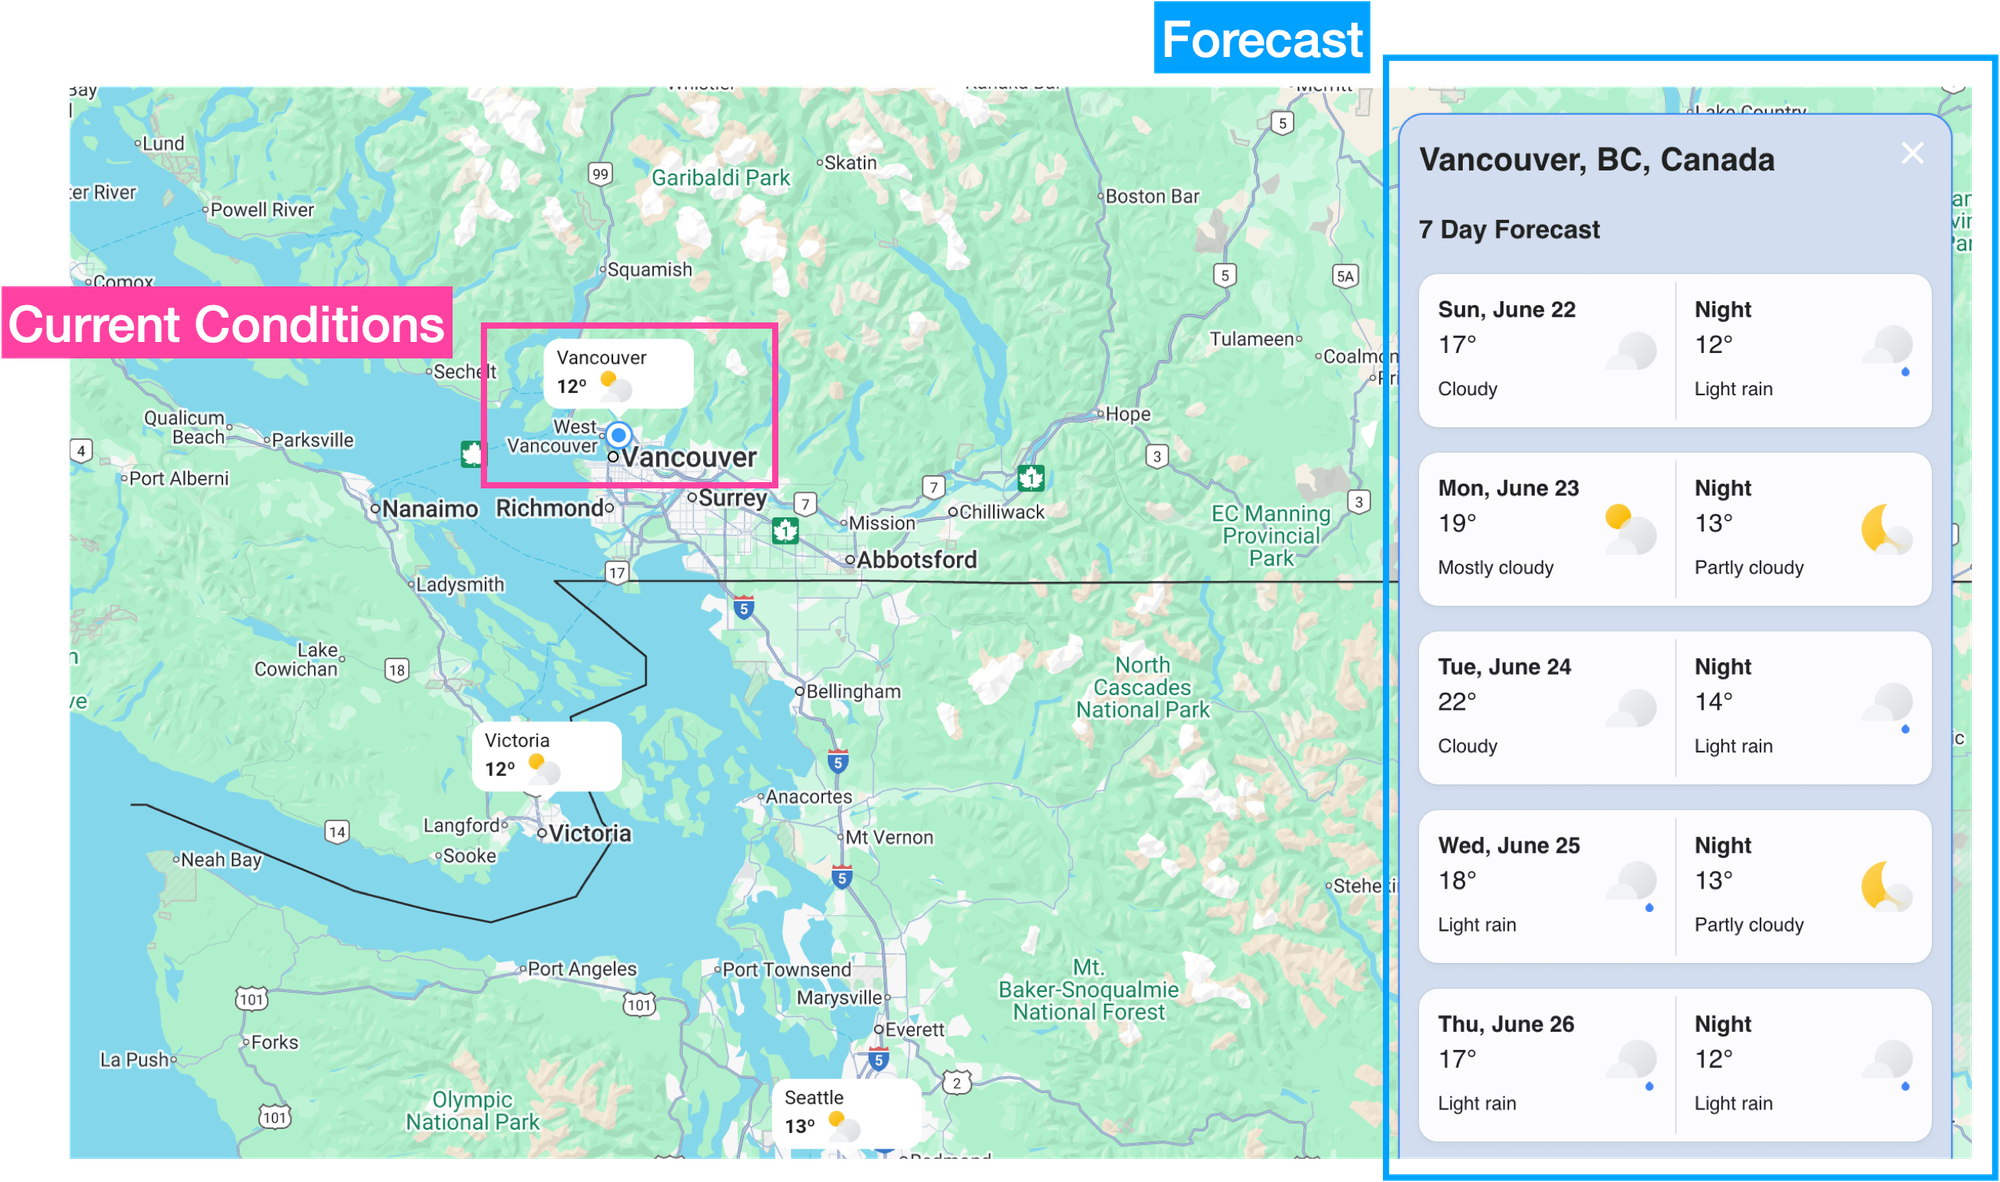
The Current Conditions and Forecast endpoints of the Google Weather API
In the next section, I'll explain how both endpoints work, what data they need, and how to interpret the response.
### Google Maps weather current conditions endpoint
Here's a simple example that shows how to retrieve current weather conditions for Vancouver, Canada (49.246292, -123.116226).
**Endpoint**: `GET`
```
https://weather.googleapis.com/v1/currentConditions:lookup?key={YOUR_API_KEY}
&location.latitude={LATITUDE}
&location.longitude={LONGITUDE}
```
**{YOUR\_API\_KEY}** This is your Google Maps API key with the Google Weather API enabled.
**{LATITUDE}** The latitude coordinates of the location you want to get weather for.
**{LONGITUDE}** The longitude coordinates of the location you want to get weather for.
Using 49.246292, -123.116226 for latitude and longitude gives us:
**Response**
```
{
"currentTime": "2025-06-23T01:25:15.062707123Z",
"timeZone": {
"id": "America/Vancouver"
},
"isDaytime": true,
"weatherCondition": {
"iconBaseUri": "https://maps.gstatic.com/weather/v1/mostly_cloudy",
"description": {
"text": "Mostly cloudy",
"languageCode": "en"
},
"type": "MOSTLY_CLOUDY"
},
"temperature": {
"degrees": 17.6,
"unit": "CELSIUS"
},
"feelsLikeTemperature": {
"degrees": 17.6,
"unit": "CELSIUS"
},
"dewPoint": {
"degrees": 12.2,
"unit": "CELSIUS"
},
"heatIndex": {
"degrees": 17.6,
"unit": "CELSIUS"
},
"windChill": {
"degrees": 17.6,
"unit": "CELSIUS"
},
"relativeHumidity": 71,
"uvIndex": 0,
"precipitation": {
"probability": {
"percent": 7,
"type": "RAIN"
},
"snowQpf": {
"quantity": 0,
"unit": "MILLIMETERS"
},
"qpf": {
"quantity": 0,
"unit": "MILLIMETERS"
}
},
"thunderstormProbability": 0,
"airPressure": {
"meanSeaLevelMillibars": 1019.3
},
"wind": {
"direction": {
"degrees": 180,
"cardinal": "SOUTH"
},
"speed": {
"value": 6,
"unit": "KILOMETERS_PER_HOUR"
},
"gust": {
"value": 15,
"unit": "KILOMETERS_PER_HOUR"
}
},
"visibility": {
"distance": 16,
"unit": "KILOMETERS"
},
"cloudCover": 70,
"currentConditionsHistory": {
"temperatureChange": {
"degrees": 1.2,
"unit": "CELSIUS"
},
"maxTemperature": {
"degrees": 18.2,
"unit": "CELSIUS"
},
"minTemperature": {
"degrees": 11.3,
"unit": "CELSIUS"
},
"snowQpf": {
"quantity": 0,
"unit": "MILLIMETERS"
},
"qpf": {
"quantity": 1.3411,
"unit": "MILLIMETERS"
}
}
}
```
The [Current Conditions](https://developers.google.com/maps/documentation/weather/current-conditions?ref=blog.afi.io) endpoint of the Google Weather API returns detailed real time weather data for a specific location based on its latitude and longitude. To display the weather on a map marker, we'll need to extract two pieces of data from the response:
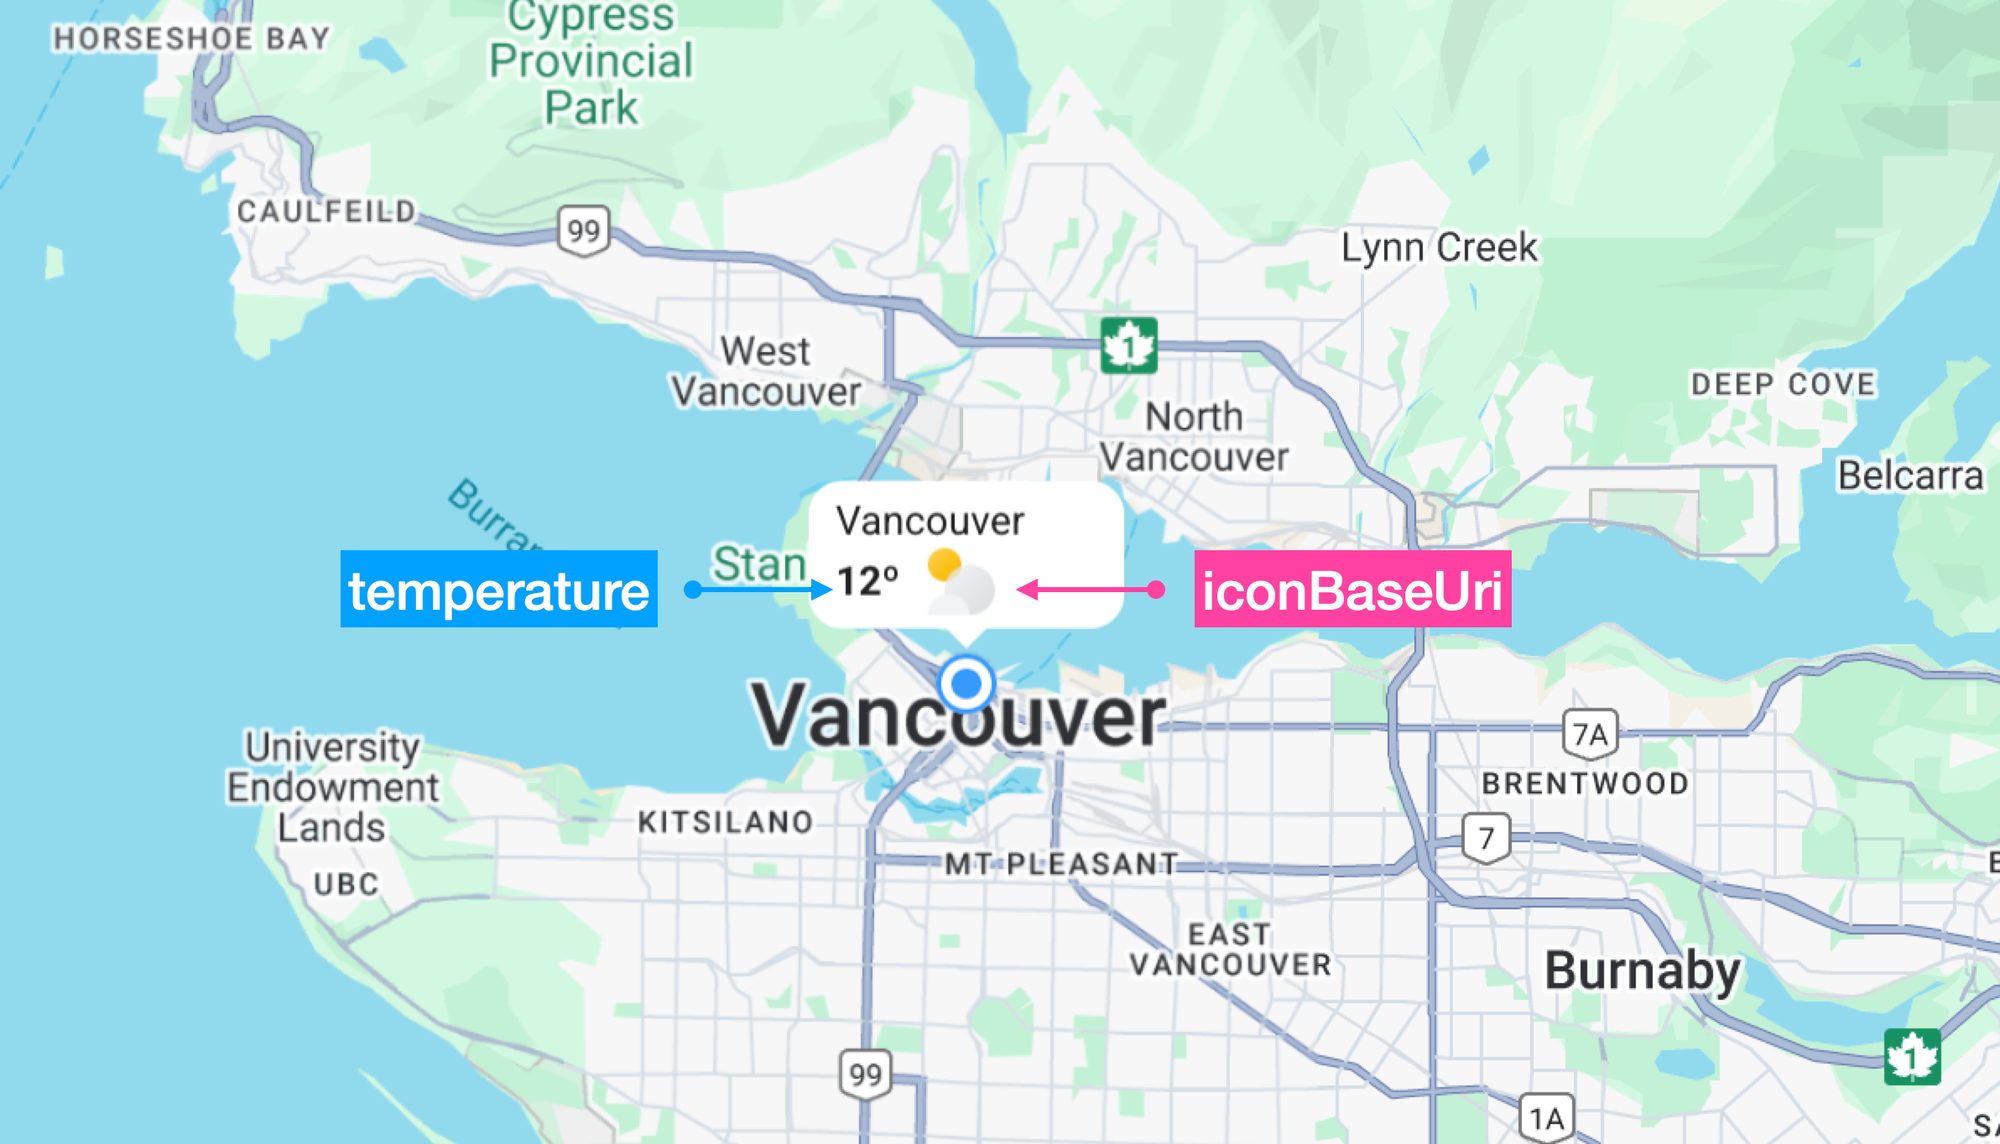
Marker element used to display the location name, temperature and weather
1. `weatherCondition.iconBaseUri`, the URL of the associated weather icon. We append a ".png" or ".svg" to the URL to retrieve the icon directly e.g. [https://maps.gstatic.com/weather/v1/mostly\_cloudy\_night.png](https://maps.gstatic.com/weather/v1/mostly%5Fcloudy%5Fnight.png?ref=blog.afi.io).
2. `temperature`, the temperature for the given location in degrees celsius (switch units to degrees Fahrenheit by adding `unitsSystem=IMPERIAL` to the request).
The place name e.g. "Vancouver" comes from [Place Autocomplete](https://developers.google.com/maps/documentation/places/web-service/place-autocomplete?ref=blog.afi.io) when the user types into the autocomplete search box and selects a location.
### Google Maps weather 7 day forecast endpoint
Here's a different example that shows how to retrieve the seven-day weather forecast for Vancouver, Canada (49.246292, -123.116226).
**Endpoint**: `GET`
```
https://weather.googleapis.com/v1/forecast/days:lookup?key={YOUR_API_KEY}
&location.latitude={LATITUDE}
&location.longitude={LONGITUDE}
&days={DAYS}
```
**{YOUR\_API\_KEY}** is the is your Google Maps API key with the Google Weather API enabled.
**{LATITUDE}** is latitude coordinate of the location you want to get weather for.
**{LONGITUDE}** is the longitude coordinate of the location you want to get weather for.
**{DAYS}** is the number of days you want to get the forecast for. If you don't set it, it defaults to the maximum of 10 days.
**Endpoint:** `GET`
[https://weather.googleapis.com/v1/forecast/days:lookup?key={YOUR\_API\_KEY} &location.latitude=49.246292&location.longitude=-123.116226&days=7](https://weather.googleapis.com/v1/forecast/days:lookup?key={YOUR%5FAPI%5FKEY}%20&location.latitude=49.246292&location.longitude=-123.116226&days=7&ref=blog.afi.io)
**Response**
```
{
"forecastDays": [
{
"interval": {
"startTime": "2025-06-22T14:00:00Z",
"endTime": "2025-06-23T14:00:00Z"
},
"displayDate": {
"year": 2025,
"month": 6,
"day": 22
},
"daytimeForecast": {
"interval": {
"startTime": "2025-06-22T14:00:00Z",
"endTime": "2025-06-23T02:00:00Z"
},
"weatherCondition": {
"iconBaseUri": "https://maps.gstatic.com/weather/v1/mostly_cloudy",
"description": {
"text": "Mostly cloudy",
"languageCode": "en"
},
"type": "MOSTLY_CLOUDY"
},
"relativeHumidity": 77,
"uvIndex": 4,
"precipitation": {
"probability": {
"percent": 20,
"type": "RAIN"
},
"snowQpf": {
"quantity": 0,
"unit": "MILLIMETERS"
},
"qpf": {
"quantity": 0,
"unit": "MILLIMETERS"
}
},
"thunderstormProbability": 0,
"wind": {
"direction": {
"degrees": 152,
"cardinal": "SOUTH_SOUTHEAST"
},
"speed": {
"value": 11,
"unit": "KILOMETERS_PER_HOUR"
},
"gust": {
"value": 21,
"unit": "KILOMETERS_PER_HOUR"
}
},
"cloudCover": 99,
"iceThickness": {
"thickness": 0,
"unit": "MILLIMETERS"
}
},
"nighttimeForecast": {
"interval": {
"startTime": "2025-06-23T02:00:00Z",
"endTime": "2025-06-23T14:00:00Z"
},
"weatherCondition": {
"iconBaseUri": "https://maps.gstatic.com/weather/v1/drizzle",
"description": {
"text": "Light rain",
"languageCode": "en"
},
"type": "LIGHT_RAIN"
},
"relativeHumidity": 85,
"uvIndex": 0,
"precipitation": {
"probability": {
"percent": 20,
"type": "RAIN"
},
"snowQpf": {
"quantity": 0,
"unit": "MILLIMETERS"
},
"qpf": {
"quantity": 0,
"unit": "MILLIMETERS"
}
},
"thunderstormProbability": 10,
"wind": {
"direction": {
"degrees": 108,
"cardinal": "EAST_SOUTHEAST"
},
"speed": {
"value": 14,
"unit": "KILOMETERS_PER_HOUR"
},
"gust": {
"value": 24,
"unit": "KILOMETERS_PER_HOUR"
}
},
"cloudCover": 99,
"iceThickness": {
"thickness": 0,
"unit": "MILLIMETERS"
}
},
"maxTemperature": {
"degrees": 18.2,
"unit": "CELSIUS"
},
"minTemperature": {
"degrees": 12.8,
"unit": "CELSIUS"
},
"feelsLikeMaxTemperature": {
"degrees": 18.2,
"unit": "CELSIUS"
},
"feelsLikeMinTemperature": {
"degrees": 12,
"unit": "CELSIUS"
},
"sunEvents": {
"sunriseTime": "2025-06-22T12:07:17.528986309Z",
"sunsetTime": "2025-06-23T04:21:54.967845012Z"
},
"moonEvents": {
"moonPhase": "WANING_CRESCENT",
"moonriseTimes": [
"2025-06-22T09:21:52.296756418Z"
],
"moonsetTimes": [
"2025-06-23T01:58:48.064038761Z"
]
},
"maxHeatIndex": {
"degrees": 18.2,
"unit": "CELSIUS"
}
},
...// 4 more entries
],
"timeZone": {
"id": "America/Vancouver"
},
"nextPageToken": "ChYKEgkaogp_hp9IQBF5PC0_cMdewBAHEAUYBSIMCLjI48IGEIKPsLgBKhFBbWVyaWNhL1ZhbmNvdXZlcg=="
}
```
The response from the [Forecast](https://developers.google.com/maps/documentation/weather/daily-forecast?ref=blog.afi.io) endpoint of the Google Weather API is an array, `forecastDays`, where each entry represents the daily weather forecast at a given location.
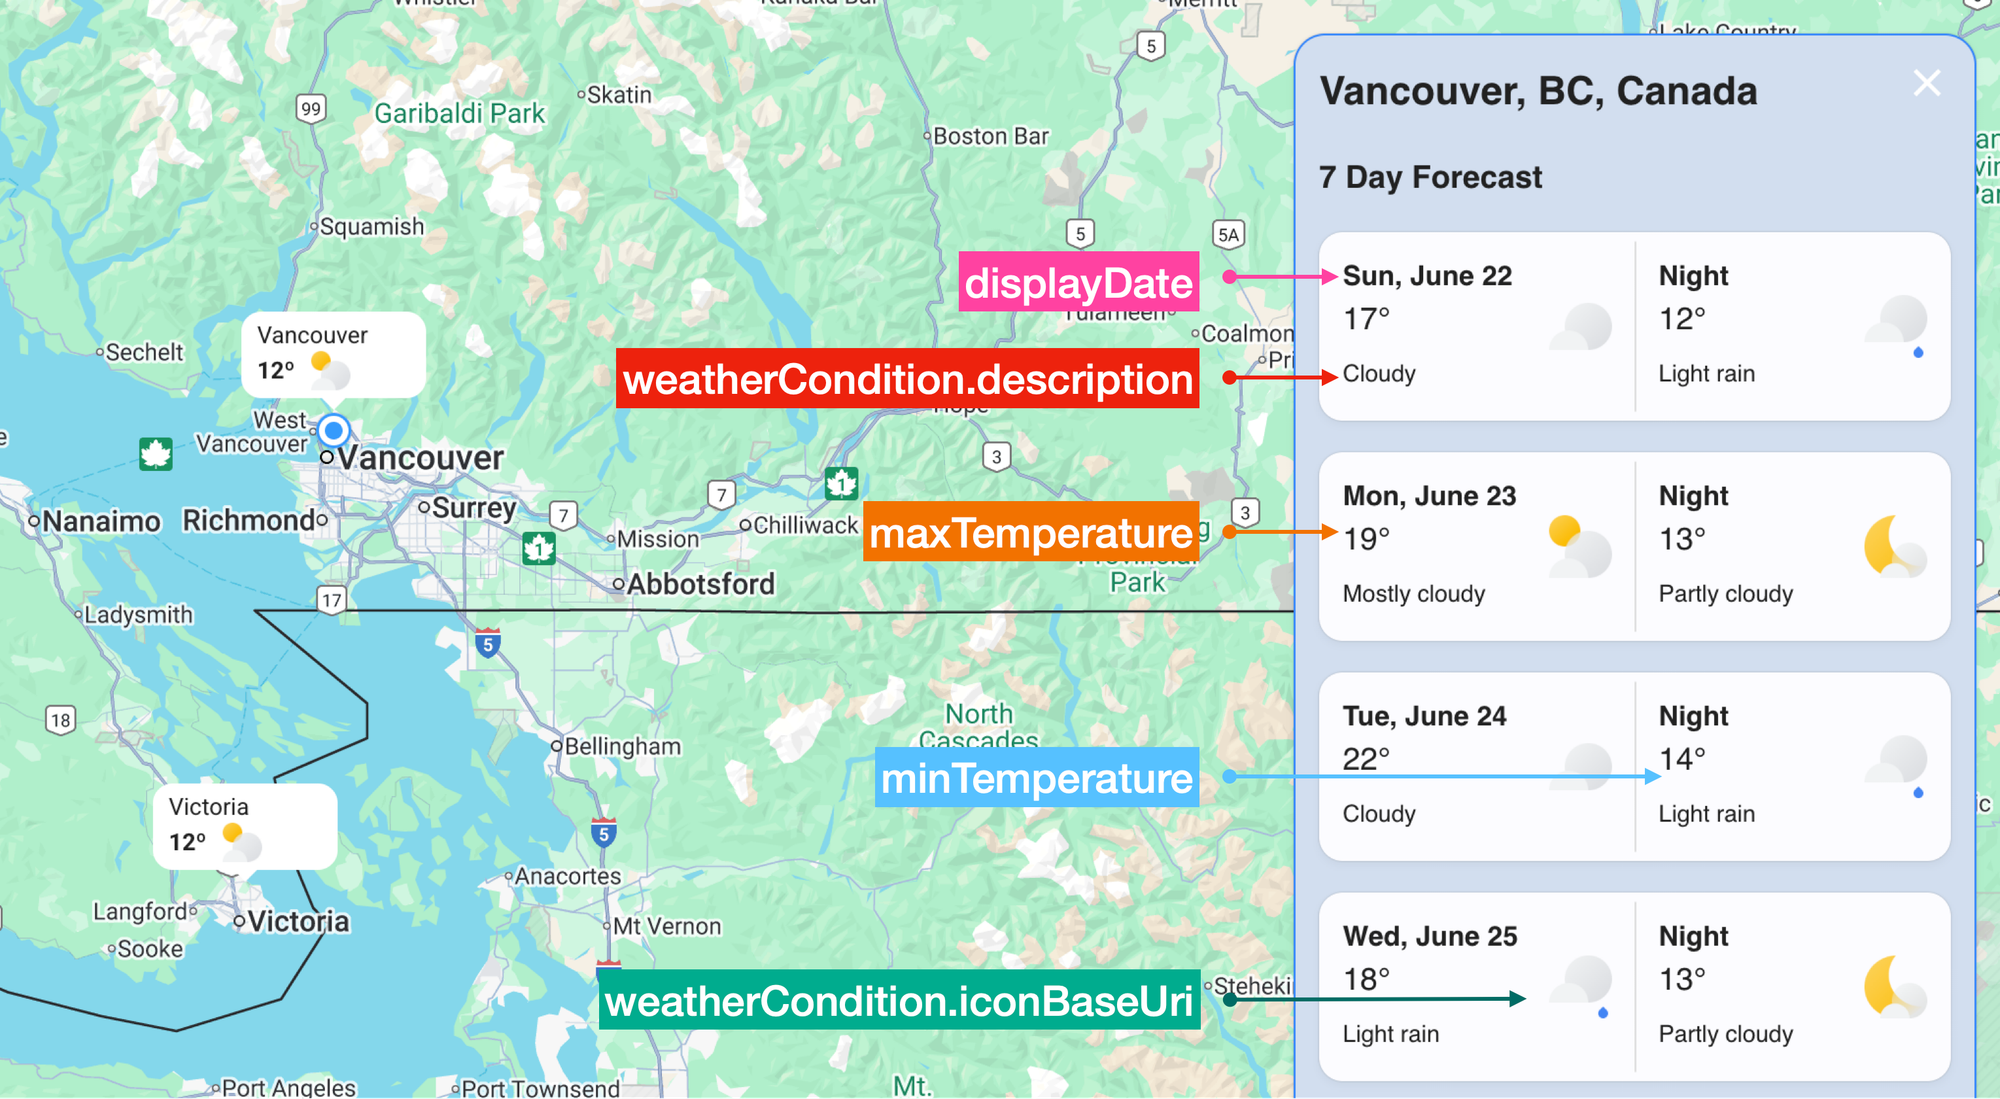
The key fields we extract from the response are:
1. `displayDate`, a human readable date (`year`, `month`, and `day`) that we display on the frontend in `ddd, MMMM D` format e.g. "Sun, June 22" using the ever so useful [dayjs library](https://day.js.org/?ref=blog.afi.io).
2. `weatherCondition.description`, a human readable summary of the forecasted weather e.g. "Cloudy", "Mostly Cloudy" or "Light Rain".
3. `maxTemperature`, the forecasted maximum (high) temperature during the day.
4. `minTemperature`, the forecasted minimum (low) temperature at night.
5. `weatherCondition.iconBaseUri`, the URL of the associated weather icon.
### Building a Google Maps weather app
In this last section, I'll show you how to build a Google Maps weather app comparable to popular online weather services such as [Weather Underground](https://www.wunderground.com/wundermap?ref=blog.afi.io), [Weather.gov](https://www.weather.gov/forecastmaps/?ref=blog.afi.io), [Windy](https://www.windy.com/?ref=blog.afi.io) and [Zoom Earth](https://zoom.earth/?ref=blog.afi.io).
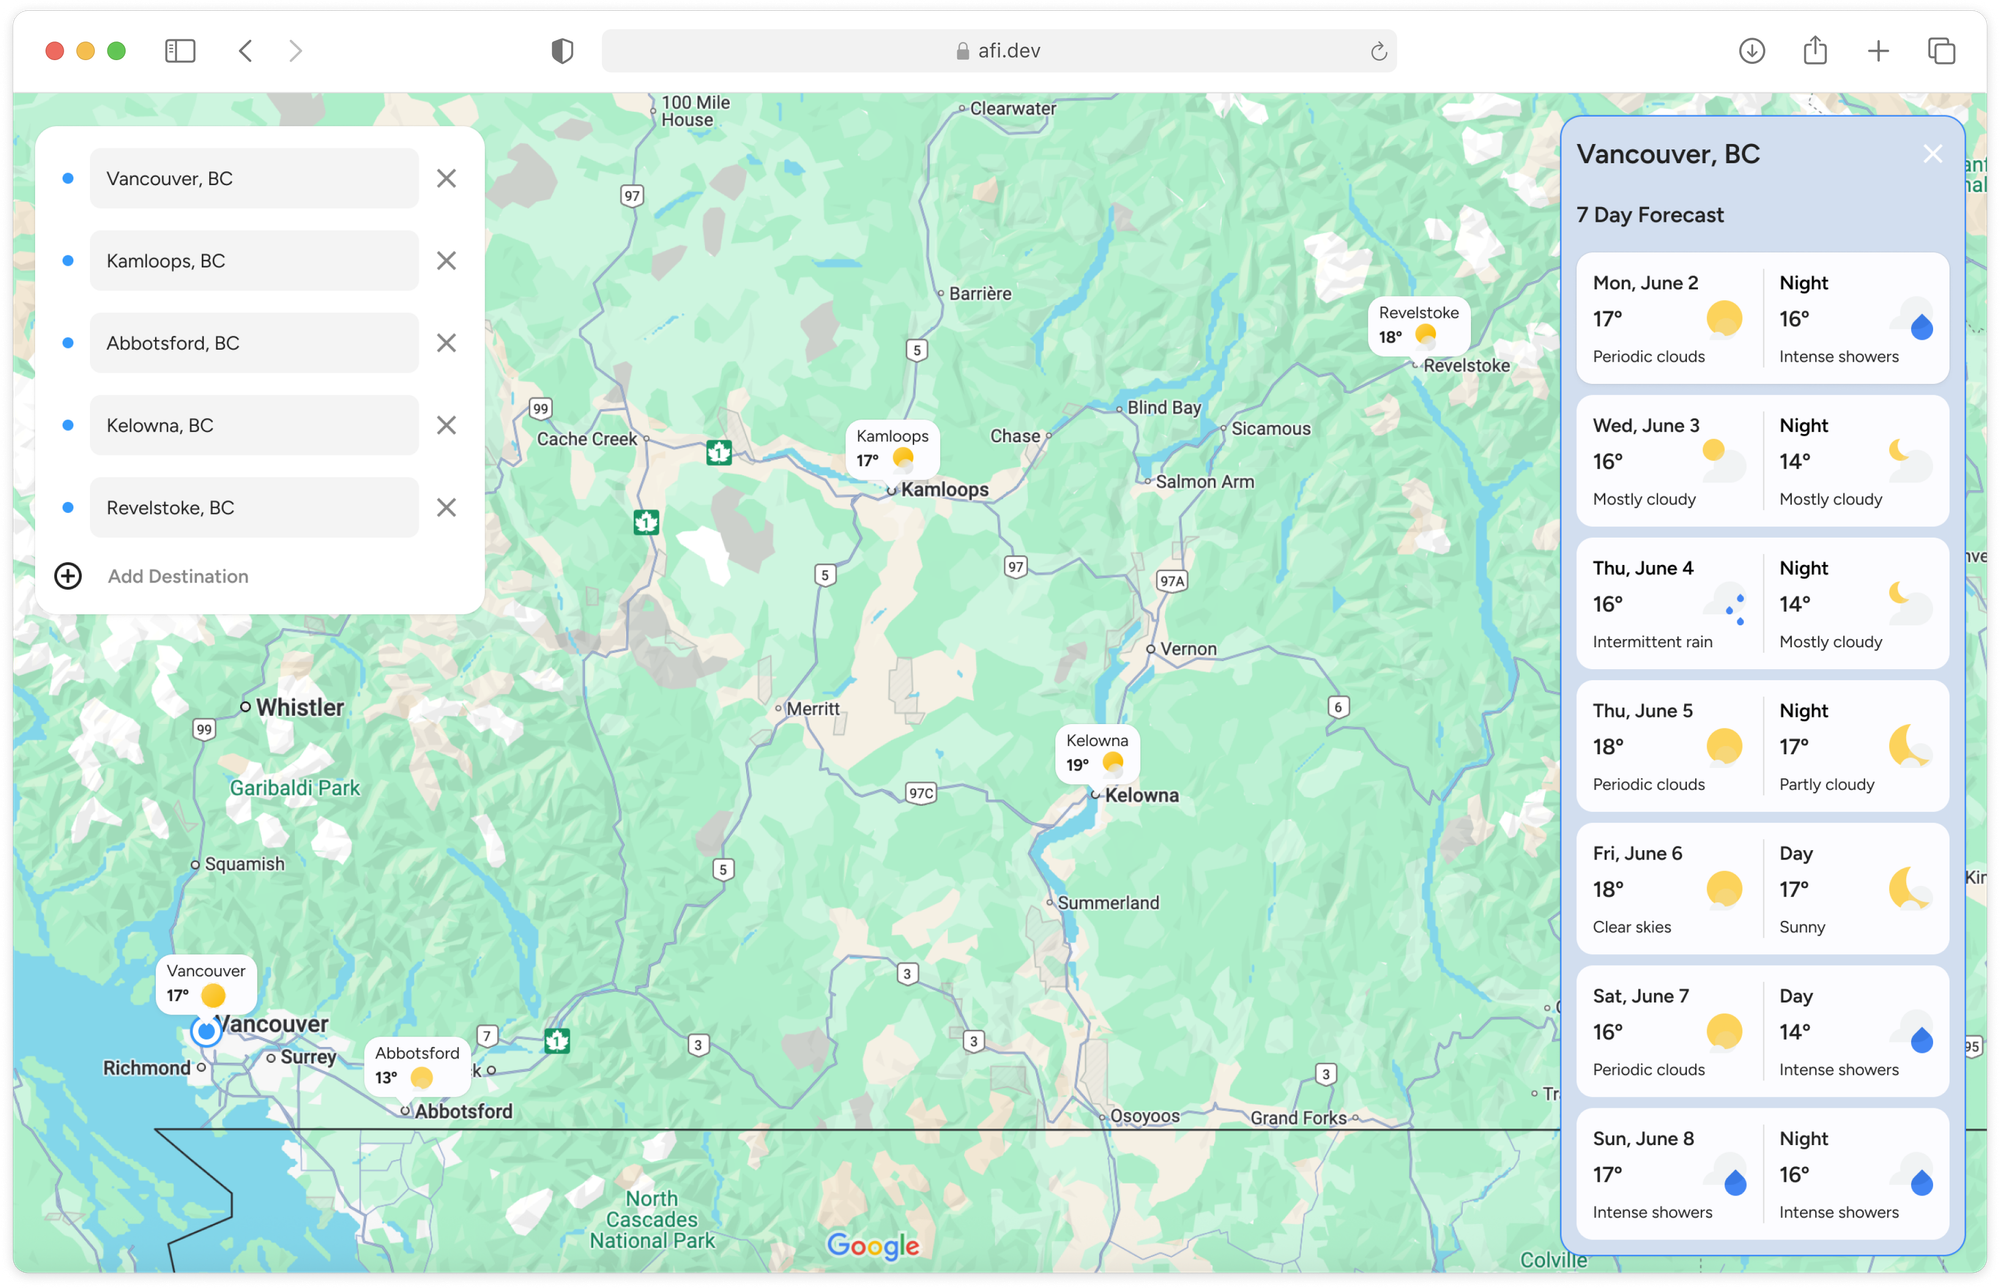
The Google Maps Weather app with several locations in British Columbia selected
There are two ways to follow along. If you have some software engineering experience, you should fork [google\_maps\_weather](https://github.com/afilabs/google%5Fmaps%5Fweather?ref=blog.afi.io) and run the app locally. Try making small tweaks e.g. changing marker styles and reload the app to see if the changes worked. If you don't want to pull code from GitHub, you can still play around with a live demo at [https://google-maps-weather.afi.dev/](https://google-maps-weather.afi.dev/?ref=blog.afi.io).
### How our code is organized
[google\_maps\_weather](https://github.com/afilabs/google%5Fmaps%5Fweather?ref=blog.afi.io) overlays current weather conditions on a Google Map. It works together with [google\_weather\_backend](https://github.com/afilabs/google%5Fweather%5Fbackend?ref=blog.afi.io), which retrieves place data from [Google Place Autocomplete](https://developers.google.com/maps/documentation/places/web-service/place-autocomplete?ref=blog.afi.io) and fetches weather information from the [Current Conditions](https://developers.google.com/maps/documentation/weather/current-conditions?ref=blog.afi.io) and [Forecast Days](https://developers.google.com/maps/documentation/weather/daily-forecast?ref=blog.afi.io) endpoints of the [Google Weather API](https://developers.google.com/maps/documentation/weather?ref=blog.afi.io).
**App.jsx**
`App.jsx` is the main entry point of the app. It defines the layout, handles state, and fetches data from the Google Places and Weather APIs.
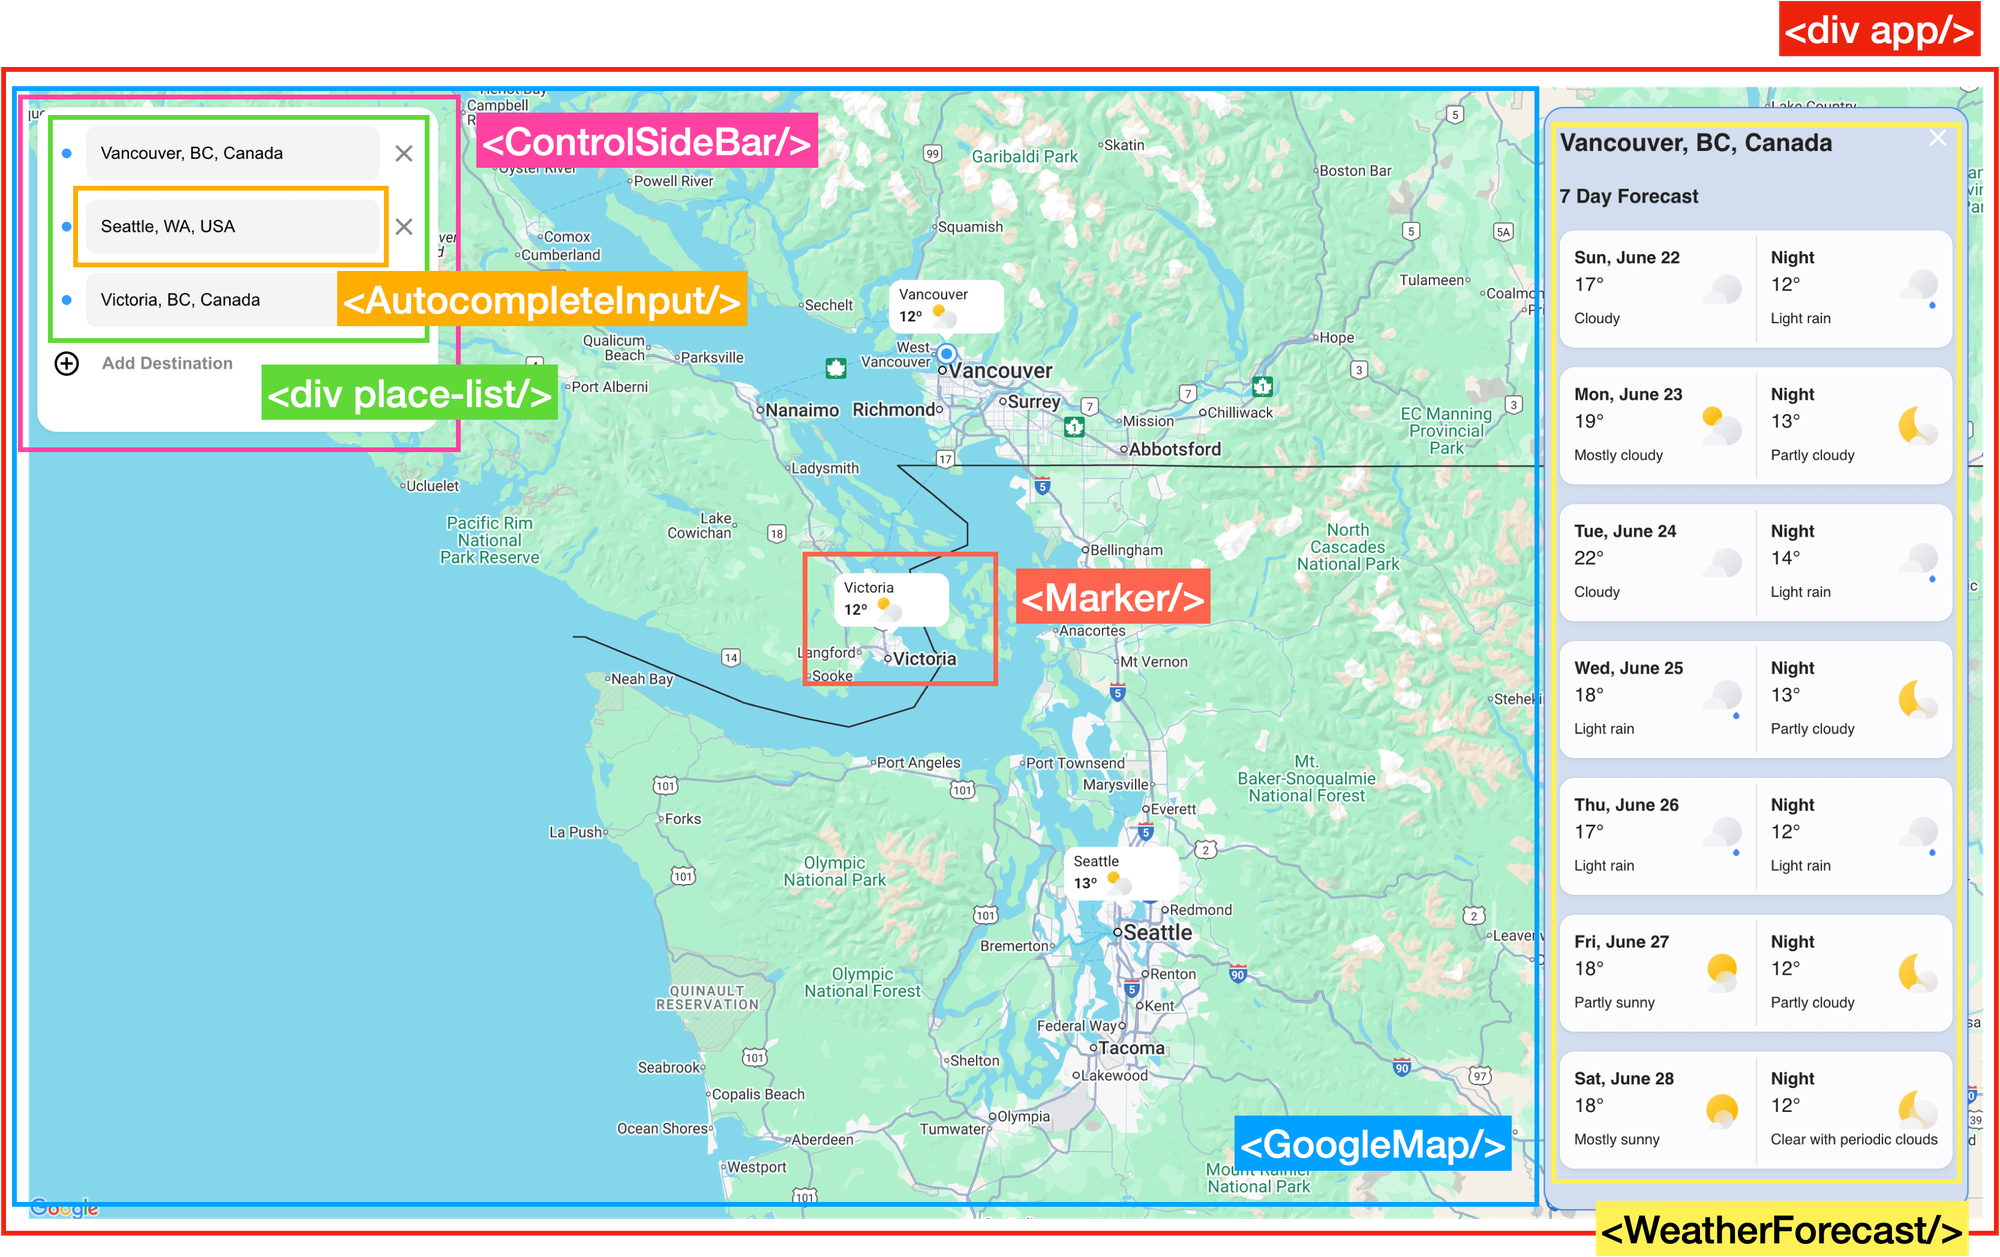
How our Google Maps Weather app is structured
`App.jsx` has three child components:
`` displays a list of [Place Autocomplete](https://developers.google.com/maps/documentation/places/web-service/legacy/autocomplete?ref=blog.afi.io) search boxes where users can look up and select locations to see weather information
``: Displays the seven day weather forecast for the selected location using the Weather API's [Forecast](https://developers.google.com/maps/documentation/weather/daily-forecast?ref=blog.afi.io) endpoint.
``: A wrapper for the react-google-maps [ component](https://visgl.github.io/react-google-maps/docs/api-reference/components/map?ref=blog.afi.io). It's responsible for displaying `` components and adjusting the viewport each time a new location is added so that all the locations are visible on the map.
`App.jsx` is also responsible for implementing an API loading wrapper design pattern to fetch data from the Google Weather API whenever a new location is selected. In `handleSetActive()`, `App.jsx` calls the `fetchForecast()` function from `/services/google.js`, passing in `noOfDays`, `latitude`, and `longitude` to retrieve the seven-day forecast for the selected location.
```
/*** App.jsx ***/
const handleSetActive = async (place) => {
if (!place) return;
setActivePlace((prev) => (prev?.place_id === place.place_id ? null : place));
const result = await fetchForecast({
noOfDays: 7,
latitude: place.geometry.location.lat(),
longitude: place.geometry.location.lng(),
});
setNextForecast(result);
};
```
Similarly, in the `useEffect()` method, `App.jsx` calls the `fetchWeatherData()` method of `/services/google.js` to get the current weather at that location.
```
useEffect(() => {
const newValidPlaces = places.filter(
(place) => place.place_id && !placeWeatherData[place.place_id],
);
newValidPlaces.forEach(async (place) => {
const position = {
lat: place.geometry.location.lat(),
lng: place.geometry.location.lng(),
};
const weather = await fetchWeatherData(position);
setPlaceWeatherData((prev) => ({ ...prev, [place.place_id]: weather }));
});
}, [places]);
```
**Google.js**
`google.js` acts as a service layer for interacting with the [Google Weather API](https://developers.google.com/maps/documentation/weather?ref=blog.afi.io). It contains helper functions that wrap API calls to fetch weather data. For example, the `fetchForecast()` method we called in `App.jsx` retrieves a multi day forecast for a specific location based on the number of days (`noOfDays`) and geographic coordinates (`latitude` and `longitude`).
```
/*** services/google.js ***/
export const fetchForecast = async ({ noOfDays, latitude, longitude }) => {
try {
const response = await axios.get(`${WEATHER_API_URL}/forecast`, {
params: { latitude, longitude, days: noOfDays },
});
if (
!response.data.forecastDays ||
response.data.forecastDays.length === 0
) {
throw new Error("No forecast data available");
}
return response.data.forecastDays;
} catch (error) {
if (error.response) {
throw new Error(`Server error: ${error.response.status}`);
} else if (error.request) {
throw new Error("No response from server");
} else {
throw new Error(`Request error: ${error.message}`);
}
}
};
```
`fetchForecast()` uses [Axios](https://axios-http.com/docs/intro?ref=blog.afi.io), a popular promise-based HTTP client for Javascript. Here's how it works:
1. First, we import Axios at the top of `google.js`.
```
import axios from 'axios';
```
1. Next, we uses `axios.get` to make a GET call to the Forecast Days endpoint ([https://weather.googleapis.com/v1/forecast/days:lookup](https://weather.googleapis.com/v1/forecast/days:lookup?ref=blog.afi.io)) of the Google Weather API (`WEATHER_API_URL` points to [google\_weather\_backend](https://github.com/afilabs/google%5Fweather%5Fbackend?ref=blog.afi.io), which makes the follow-on API call to the Google Weather API).
```
const response = await axios.get(`${WEATHER_API_URL}/forecast`, {
params: { latitude, longitude, days: noOfDays },
});
```
1. Axios automatically parses the JSON response and handles any errors with a try/catch code block. This lets us distinguish between server errors (like 500), network failures (no response) by throwing a specific error message for each case.
```
try {
//... Axios GET call
return response.data.forecastDays;
} catch (error) {
if (error.response) {
throw new Error(`Server error: ${error.response.status}`);
} else if (error.request) {
throw new Error("No response from server");
} else {
throw new Error(`Request error: ${error.message}`);
}
}
```
Similarly, the `fetchCurrentWeather()` function in `google.js` uses Axios to call the [Current Conditions](https://developers.google.com/maps/documentation/weather/current-conditions?ref=blog.afi.io) endpoint of the Google Weather API. It then simplifies the response to include only the time, time zone, temperature in degrees, and a weather icon URL representing the conditions at the selected location.
```
/*** services/google.js ***/
export const fetchCurrentWeather = async (location) => {
try {
const { lat, lng } = location;
const response = await axios.get(`${WEATHER_API_URL}/current-conditions`, {
params: { latitude: lat, longitude: lng },
});
const parsedResponse = {
time: response.data.currentTime,
timeZone: response.data.timeZone.id,
degree: response.data.temperature.degrees,
iconUrl: response.data.weatherCondition.iconBaseUri + ".png",
};
return parsedResponse;
} catch (error) {
console.error("Error fetching weather data:", error);
throw error;
}
};
```
In summary, the code in `google.js` acts as an API wrapper that retrieves current and daily weather forecasts from the Google Weather API, and formats the responses to make it easy to use throughout the app.
**ControlSideBar.jsx**
`ControlSideBar.jsx` is a React UI panel that allows users to manage the list of destination places. The component doesn’t hold its own state - it knows what to render based on the data contained in the `places` array which it receives as a prop from `App.jsx`.
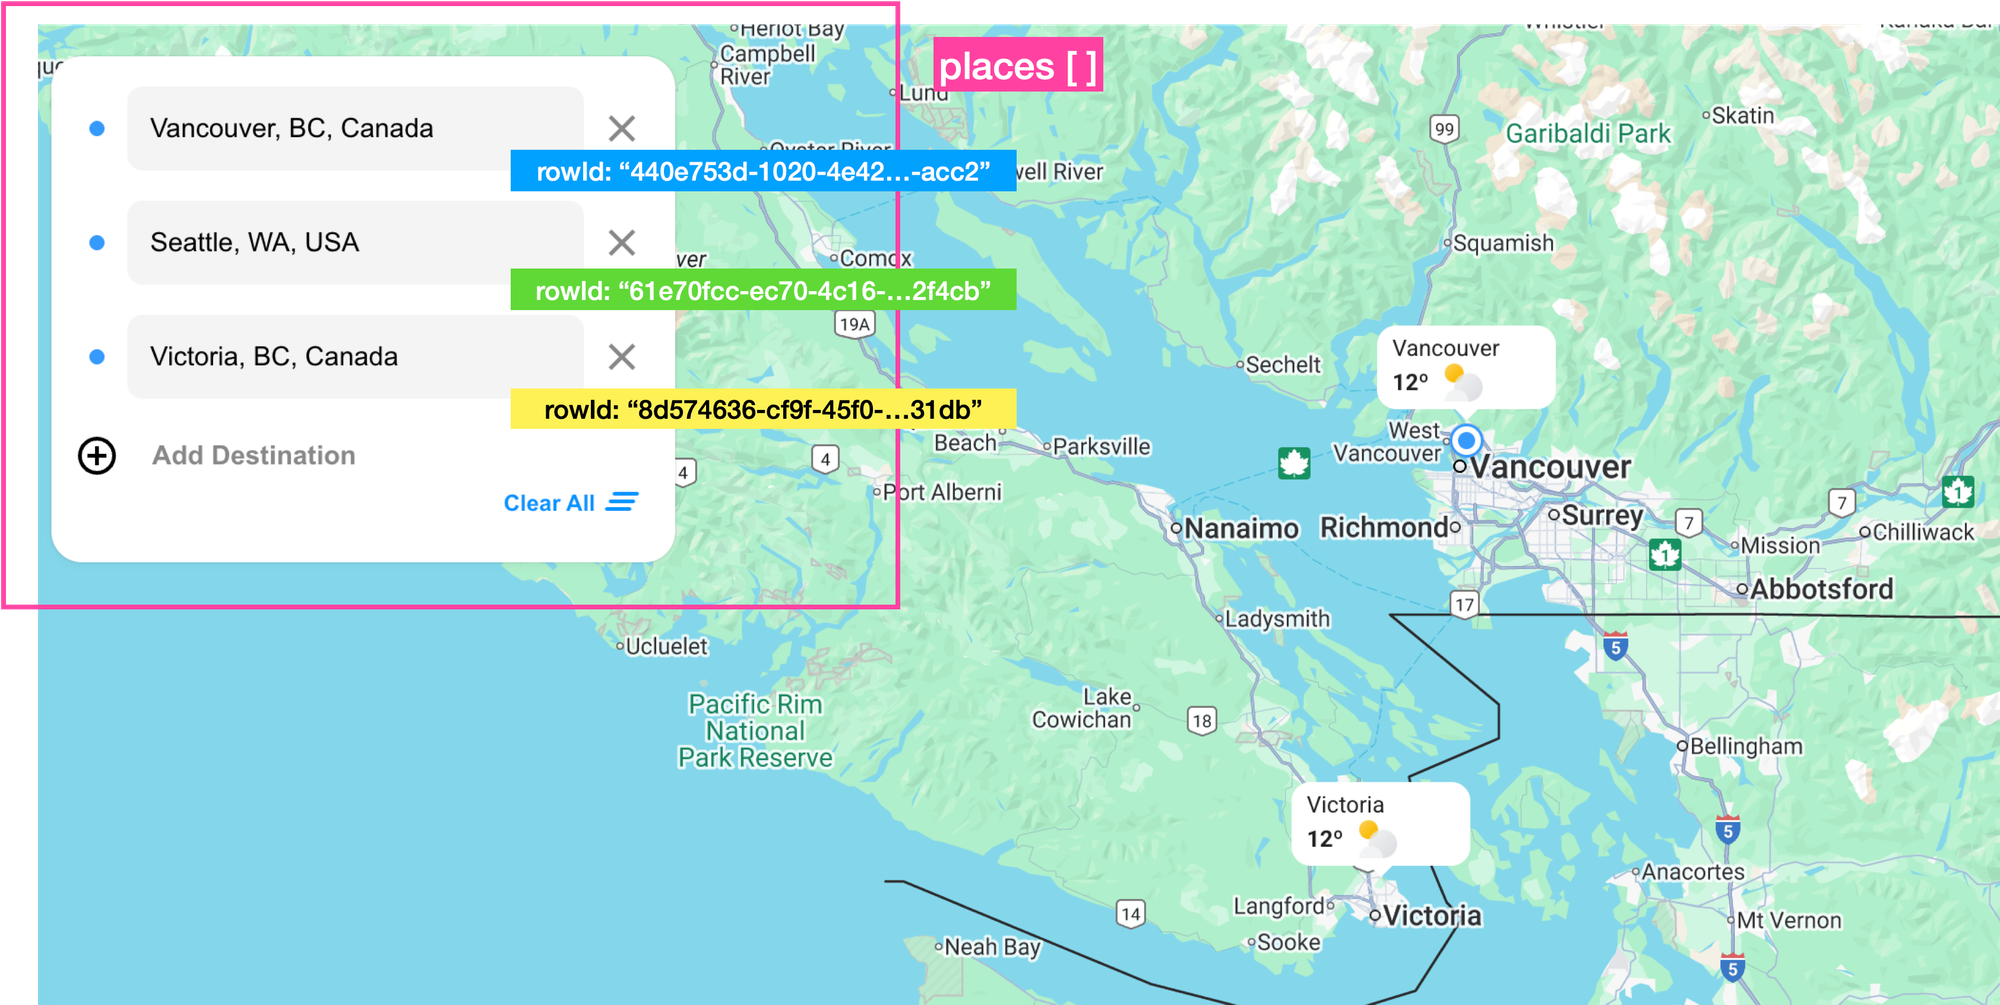
Unique row ids are used to identify each location in the side bar
Each time the `places` array is updated, for example when you click \[Add Destination\] and enter a valid address, `ControlSideBar.jsx` loops through the places array and renders a `place-item` div, each with a visual marker (`.eclipse`), an `` text box and an \[x\] icon that removes the item using `onRemovePlace()`.
```
/*** components/ControlSideBar.jsx ***/
import AutocompleteInput from "./AutocompleteInput";
import Icon from "./Icon";
import "./ControlSideBar.scss";
const ControlSideBar = ({
places,
onAddPlace,
onPlaceUpdate,
onRemovePlace,
onClearAll,
}) => {
return (
);
};
export default ControlSideBar;
```
Removing a place
The `onRemovePlace()` prop is linked to the `handleRemovePlace()` function in the parent `App.jsx`. This function updates the `places` array in state by filtering out the place with a matching `rowId`. Specifically, it uses `.filter((place) => place.rowId !== id)` to create a new array that excludes the place with the given `id`. As a result, the place is removed from both the `` and the map.
```
/*** App.jsx ***/
const handleRemovePlace = (id) => {
setPlaces((prev) => prev.filter((place) => place.rowId !== id));
//... code to remove weather data
};
```
Adding a place
When the user clicks the \[Add Destination\] button, the `onAddPlace()` function (passed in as a prop) is called. This function maps to `handleAddPlace()` in the parent `App.jsx`. In side `handleAddPlace()`, we assign the new `place` object a randomly generated `rowId` and add it to the existing array of `places` stored in React state i.e. it is saved to a new array that includes all previous items plus the new one.
```
/*** App.jsx ***/
const handleAddPlace = () => {
const newId = crypto.randomUUID();
setPlaces((prev) => [...prev, { rowId: newId }]);
};
```
Now, a new place object with only a `rowId` is added to the `places` array. When the `` component re-renders, a new `place-item` `
` appears at the end of the list, using the new `place` object's `rowId` as its `key` value.
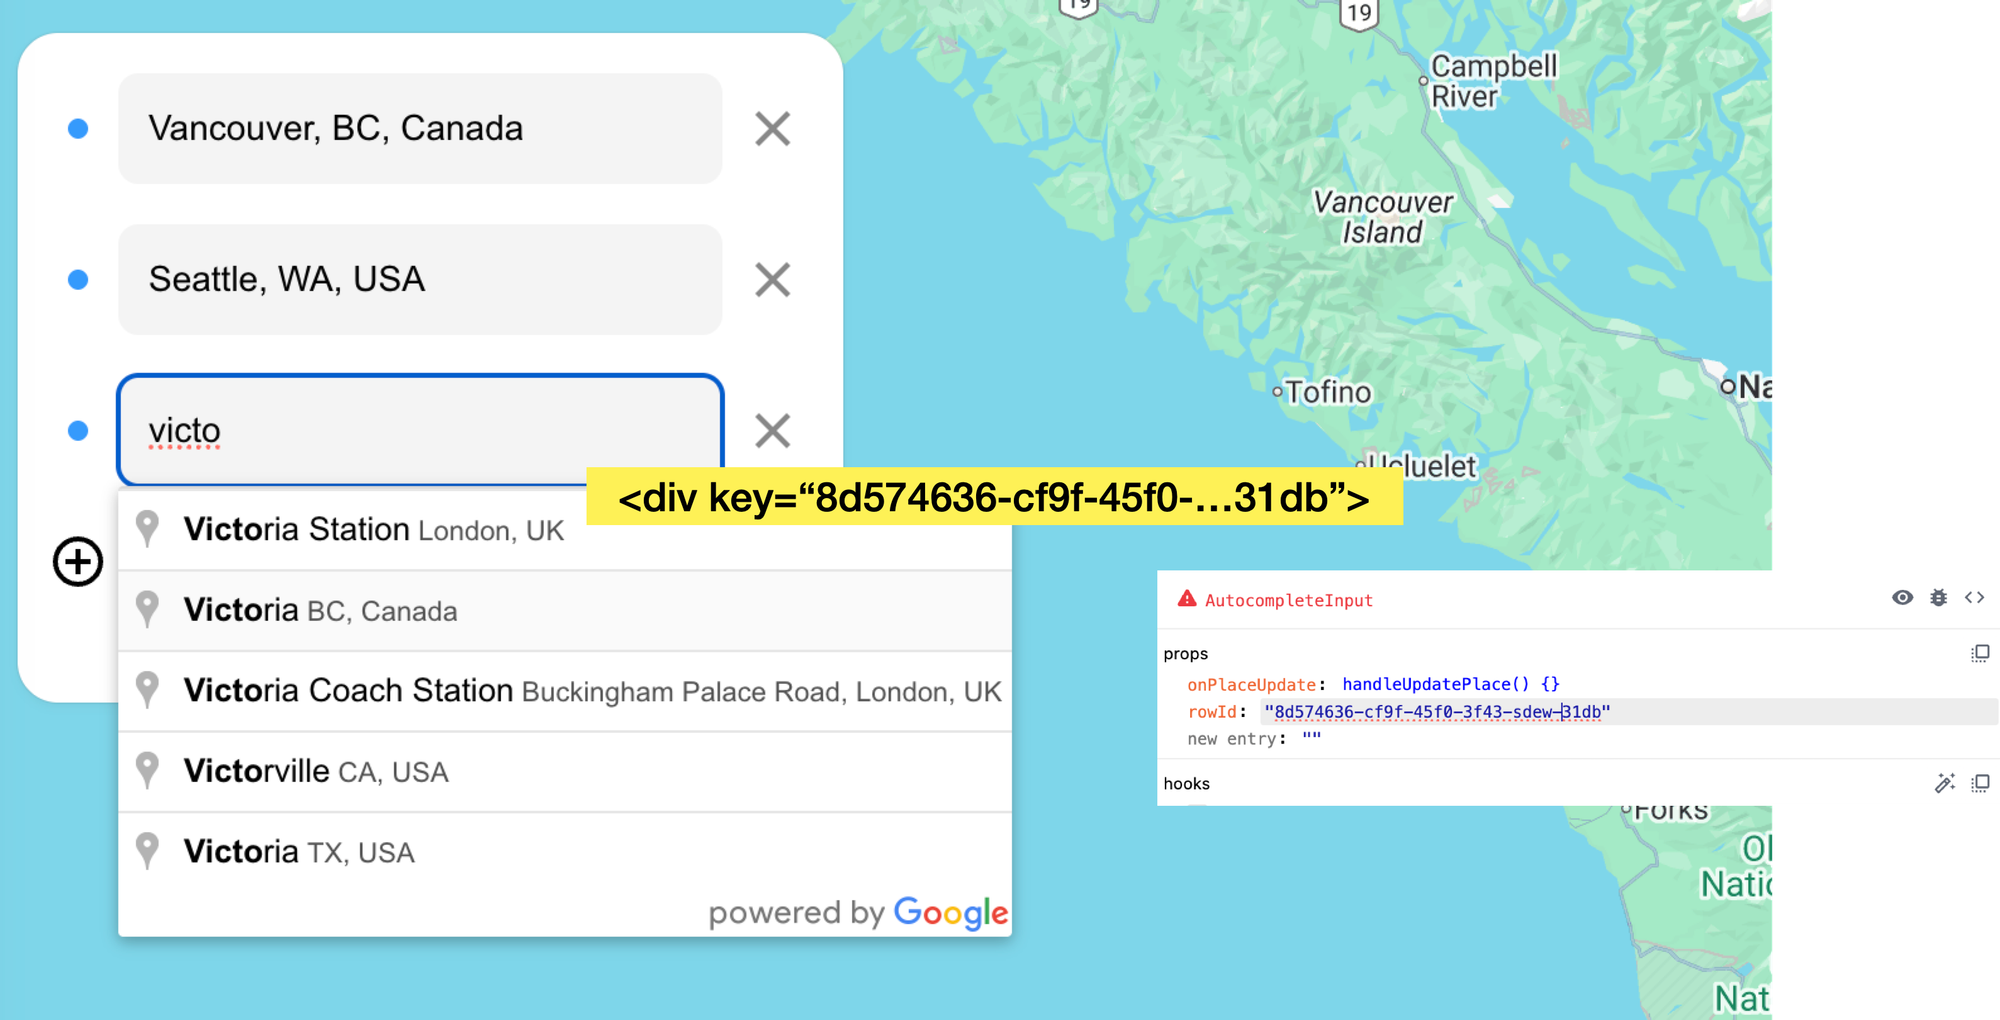
Binding Google Place Autocomplete results with unique row ids
**AutocompleteInput.jsx**
The `` component, as the name suggests, contains a text input field that uses [Google Places Autocomplete](https://blog.afi.io/blog/google-address-autocomplete-with-the-places-api/) to suggest places dynamically as the user types. When the user selects a place from the dropdown menu, Google triggers a `place_changed` event on the Autocomplete instance.
🌐
For a more detailed explanation of how Google Place Autocomplete works, see [Google address autocomplete with the Places API](https://blog.afi.io/blog/google-address-autocomplete-with-the-places-api/).
`AutocompleteInput.jsx` listens for this event, uses `getPlace()` to retrieve the selected place's details (`place_id`, `geometry`, `name`, and `formatted_address`), and then calls `onPlaceUpdate()` to pass both the `rowId` and `place` data to its parent component.
```
/*** components/AutocompleteInput.jsx ***/
import { useMapsLibrary } from "@vis.gl/react-google-maps";
import { useEffect, useRef, useState } from "react";
import "./AutocompleteInput.scss";
const AutocompleteInput = ({ onPlaceUpdate, rowId }) => {
const [placeAutocomplete, setPlaceAutocomplete] = useState(null);
const inputRef = useRef(null);
const places = useMapsLibrary("places");
useEffect(() => {
if (!places || !inputRef.current) return;
const options = {
fields: ["place_id", "geometry", "name", "formatted_address"],
};
setPlaceAutocomplete(new places.Autocomplete(inputRef.current, options));
}, [places]);
useEffect(() => {
if (!placeAutocomplete) return;
placeAutocomplete.addListener("place_changed", () => {
const place = placeAutocomplete.getPlace();
onPlaceUpdate(rowId, place);
});
}, [onPlaceUpdate, placeAutocomplete]);
return (
);
};
export default AutocompleteInput;
```
`onPlaceUpdate()` points to the `handleUpdatePlace()` method in `App.jsx`, which takes an `id` and a `place` object as arguments. This method cleverly updates the `places` array in state by taking the current state (`prev`) and mapping through each `place` object (`dest`, for destination) in the array and checking to see if the `rowId` matches the given `id`. f it does, it returns a new object that merges the existing data (`dest`) with the updated place data (`place`); otherwise, it leaves the item unchanged.
```
/*** App.jsx ***/
const handleUpdatePlace = (id, place) => {
setPlaces((prev) => {
return prev.map((dest) =>
dest.rowId === id ? { ...dest, ...place } : dest,
);
});
};
```
This approach works for both newly added locations and updates to existing ones on the map. The `places` array is then passed to `` as a prop, allowing it to place markers that show the current weather at each location.
```
;
```
**GoogleMap.jsx**
`GoogleMap.jsx` (`components/GoogleMap/index.jsx`) is a wrapper for the [react-google-maps](https://visgl.github.io/react-google-maps/?ref=blog.afi.io) component, which is itself a React wrapper around the [Google Maps Javascript API](https://developers.google.com/maps/documentation/javascript/overview?ref=blog.afi.io). It loads and initializes a Google Map instance in the DOM, lets us specify the map’s center, zoom level, and other options via props and acts as a parent container for the `` component, which we use to display current weather conditions on the map.
This is done by first filtering the `places` array and keeping only the `places` that have a valid `place_id`, and then iterating over this new array and adding a `` component at each place's position. Each `place` object is a Google Maps `PlaceResult` ([docs](https://developers.google.com/maps/documentation/javascript/reference/places-service?ref=blog.afi.io#PlaceResult)), so we can use the `geometry.location.lat()` and `geometry.location.lng()` methods to retrieve its latitude and longitude coordinates.
To retrieve the current weather conditions for each place, we use its unique `place_id` as the key in the `placeCurrentWeatherData` object like this: `const weatherData = placeCurrentWeatherData[marker.place_id];`. This weather data is immediately passed to `` as a prop.
```
/*** components/GoogleMap/index.jsx ***/
import { Map, useMap } from "@vis.gl/react-google-maps";
import MapHandler from "./MapHandler";
import Marker from "./Marker";
import { DEFAULT_MAP_CENTER, DEFAULT_MAP_ZOOM } from "~/constants";
const MAP_ID = import.meta.env.VITE_GOOGLE_MAP_ID;
const GoogleMap = ({
places,
placeCurrentWeatherData,
activePlace,
onSelectPlace,
}) => {
const map = useMap();
const markers = places.filter((place) => place.place_id);
return (
);
};
export default GoogleMap;
```
**Marker.js**
The `` component, located in `components/GoogleMap/index.jsx` is a wrapper for Google Map's [AdvancedMarkerElement](https://developers.google.com/maps/documentation/javascript/reference/advanced-markers?ref=blog.afi.io#AdvancedMarkerElement), which allows us to fully customize our location marker using a combination of SVGs, HTML and CSS..
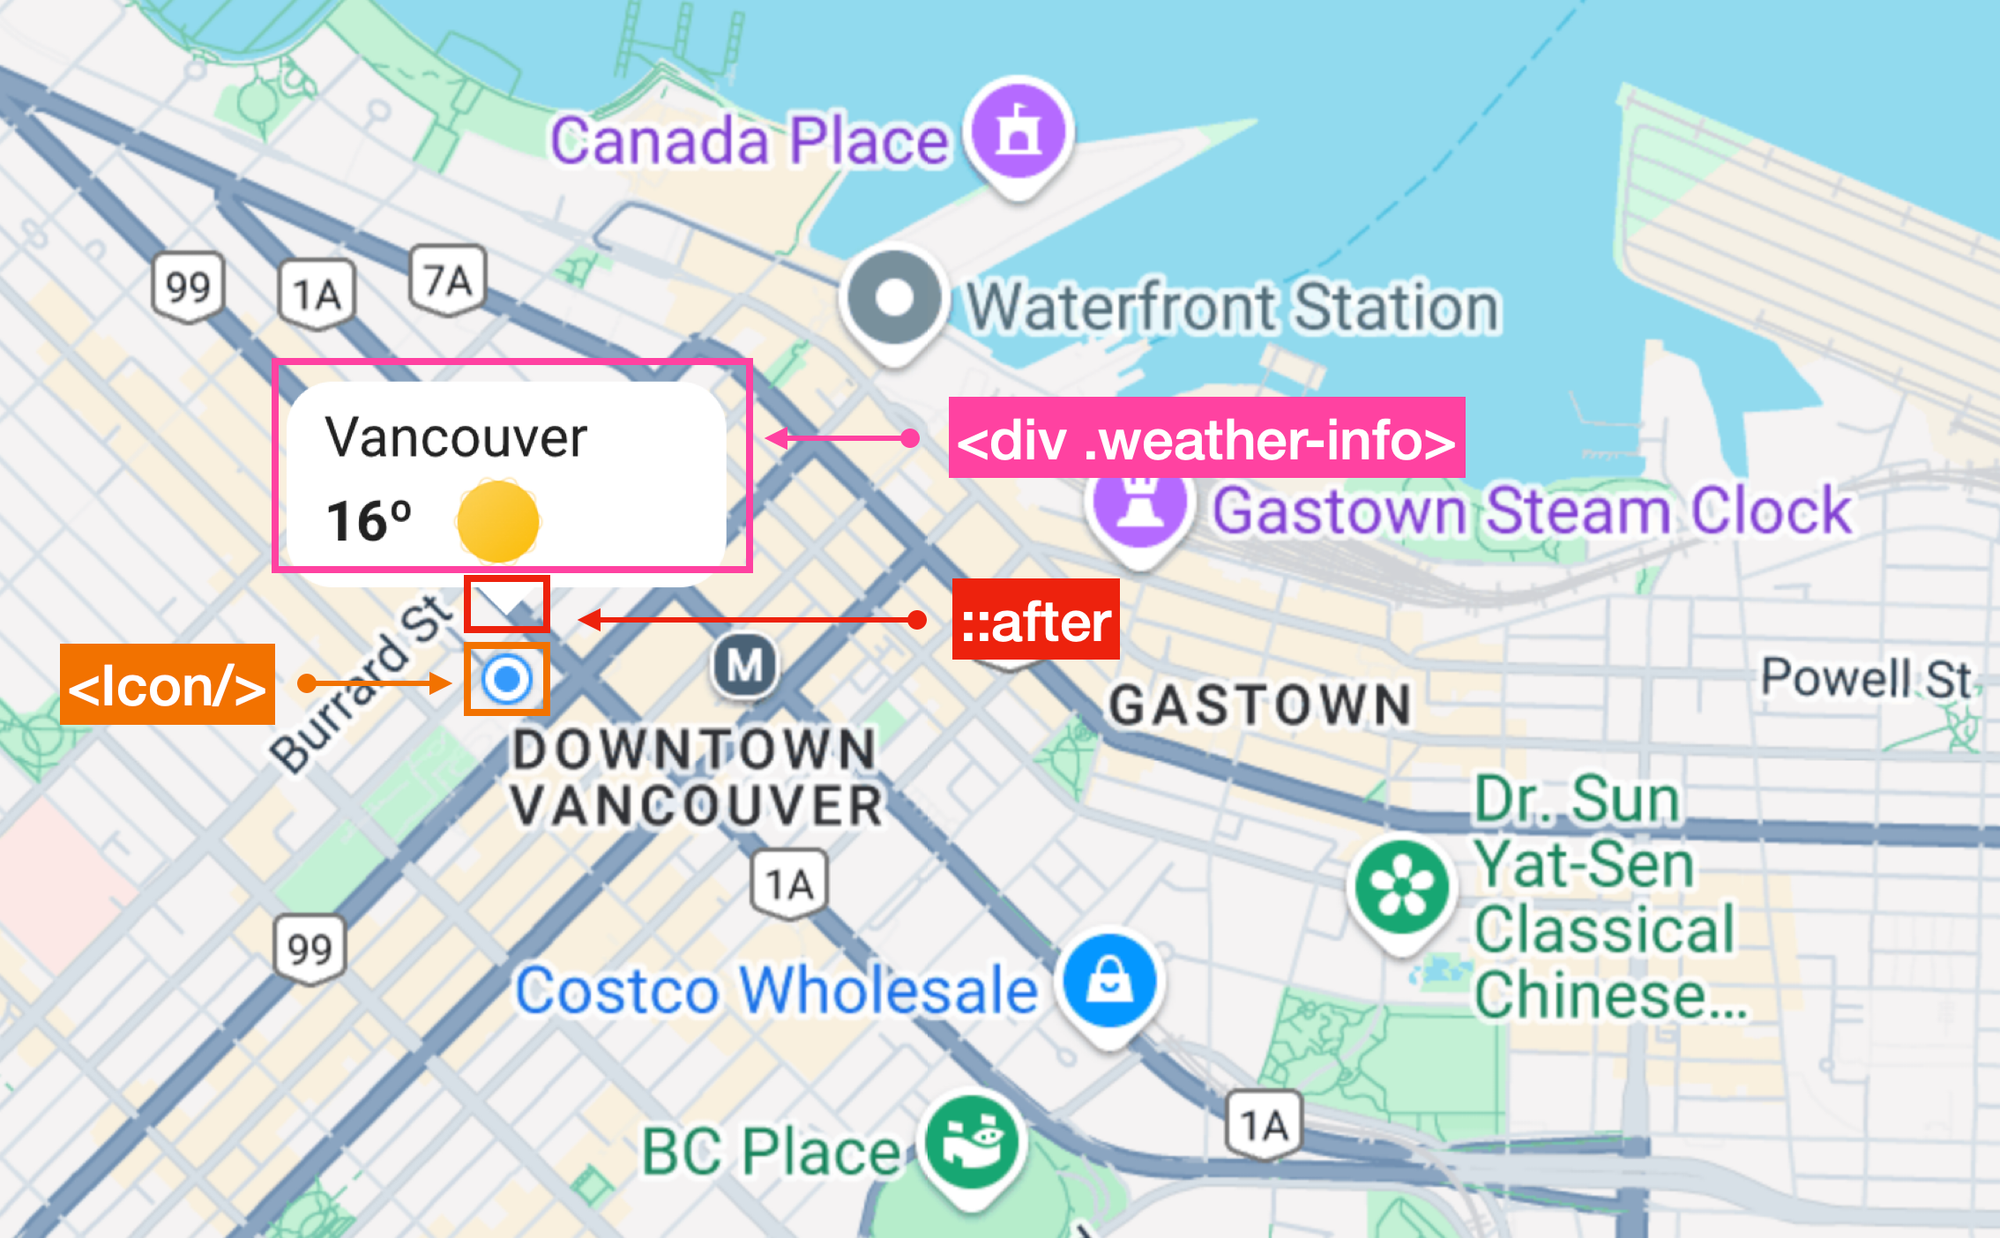
The structure of our custom Advanced Marker element
`` is composed of three distinct visual elements:
1. A rectangular white box with rounded corners (`.weather-info`) that holds the location name, temperature and weather icon,
2. An `::after` pseudo-element to create the downwards pointing triangle arrow,
3. A blue circle `` that shows up when the marker is clicked.
```
import { AdvancedMarker } from "@vis.gl/react-google-maps";
import Icon from "../Icon.jsx";
import "./Marker.scss";
const Marker = ({ position, onToggle, weatherData, name, isActive }) => {
const { degree, iconUrl } = weatherData || {};
return (
weatherData && (
<>
{name}
{Math.round(degree)}º
)
);
};
export default Marker;
```
Rectangular white box
The `.weather-info` class creates a clean, compact vertical box with a white background, rounded corners, and nicely spaced text stacked top to bottom
```
/*** components/GoogleMap/Marker.scss ***/
.weather-info {
background-color: #fff;
border-radius: 10px;
padding: 4px 8px;
display: flex;
flex-direction: column;
color: #212121;
}
```
Downwards pointing triangle window
The small white triangle pointing downward is created using a CSS border trick - a clever technique that uses the borders of a zero-sized box to render a triangle.
```
/*** components/GoogleMap/Marker.scss ***/
&::after {
content: '';
position: absolute;
bottom: -6px;
left: 50%;
transform: translateX(-50%);
width: 0;
height: 0;
border-left: 8px solid transparent;
border-right: 8px solid transparent;
border-top: 8px solid white;
}
```
First, this line of code:
```
width: 0;
height: 0;
```
creates a box with no size — it's invisible by itself. Then, borders are added like this:
```
border-left: 8px solid transparent;
border-right: 8px solid transparent;
border-top: 8px solid white;
```
Which creates three borders:
- Left and right borders are transparent, forming the slanted sides
- The top border is solid white, forming the triangle tip
Because the element has zero height, the only visible part is the top border, which looks like a triangle pointing down.
Blue location icon

The stop SVG element used on an active marker
The `` component nested inside `` is rendered as a blue circle with a white outline. `` is taken from `Icon.jsx`, which in turn imports the SVG directly from `assets/svg/index.js` with the line `import Stop from '~/assets/svg/stop.svg?react';`. The "react" at the end tells [Vite](https://vite.dev/?ref=blog.afi.io), our build tool, to import this SVG file as a React component, not just a URL or string. This transforms the SVG into a React component and lets us use it just like any other JSX element e.g. ``.
When a marker is clicked, it triggers an [AdvancedMarkerClickEvent](https://developers.google.com/maps/documentation/javascript/reference/advanced-markers?ref=blog.afi.io#AdvancedMarkerClickEvent) event which is detected by the `onClick` handler that was passed in as a prop to ``. This triggers the attached `onToggle()` function, which points to `handleSetActive()` in `App.jsx`.
```
/*** App.jsx ***/
const handleSetActive = async (place) => {
if (!place) return;
setActivePlace((prev) => (prev?.place_id === place.place_id ? null : place));
const result = await fetchForecast({
noOfDays: 7,
latitude: place.geometry.location.lat(),
longitude: place.geometry.location.lng(),
});
setNextForecast(result);
};
```
In `handleSetActive()`, the following takes place:
1. If the clicked place is already active, it sets it to null (i.e. deactivates it, removing the `` side bar and the bouncing animation on the marker). Otherwise, it activates the new place and saves it in state to `activePlace`.
2. Next, it calls the `fetchForecast()` Weather API wrapper function and passes in the place’s latitude and longitude to retrieve its 7-day forecast.
3. Lastly, it stores the forecast in state so that it can be displayed in the side bar.
If the marker's `place_id` matches `activePlace.place_id`, its `className` becomes "Marker active", which applies a jumping animation to the marker and displays the blue circle (`.icon-stop {display: block;}`).
```
/*** components/GoogleMap/Marker.scss ***/
.Marker {
&.active {
animation: jump 0.6s infinite;
.icon-stop {
display: block;
}
}
.icon-stop {
display: none;
position: absolute;
left: 50%;
margin-left: -12px;
bottom: -30px;
}
}
```
When a marker is unselected or a different marker is clicked, the current marker is hidden by applying the default `display: none` style. This is because the JSX code `` compiles to:
```
...
```
**WeatherForecast.jsx**
`WeatherForecast.jsx` is a presentational component that displays the 7-day forecast at the selected location. It displays the location name, followed by a list of daily forecasts. Each day includes a daytime and nighttime section with the temperature, precipitation, weather icon, and a short description of weather conditions (`weatherCondition.description`).
```
├──
│ ├──
[formatted address]
│ └──
├──
7 Day Forecast
├──
(for each day)
│ ├──
│ │ ├── [Date]
│ │ ├──
│ │ │ ├── [Max Temp]°
│ │ │ └──
│ │ └──
[Text + precip]
│ └──
│ ├── Night
│ ├──
│ │ ├── [Min Temp]°
│ │ └──
│ └──
[Text + precip]
```
### Running Google Maps Weather on your local machine
To try out Google Maps Weather, visit [https://google-maps-weather.afi.dev](https://google-maps-weather.afi.dev/?ref=blog.afi.io) and enter locations in the search box on the left to add them to the map.
To run the app locally, fork both [google\_maps\_weather](https://github.com/afilabs/google%5Fmaps%5Fweather?ref=blog.afi.io) and [google\_weather\_backend](https://github.com/afilabs/google%5Fweather%5Fbackend?ref=blog.afi.io) from GitHub. Install dependencies by running `npm install` in each project. Start the frontend with `npm run dev` and the backend with `npm start`, then open [http://localhost:3000](http://localhost:3000/?ref=blog.afi.io) in your browser.
Don’t forget to update the `.env` file in the backend with your Google Maps API key, making sure both the Places API and Weather API are enabled.
### Concluding the Google Weather tutorial series
And that's a wrap. In this short tutorial series, I've shown you how to use the [Google Maps Weather API](https://developers.google.com/maps/documentation/weather?ref=blog.afi.io) to:
1. Build a [simple weather app](https://google-weather-demo.afi.dev/?ref=blog.afi.io) that displays current and forecasted conditions for anywhere in the world,
2. See the [weather along your route](https://weather-along-route.afi.dev/?ref=blog.afi.io) so that you can plan road trips and delivery routes to avoid bad weather,
3. Recreate the 2011 Google Maps weather layer by building a [real time weather map](https://google-maps-weather.afi.dev/?ref=blog.afi.io) that displays conditions for any location you choose.
It's July 2, 2025, and the Google Weather API officially reached General Availability (GA) today. The API already delivers high resolution weather data, including temperature, precipitation, cloud cover and more, and Google's weather models will only get better particularly as Google begins integrating public weather alerts (such as fires, floods, and hurricanes) and the [latest AI models from Google Research](https://deepmind.google/science/weathernext/?ref=blog.afi.io).
The Google Weather API is also very popular. Common use cases include:
- **Mobility:** Dynamically adjusting pricing, optimizing routes for safety and efficiency, and personalizing travel recommendations based on current weather conditions.
- **Retail and Advertising:** Using weather data to manage inventory, anticipate changes in demand, and target advertising campaigns more effectively.
- **Travel:** Providing forecasts to help users choose destinations, pack accordingly, and plan activities around expected weather.
I hope you enjoyed reading this tutorial series as much as I enjoyed creating it. Get out there and have fun - but don’t forget to check the weather first!
Part 1: [Meet the Google Weather API: Real time weather for maps](https://blog.afi.io/blog/meet-the-google-weather-api-real-time-weather-for-maps/)
Part 2: [Build a weather app with the Google Weather API ](https://blog.afi.io/blog/build-a-weather-app-with-the-google-weather-api/)
Part 3: [Google Maps weather along route: Weather aware route planner](https://blog.afi.io/blog/google-maps-weather-along-route-weather-aware-planner/)
Part 4: [Google Maps Weather: Add a weather layer to Google Maps](https://blog.afi.io/blog/google-maps-weather-add-a-weather-layer-to-google-maps/)
**This article was written by** [**Afi Labs**](https://afi.io/?ref=blog.afi.io)**, a** [**Google Maps Premier Partner**](https://www.afi.io/?ref=blog.afi.io) **and reseller. We build route optimization, navigation, and fleet tracking software on Google Maps, and offer volume pricing on GMP licensing.** [**Talk to an engineer**](https://www.afi.io/contact%5Fus?ref=blog.afi.io) **or** [**follow Afian on LinkedIn**](https://www.linkedin.com/in/afian-anwar/?ref=blog.afi.io)**.**
![[description]]([icon]) │ │ └──
│ │ └──