Let's build a route optimization web service
Coding up a route optimization web service with authentication, persistence and error handling.

In my last post, I gave a high-level overview of how to build a route optimization web service that uses the Google Maps Directions API as a routing engine.
Part 1: Build your own route optimization API with Google Maps
Part 2: Creating a route with the Google Maps Directions API
Part 3: Optimizing a route with the Google Maps Directions API
Part 4: Route optimization web service basics
Part 5: Let's build a route optimization web service (this article)
Part 6: Putting it all together - testing your route optimization API (coming soon)
In this tutorial, I'll walk through the code that adds authentication, persistence and error handling to the route returned by Google Maps so that you'll get a fully featured route optimization API similar to Routific, GraphHopper and OptimoRoute (these are all services hosted on third party servers - if you want your own routing engine running on your infrastructure, Afi Lab's very own routing engine and route optimization API might be a better fit).
We'll be using Nest (NestJS), a web framework built on Typescript that makes it easy to build efficient, scalable Node.js server-side applications. It forces you to write your code in a standardized way that follows simple database and programming conventions to keep a project structured and readable.
How our Code is Organized
This isn't a Nest tutorial, but it's worth spending a few minutes explaining how a typical Nest project is structured. As with all my tutorials, you can find working sample code for this project on Github. To get the web service running, follow the readme instructions and set up your Google Maps keys and database URI (for this project, we are using MongoDB Atlas) in the .env file.
Modules
Modules are the basic building block of each Nest application and are used to group related features like controllers and services together. They are Typescript files decorated with the @Module() decorator.

In this project, we'll be using two modules - optimization.module.ts and users.module.ts to organize the optimization and user features. Taking a peek at optimization.module.ts, here's what we see.
import { Module } from '@nestjs/common';
import { OptimizationController } from './optimization.controller';
import { HttpModule } from '@nestjs/axios';

@Module({
  controllers: [OptimizationController],
  imports: [HttpModule],
})
export class OptimizationModule {}
The OptimizationModule imports HttpModule from the @nestjs/axios library, which allows the OptimizationModule to make server side http requests (e.g. to call the Google Maps API).
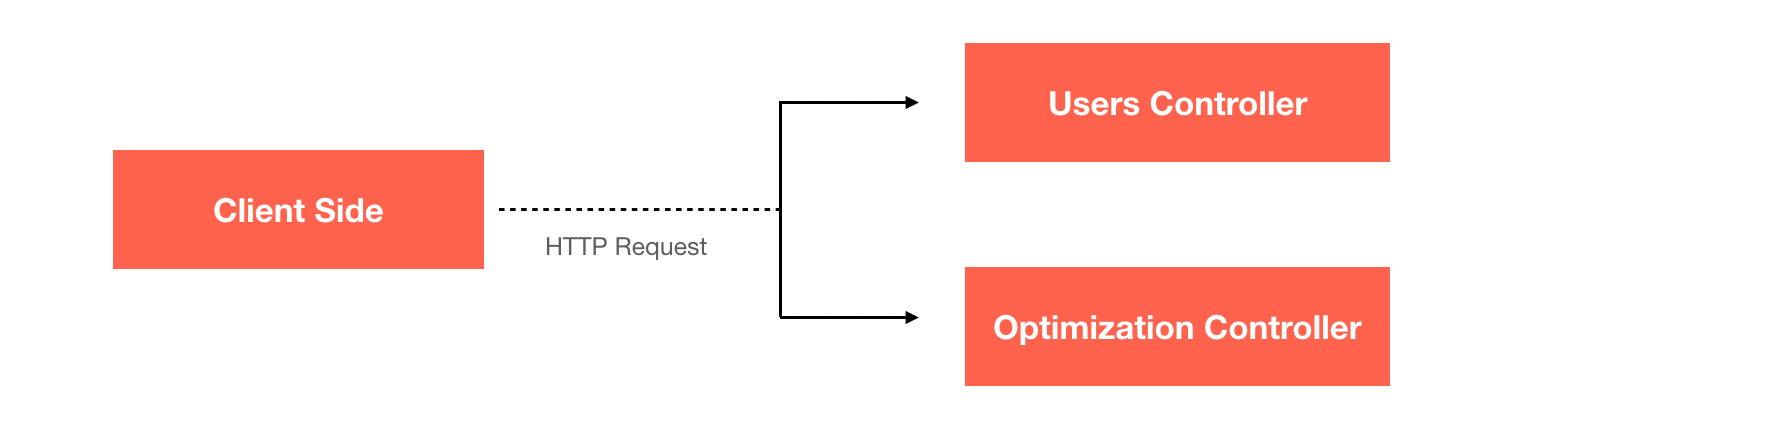
Controllers
In Nest, controllers are responsible for handling incoming requests and returning responses to the client. They are defined using the @Controller() declarator which takes the path for the primary route as its argument. Controllers always belong to a module, which is why we included OptimizationController in the controllers array in optimization.module.ts .
Endpoints in the controller are made available to the client by using the decorator e.g. @Get, @Post, @Put and @delete that corresponds to the HTTP request method you want to use. For example, in optimization.controller.ts we see the method @Get('jobs/:id'):
@Get('jobs/:id')
  async getJob(@Param('id') id: string) {
    const job = await this.jobsValidateService.validateJobByJobId(id);

    return {
      id: job.jobId,
      status: 'finished',
      output: JSON.parse(job.output),
    };
  }
What this method does is expose the /jobs/:id endpoint so that you can make a GET request to the /jobs endpoint with a given id to retrieve a specific optimization job e.g. /jobs/604a2928-7f6e-4556-994a-4c1114a6d55b.
Services
In Nest, services are used for data storage and retrieval. Instead of sending plain text SQL queries to the database, Nest uses TypeORM to let us retrieve, save and modify database entries in an object-oriented manner using typescript. Because our data structure is relatively straightforward (we'll mostly use a unique key to retrieve optimization job data), we are going to use a NoSQL database called MongoDB. To keep things simple, we'll host our MongoDB instance in the cloud on a the Atlas database as a service (detailed instructions on how to set this up is included in the readme file).
In the @Get('jobs/:id') method above, we call the validateJobByJobId(id) method of the jobsValidateService to retrieve data from the specified optimization job. We are able to use this service in optimization.controller.ts because we imported it with the line import { JobsValidateService } from '../database/services/jobs.validate.service'; at the very top. Taking a peek at jobs.validate.service.ts, we see:
async validateJobByJobId(jobId: string) {
    const job = await this.jobModel.findOne({ jobId: jobId }).exec();
    if (!job) {
      throw new BadRequestException([`job not exist`]);
    }
    return job;
  }
The validateJobByJobId method simply calls FindOne() on jobModel. This method expects a jobId of type string and returns a single job object (defined in job.schema.ts). If the job with the specified jobId does not exist, we throw a bad request exception with a basic 'job does not exist' error message.
Creating Users
The users module lets you create users with an email address and password. When a user is created, a static API key is generated that you can use to authenticate with the web service. Let's look at the code to see how all this works - it's a good example of how a typical Nest application is put together. Near the top of users.controller.ts we find the createUser() method.
users.controller.ts
@Post()
async createUser(@Body() createUserDto: CreateUserDto) {
    return await this.usersService.createNewUser(createUserDto);
}
The @Post() decorator without any arguments next to createUser() means that you can make a POST request to /users to call the method and create a user. The @Body decorator extracts data from the json body of our request in the form of a data transfer object (DTO) which has a schema consistent with CreateUserDto ( create-user.dto.ts ).
create-user.dto.ts
Data transfer objects are templates that let developers (or anyone consuming an API) know how the request body should be structured. Here's what create-user.dto.ts looks like.
export class CreateUserDto {
  @ApiProperty({
    default: 'Afian Anwar',
  })
  @IsNotEmpty()
  readonly name: string;

  @ApiProperty({
    default: 'afian@afi.io',
  })
  @IsNotEmpty()
  @IsEmail()
  readonly email: string;

  @ApiProperty({
    default: '123123123',
  })
  @IsNotEmpty()
  readonly password: string;
}
Users are created with a name (string), email (string), and password (string). The DTO is passed into the createNewUser() function of UsersService which subsequently calls the registerNewUser() method in UsersUtilService. Let's take a look at what happens there.
async registerNewUser(
    registerUserDto: RegisterUserDto,
    fields = {},
): Promise < User > {
    const user = await this.findUserByEmail(registerUserDto.email);
    if (user) {
        throw new BadRequestException([`email already exist`]);
    }

    const token = (await nanoid()) + CryptoService.randomToken(6);
    const tokenEncrypted = CryptoService.encrypt(token);

    const encryptPassword = await bcrypt.hash(registerUserDto.password, 10);
    const values = {
        ...registerUserDto,
        ...fields,
        token: tokenEncrypted,
        password: encryptPassword,
    };

    const createdUser = new this.userModel(values);
    await createdUser.save();

    return createdUser;
}
Authentication
In addition to the name, email and password associated with the user, we generate a token that can be used as an API key to authenticate requests to our web service. The two lines of code
const token = (await nanoid()) + CryptoService.randomToken(6);
const tokenEncrypted = CryptoService.encrypt(token);
generate a 34 character long random string e.g. V2S7y2t5aZ6icuTxlP8a3f2123f07c4af. We then save this information (together with the name, email and password of our user) to the database with
const createdUser = new this.userModel(values);
await createdUser.save();
Next, let's see how this API key is used to authenticate route requests.
Making a Route Request
To make a route request, the user makes a POST call to /tsp-long and includes his API key in the header ( e.g. Authorization: V2S7y2t5aZ6icuTxlP8a3f2123f07c4af ) and the request input in the body.
{
	"visits": {
		"A": {
			"location": {
				"name": "Stop A",
				"address": "1200 Third Ave, San Diego, CA 92101, United States"
			}
		},
		"B": {
			"location": {
				"name": "Stop B",
				"address": "707 Tenth Ave, San Diego, CA 92101, United States"
			}
		}
	},
	"fleet": {
		"Afian": {
			"start_location": {
				"id": "afian-start",
				"name": "afian-start",
				"address": "1337 India St, San Diego, CA 92101, United States"
			},
			"shift_start": "08:00"
		}
	}
}
We've designed the input as a json object with two fields - visits (a mapping of stop names to locations) and fleet (a mapping of drivers to their start locations and starting times). The data sent to /tsp-long is immediately routed to the googleDirection() method of optimization.controller.ts.
optimization.controller.ts
This is where the magic happens. Let's break down what happens to our request input at each stage.
@Post('tsp-long')
async googleDirection(@Body() body) {
    const jobId = uuidv4();
    await this.jobsUtilService.createNewJob({
        jobId
    });

    let capacity = Object.keys(body.visits).length;
    if (capacity > 25) {
        return {
            message: 'Too many visits in this request. Please limit your optimization request to 25 visits or less (https://developers.google.com/maps/documentation/directions/usage-and-billing).',
        };
    }
    capacity = Object.keys(body.fleet).length;
    if (capacity !== 1) {
        return {
            message: 'Too many visits in this request. Please limit your optimization request to 25 visits or less (https://developers.google.com/maps/documentation/directions/usage-and-billing).',
        };
    }
    ...
}
The body of our request is captured by the body object using Nest's @Body() decorator. Google Maps limits how many stops and vehicles can be optimized in a single API call, so we first need to check that our visits objects contains at most 25 stops and that there is only a single driver in the fleet object.
https://maps.googleapis.com/maps/api/directions/json?
origin={origin}
&destination={destination}
&waypoints=optimize:true|{first_waypoint}|{second_waypoint}|...|{last_waypoint}
&key=GOOGLE_API_KEY
Keep in mind that our goal is to eventually optimize our route using Google Map's Directions API. To do that, we need to format our API call to be consistent with the Directions API schema (above).
const points = [];
const visits = body.visits;
const fleets = body.fleet;
const options = body.options;
let driver = null;
const stops = [];

for (const key in visits) {
    const visit = visits[key];
    const address = visit.location?.address;

    if (!address) {
        return {
            message: `Your visit (${key}) is missing the address field.`,
        };
    }

    points.push(address);
    stops.push({
        ...visit,
        key
    });
}
First, we are going to iterate over visits and save each location's address in the stops array. We also check to see that the address field for each field is populated, and if not, return a helpful error message pointing out that a specific visit is missing the address field.
const points = [];
const visits = body.visits;
const fleets = body.fleet;
const options = body.options;
let driver = null;
const stops = [];

for (const key in visits) {
    const visit = visits[key];
    const address = visit.location?.address;

    if (!address) {
        return {
            message: `Your visit (${key}) is missing the address field.`,
        };
    }

    points.push(address);
    stops.push({
        ...visit,
        key
    });
}
Next, we do the same for fleets (note: there should only be a single vehicle in the fleets object because the Directions API limits us to optimizing a single origin / destination pair).
for (const key in fleets) {
    const fleet = fleets[key];
    const address = fleet.start_location?.address;

    if (!address) {
        return {
            message: `Your fleet (${key}) is missing the address field.`,
        };
    }

    driver = {
        ...fleet,
        key
    };
}
Recall, here's what the call to the Directions API looks like:
https://maps.googleapis.com/maps/api/directions/json?
origin={origin}
&destination={destination}
&waypoints=optimize:true|{waypoints}
&key={key}
Let's work on substituting {origin}, {destination} and {waypoints} with the correct values.
{origin} is simply driver.start_location.address,
url = url.replace('{origin}', driver.start_location?.address);{destination} (if one exists) is driver.end_location.address,
url = url.replace('{destination}', driver.end_location?.address);and {waypoints} is the concatenated list of stops joined together by a "|".
url = url.replace('{waypoints}', points.join('|'));Once the URL is set up, we encode it and make a GET request, saving the response in a data object. We also prepare the output with empty objects that will be populated later.
url = encodeURI(url);
const response = await this.httpService.get(url).toPromise();
const {
data
} = response;
if (data.status !== 'OK') {
return data;
}
const output = {
status: 'completed',
fitness: 0,
unserved: [],
solution: {},
polylines: {},
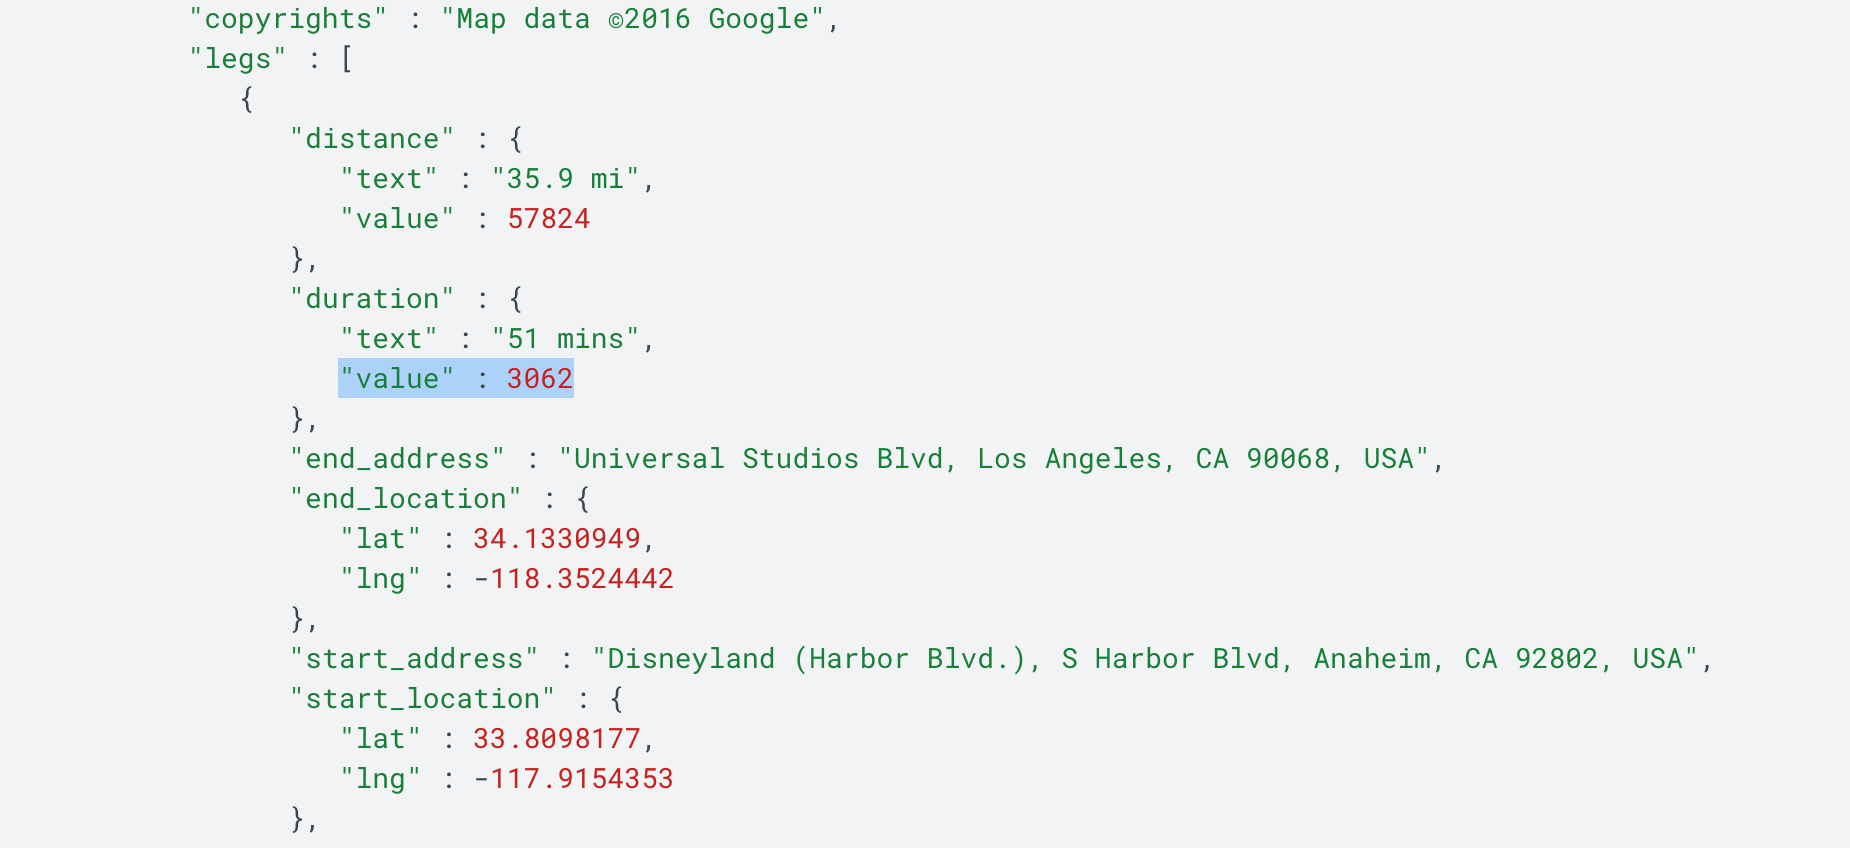
};If you called the Directions API directly, you'll annoyingly find that it does not list the arrival times at each stop. Instead, each segment of the trip is broken down into legs with a duration object. Inside it is the value field which contains the travel time for each leg (see example below).
To get the arrival times at each stop, we start with driver.shift_start and incrementally add the duration value to each stop (we use the hhmmToMinutes() and minutesToHHmm() helper functions to convert minutes to hh:mm and back) and update the arrival time. We also assume a service time at each stop of 1 minute e.g. if you arrive at the first stop at 08:05, you leave at 08:06.
arrivalTime = arrivalTime + Math.round(duration.value / 60);
finishTime = arrivalTime + 1;
We then add this data to the steps array in a nicely formatted javascript object with location_id, location_name, arrival_time and finish_time.
const route = data.routes[0];
    const { legs, overview_polyline, waypoint_order } = route;

    const hhmmToMinutes = (hhmm) => {
      const a = hhmm.split(':');
      return +a[0] * 60 + +a[1];
    };
    const minutesToHHmm = (m) => {
      const hours = Math.floor(m / 60);
      const minutes = m - hours * 60;
      return (
        hours.toString().padStart(2, '0') +
        ':' +
        minutes.toString().padStart(2, '0')
      );
    };

    let arrivalTime = hhmmToMinutes(
      driver.shift_start ? driver.shift_start : '08:00',
    );
    let finishTime = arrivalTime + 1;

    const steps = [];
    steps.push({
      location_id: driver.id ? driver.id : driver.key,
      location_name: driver.start_location.name,
      arrival_time: minutesToHHmm(arrivalTime),
      finish_time: minutesToHHmm(finishTime),
    });

    legs.forEach((leg, key) => {
      const { duration } = leg;
      const index =
        typeof waypoint_order[key] === 'undefined'
          ? stops.length - 1
          : waypoint_order[key];
      const visit = stops[index];
      arrivalTime = arrivalTime + Math.round(duration.value / 60);
      finishTime = arrivalTime + 1;

      steps.push({
        location_id: visit.key,
        location_name: visit.location.name,
        arrival_time: minutesToHHmm(arrivalTime),
        finish_time: minutesToHHmm(finishTime),
      });
    });
After that, we maps the steps array to the driver's id in output.solution and the encoded polylines string (used to draw the route on a map) in output.polylines. We then use Javascript's build in JSON.stringify() method to convert both to json and save it to the database via jobsUtilService.updateJobByJobId().
output.solution[driver.key] = steps;
output.polylines[driver.key] = overview_polyline.points;

await this.jobsUtilService.updateJobByJobId(jobId, {
    input: JSON.stringify(body),
    output: JSON.stringify(output),
});

return {
    job_id: jobId
};
Lastly, we return jobId to the user, so they get back something like
{ "job_id": "604a2928-7f6e-4556-994a-4c1114a6d55b" }in the response. You can then make a GET request to the /jobs endpoint with a given id to retrieve a specific optimization job e.g. /jobs/604a2928-7f6e-4556-994a-4c1114a6d55b.
Congratulation! You've just built a route optimization web service from the ground up. In our last post of this series, Part 6: Testing our Route Optimization Web Service (coming soon!), we'll do some live testing so you can use the API we've just built in production.
👋 As always, if you have any questions or suggestions for me, please reach out or say hello on LinkedIn.