> ## Content Index
> Fetch the complete content index at: https://blog.afi.io/llms.txt
> Use this file to discover other available public pages before exploring further.

# Three ways to add Google Autocomplete to your React app
- URL: https://blog.afi.io/blog/three-ways-to-add-google-autocomplete-to-your-react-app/
- Published: 2026-04-21T19:58:30.000Z
- Updated: 2026-08-21T05:10:23.000Z
- Description: Google Autocomplete in React: Should you use react-google-places-autocomplete, prebuilt components, or a custom build?
- Author: Afian Anwar
- Tags: googlemaps

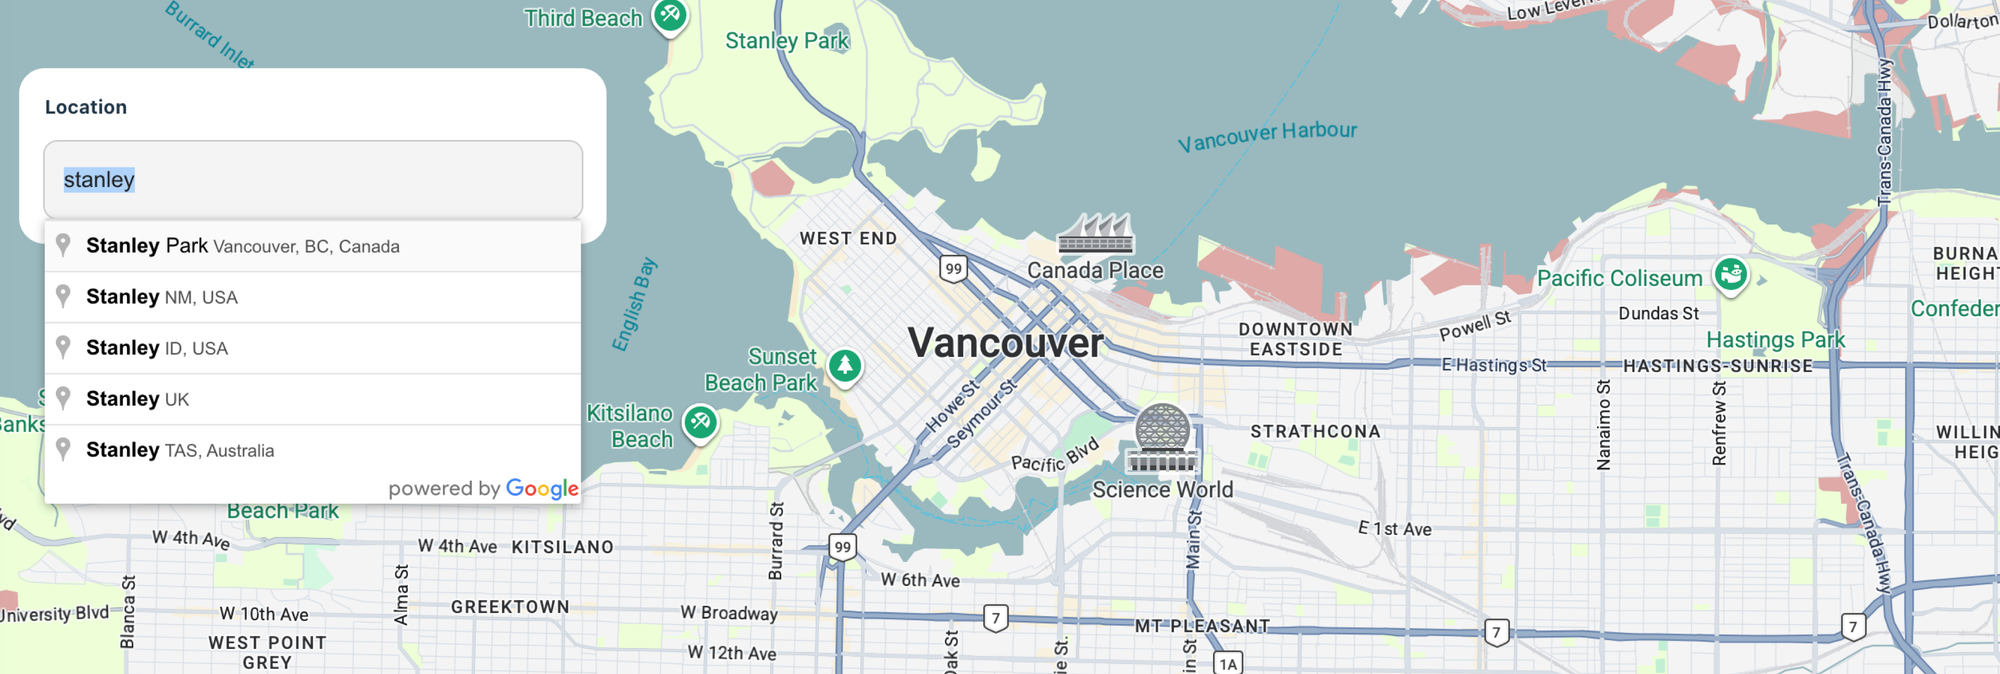
[Google Autocomplete](https://developers.google.com/maps/documentation/places/web-service/place-autocomplete?ref=blog.afi.io) is a Google Maps API that returns location suggestions as a user types into a search field. Suggestions appear in a dropdown in real time, narrowing down as the user types. It's commonly used in e-commerce checkouts, delivery and logistics apps, ride sharing platforms, and travel websites - anywhere accurate address input matters. In this blog post, I cover three ways to add Google Autocomplete to a React app and explain the benefits and tradeoffs of using each. As with my other tutorials in this series, you can find working code samples at our GitHub repo [react\_google\_maps\_demo](https://github.com/afilabs/react%5Fgoogle%5Fmaps%5Fdemo?ref=blog.afi.io).
![](https://storage.ghost.io/c/c6/4d/c64da7e8-63a6-4cff-acdc-2782a6ebc377/content/images/2026/04/image-8.png)

Part 1: [React Google Maps: Build with Google Maps using React](https://blog.afi.io/blog/react-google-maps-build-with-google-maps-using-react/)  
Part 2: [Google Maps with React: Add a Google Map and style it](https://blog.afi.io/blog/react-google-maps-build-with-google-maps-using-react/)  
Part 3: [Work with Google Maps React map markers and info windows](https://blog.afi.io/blog/work-with-google-maps-react-map-markers-and-info-windows/)   
Part 4: [Draw a Google Maps polyline in React](https://blog.afi.io/blog/draw-a-google-maps-polyline-in-react/)  
**Part 5: Three ways to add Google Autocomplete to your React app (this article)**

### Adding Google Autocomplete with the react-google-places-autocomplete library
![Google Autocomplete with the react-google-places-autocomplete library](https://storage.ghost.io/c/c6/4d/c64da7e8-63a6-4cff-acdc-2782a6ebc377/content/images/2026/04/Screenshot-2026-04-19-at-5.38.57---PM.png)

Google Autocomplete with the react-google-places-autocomplete library

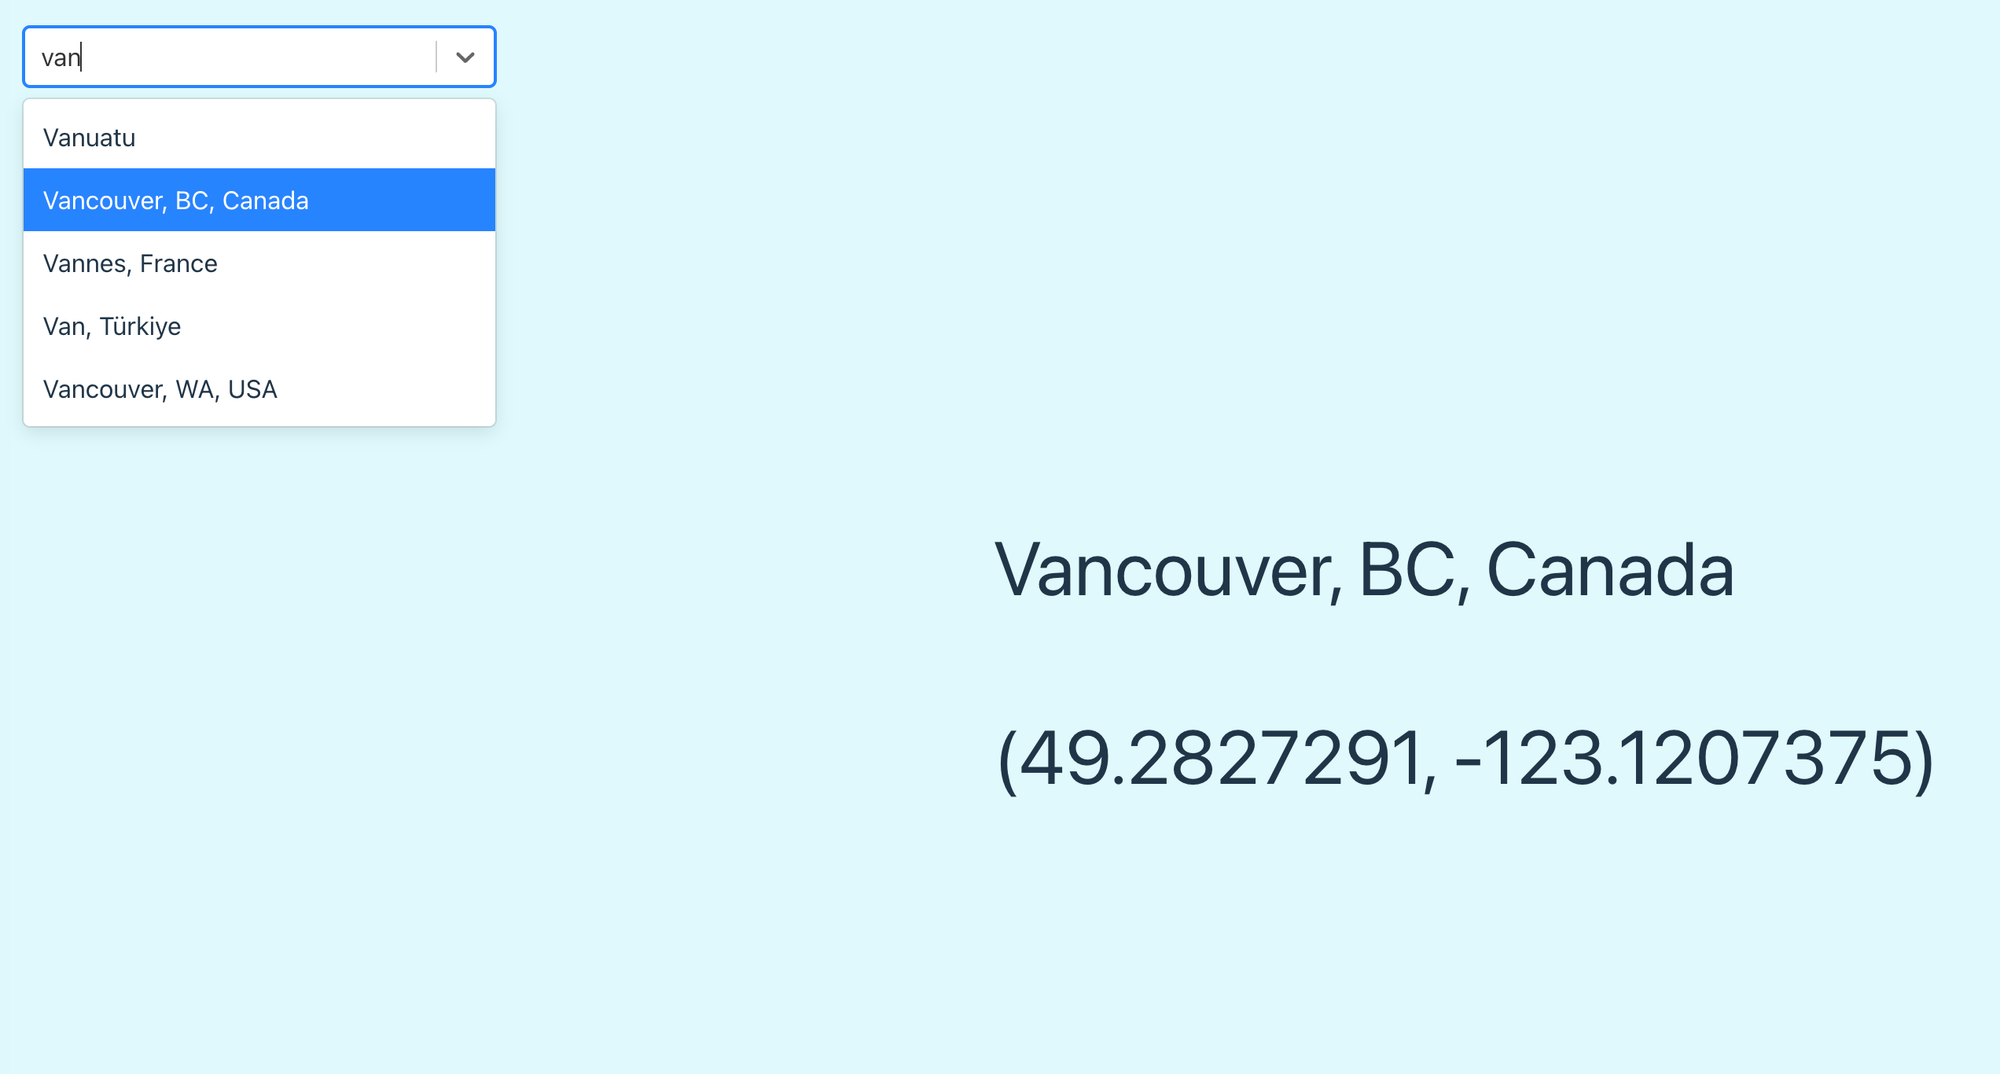
The fastest way to add Google Autocomplete to your website or app is by using the [react-google-places-autocomplete](https://www.npmjs.com/package/react-google-places-autocomplete?ref=blog.afi.io) library. It's built on top of [react-select](https://react-select.com/home?ref=blog.afi.io) , so you get a polished dropdown out of the box along with a flexible styling API to customize every part of the UI. To start using it, follow these steps:

1. Install the library

```
npm install react-google-places-autocomplete
```

1. Enable the [Places API](https://developers.google.com/maps/documentation/places/web-service/legacy/overview-legacy?ref=blog.afi.io) in your Google Cloud Console and grab your API key. You'll want to use the legacy Google Places API, not Places API (New) because it uses the legacy `google.maps.places.AutocompleteService` under the hood. The library was written before Places API (New) product was launched, and hasn't been updated to use it.
2. Import the `GooglePlacesAutocomplete` component together with the `geocodeByPlaceId` and `getLatLng` methods. The legacy Place Autocomplete API does not return a geocoded latitude and longitude, which is why we need these two methods to make a follow on API call to the Google Geocoding API.

```
import GooglePlacesAutocomplete from 'react-google-places-autocomplete';
import { geocodeByPlaceId, getLatLng } from 'react-google-places-autocomplete';
```

1. Add a `<GooglePlacesAutocomplete/>` component to your return statement. This gives you a basic text input field that updates with predicted place options as the user types. You can style the dropdown using basic CSS or a custom [styles prop](https://react-select.com/styles?ref=blog.afi.io).

```
return (
  <div>
    <div
      style={{
        minWidth: "300px",
        position: "absolute",
        top: "25px",
        left: "25px",
      }}
    >
      <GooglePlacesAutocomplete
        apiKey={import.meta.env.VITE_GOOGLE_MAPS_API_KEY}
        selectProps={{
          value: autocompletePlace,
          onChange: handleSelect,
        }}
      />
    </div>
  </div>
);
```

1. Write an event handler to handle the `onChange` event from the autocomplete component. The code below takes the `place` object returned by the Place Autocomplete API and [geocodes](https://developers.google.com/maps/documentation/geocoding/guides-v3/overview?ref=blog.afi.io) it to get its GPS coordinates.

```
const [autocompletePlace, setAutocompletePlace] = useState(null);
const [coords, setCoords] = useState(null);

const handleSelect = async (place) => {
  setAutocompletePlace(place);

  const results = await geocodeByPlaceId(place.value.place_id);
  const { lat, lng } = await getLatLng(results[0]);

  setCoords({ lat, lng });

  console.log(lat, lng);
};
```

As you can see, [react-google-places-autocomplete](https://www.npmjs.com/package/react-google-places-autocomplete?ref=blog.afi.io) is easy to use and comes with tons of features and styling options thanks to [react-select](https://react-select.com/home?ref=blog.afi.io). 
![Customizing Google Autocomplete using react-select custom styling](https://storage.ghost.io/c/c6/4d/c64da7e8-63a6-4cff-acdc-2782a6ebc377/content/images/2026/04/Screenshot-2026-04-19-at-5.53.57---PM.png)

Customizing Google Autocomplete using react-select custom styling

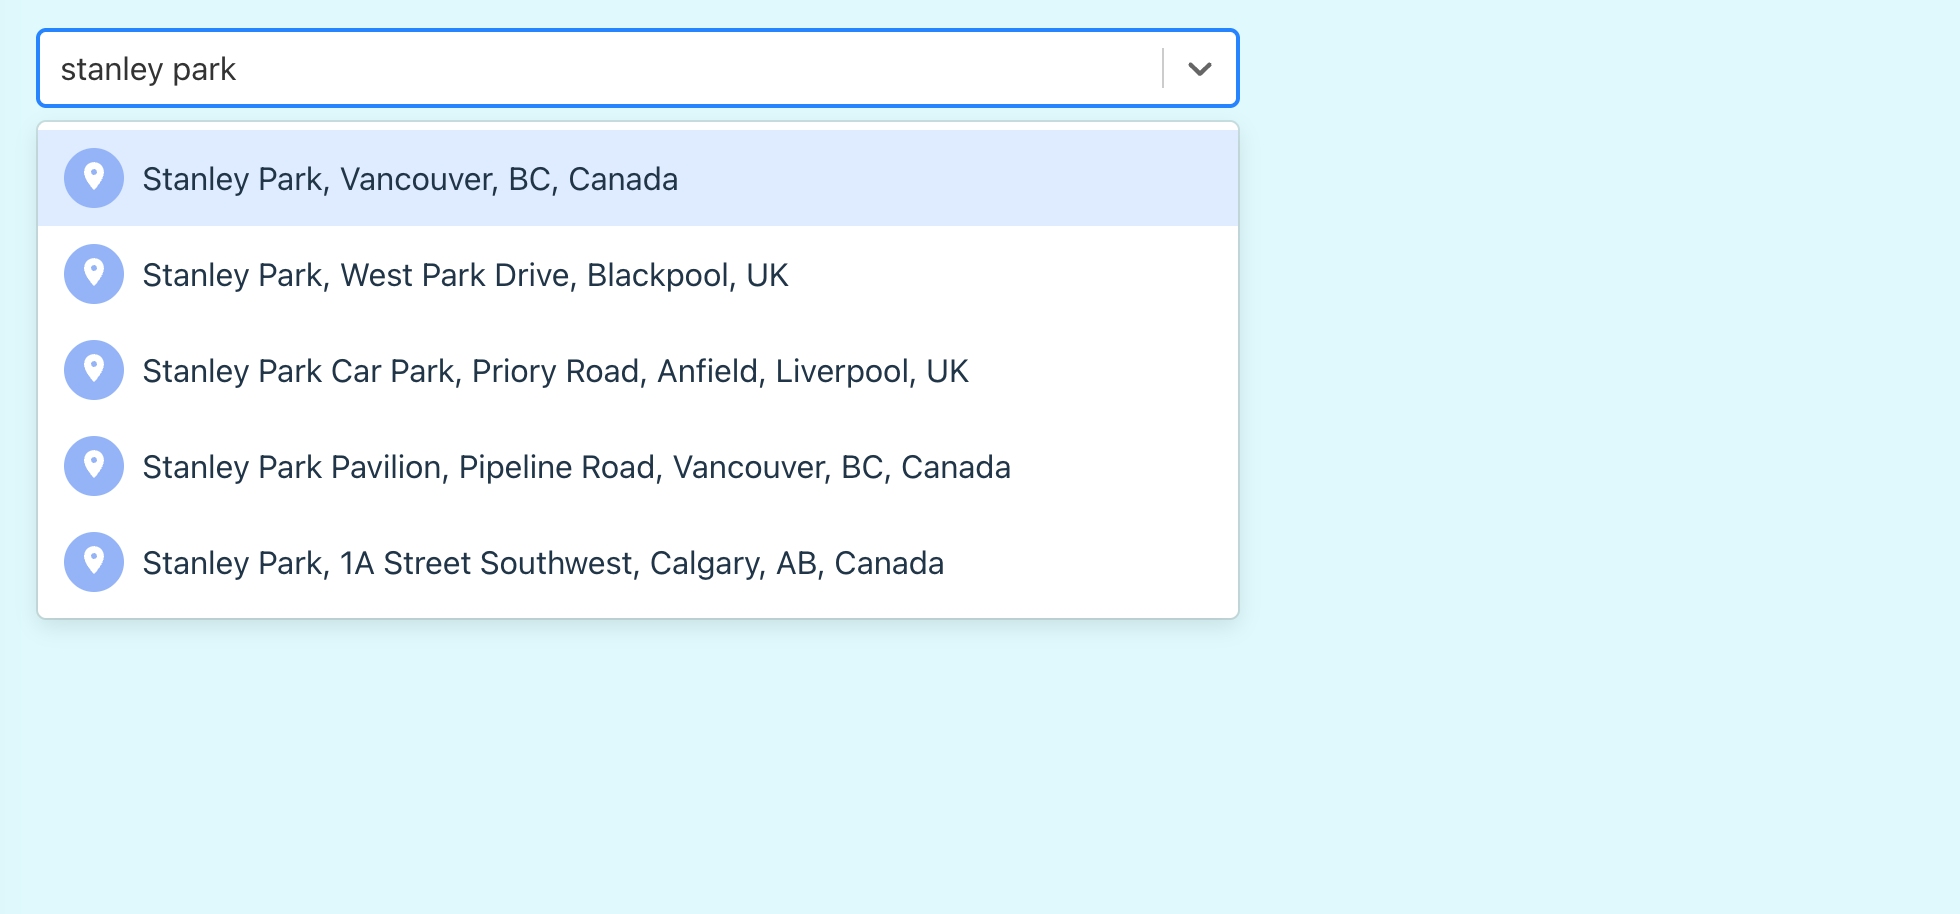
For instance, to add a custom icon to the left of each dropdown option (see above), all you need to do is modify the `formatOptionLabel` prop (which lets you control exactly what renders inside each option) and add an inline SVG to it.

```
const MarkerIcon = () => (
  <svg
    width="32"
    height="32"
    viewBox="0 0 32 32"
    fill="none"
    xmlns="http://www.w3.org/2000/svg"
  >
    {/* Circle background */}
    <circle cx="16" cy="16" r="15" fill="#94B4F7" />
    {/* Map marker */}
    <path
      d="M16 8C13.24 8 11 10.24 11 13C11 17 16 22 16 22C16 22 21 17 21 13C21 10.24 18.76 8 16 8ZM16 14.5C15.17 14.5 14.5 13.83 14.5 13C14.5 12.17 15.17 11.5 16 11.5C16.83 11.5 17.5 12.17 17.5 13C17.5 13.83 16.83 14.5 16 14.5Z"
      fill="#ffffff"
    />
  </svg>
);

const formatOptionLabel = ({ label }) => (
  <div style={{ display: "flex", alignItems: "center", gap: "8px" }}>
    <MarkerIcon />
    <span>{label}</span>
  </div>
);

return (
  <div>
    <GooglePlacesAutocomplete
      apiKey={import.meta.env.VITE_GOOGLE_MAPS_API_KEY}
      selectProps={{
        value: autocompletePlace,
        onChange: handleSelect,
        formatOptionLabel: formatOptionLabel,
      }}
    />
  </div>
);
```

So what's the downside to using it? 

The main problem with this library is that it does not play well with [@vis.gl/react-google-maps](https://visgl.github.io/react-google-maps/?ref=blog.afi.io), which is a non-starter if your app is built around Google Maps. If you use them together, both libraries try to inject `<script src="maps.googleapis.com/...?key=YOUR_KEY&libraries=places">` at the same time. Google detects two Maps scripts on the page and throws a warning:

⚠️

You have included the Google Maps JavaScript API multiple times on this page. This may cause unexpected errors.

This causes all kinds of render and data consistency issues on the frontend. So should you use [react-google-places-autocomplete](https://www.npmjs.com/package/react-google-places-autocomplete?ref=blog.afi.io)? My answer is *yes*, particularly if you are not using a Google Map in your app e.g. if you are using autocomplete strictly for address validation on a checkout page. If you are using autocomplete with a Google Map, read on!

### Adding Google Autocomplete using prebuilt components

![Google Autocomplete using the Web Components API](https://storage.ghost.io/c/c6/4d/c64da7e8-63a6-4cff-acdc-2782a6ebc377/content/images/2026/04/Screenshot-2026-04-19-at-11.53.12---PM.png)

Google Autocomplete using the Web Components API

The easiest way to add Google Autocomplete to a React app is with the `<gmp-place-autocomplete/>` web component. It's part of Google's Maps [Web Components](https://mapsplatform.google.com/resources/blog/build-maps-faster-web-components/?ref=blog.afi.io) collection - a set of HTML elements that replace verbose Javascript setup with simple, declarative markup.

First, add the `<APIProvider/>` component from [@vis.gl/react-google-maps](https://visgl.github.io/react-google-maps/?ref=blog.afi.io) to the return statement of `App.jsx`.

```
<APIProvider
  apiKey={import.meta.env.VITE_GOOGLE_MAPS_API_KEY}
  libraries={["places"]}
  version="beta"
></APIProvider>;
```

Make sure to add the following props:

- `libraries={["places"]}`: loads the Places library, which is required for `<gmp-place-autocomplete/>` to work.
- `version="beta"`: loads the beta version of the API, which is required because `<gmp-place-autocomplete/>` isn't in the stable release yet.

Nested inside `<APIProvider/>`, add the `<gmp-map/>` component. Its the web component alternative to `<Map/>` in the @vis.gl/react-google-maps library.

```
<gmp-map
  ref={mapRef}
  center="49.2827,-123.1207"
  zoom="13"
  map-id={import.meta.env.VITE_GOOGLE_MAPS_MAP_ID}
  style={{ display: "block", width: "100vw", height: "100vh" }}
></gmp-map>;
```

Add `<gmp-place-autocomplete/>` as a child of `<gmp-map/>`. Wrap it in a div and set `slot="control-inline-start-block-start"` on the div to position it in the top left corner of the map.

```
<div slot="control-inline-start-block-start" style={{ margin: "10px" }}>
  <gmp-place-autocomplete placeholder="Search for a place..."></gmp-place-autocomplete>
</div>
```

Here's what the full `App.jsx` looks like:

```
import { useRef, useEffect } from "react";
import { APIProvider } from "@vis.gl/react-google-maps";

function App() {
  const mapRef = useRef(null);

  useEffect(() => {
    if (!mapRef.current) return;
    customElements.whenDefined("gmp-map").then(() => {
      mapRef.current.innerMap.setOptions({
        mapTypeControl: false,
      });
    });
  }, []);

  return (
    <APIProvider
      apiKey={import.meta.env.VITE_GOOGLE_MAPS_API_KEY}
      libraries={["places"]}
      version="beta"
    >
      <gmp-map
        ref={mapRef}
        center="49.2827,-123.1207"
        zoom="13"
        map-id={import.meta.env.VITE_GOOGLE_MAPS_MAP_ID}
        style={{ display: "block", width: "100vw", height: "100vh" }}
      >
        <div slot="control-inline-start-block-start" style={{ margin: "10px" }}>
          <gmp-place-autocomplete placeholder="Search for a place..."></gmp-place-autocomplete>
        </div>
      </gmp-map>
    </APIProvider>
  );
}

export default App;
```

The widget works, but it doesn't do anything with your selection yet. To make it useful e.g. dropping a marker at the selected location, you'll need to capture the place data when a user picks a suggestion, store it in state, and use that state to update the marker on the map. Here's what we need to change in our code:

![Google Autocomplete using a custom buildGoogle Autocomplete with location map markers using Web Components](https://storage.ghost.io/c/c6/4d/c64da7e8-63a6-4cff-acdc-2782a6ebc377/content/images/2026/04/Screenshot-2026-04-20-at-6.37.38---PM.png)

Google Autocomplete with location map markers using Web Components

1. Add an `autocompleteRef` to track the autocomplete element.

```
<gmp-place-autocomplete
  ref={autocompleteRef}
  placeholder="Search for a place..."
></gmp-place-autocomplete>
```

1. Include a second `useEffect` that attaches a `handlePlaceSelect` event handler to listen for the `gmp-select` event, which fires when the user selects a place from the autocomplete dropdown. The handler then updates the marker position.

```
useEffect(() => {
  if (!autocompleteRef.current) return;

  const handlePlaceSelect = async ({ placePrediction }) => {
    const place = placePrediction.toPlace();
    await place.fetchFields({ fields: ["location", "displayName"] });

    const location = place.location;
    setMarkerPosition(`${location.lat()},${location.lng()}`);

    // Pan the map to the selected location
    mapRef.current.innerMap.panTo(location);
    mapRef.current.innerMap.setZoom(15);
  };

  autocompleteRef.current.addEventListener("gmp-select", handlePlaceSelect);

  return () => {
    autocompleteRef.current?.removeEventListener(
      "gmp-select",
      handlePlaceSelect,
    );
  };
}, []);
```

1. Include the `marker` library so that `<gmp-advanced-marker>` gets registered.

```
<APIProvider
  apiKey={import.meta.env.VITE_GOOGLE_MAPS_API_KEY}
  libraries={["places", "marker"]}
  version="beta"
></APIProvider>
```

1. Introduce a `markerPosition` state to store the coordinates of the user's selected place.

```
const [markerPosition, setMarkerPosition] = useState(null)
```

1. Insert a `<gmp-advanced-marker>` as a child component of `<gmp-map/>` that renders conditionally when `markerPosition` is set.

```
{
  markerPosition && (
    <>
      {console.log("Marker position:", markerPosition)}
      <gmp-advanced-marker position={markerPosition}></gmp-advanced-marker>
    </>
  );
}
```

Here's what the revised `App.jsx` looks like:

```
import { useRef, useEffect, useState } from 'react'
import { APIProvider } from '@vis.gl/react-google-maps'

function App() {
  const mapRef = useRef(null)
  const autocompleteRef = useRef(null)
  const [markerPosition, setMarkerPosition] = useState(null)

  useEffect(() => {
    if (!mapRef.current) return
    customElements.whenDefined('gmp-map').then(() => {
      mapRef.current.innerMap.setOptions({
        mapTypeControl: false,
      })
    })
  }, [])

  useEffect(() => {
    if (!autocompleteRef.current) return

    const handlePlaceSelect = async ({ placePrediction }) => {
      const place = placePrediction.toPlace()
      await place.fetchFields({ fields: ['location', 'displayName'] })

      const location = place.location
      setMarkerPosition(`${location.lat()},${location.lng()}`)

      // Pan the map to the selected location
      mapRef.current.innerMap.panTo(location)
      mapRef.current.innerMap.setZoom(15)
    }

    autocompleteRef.current.addEventListener('gmp-select', handlePlaceSelect)

    return () => {
      autocompleteRef.current?.removeEventListener('gmp-select', handlePlaceSelect)
    }
  }, [])

  return (
    <APIProvider apiKey={import.meta.env.VITE_GOOGLE_MAPS_API_KEY} libraries={['places', 'marker']} version="beta">
      <gmp-map
        ref={mapRef}
        center="49.2827,-123.1207"
        zoom="13"
        map-id={import.meta.env.VITE_GOOGLE_MAPS_MAP_ID}
        style={{ display: 'block', width: '100vw', height: '100vh' }}
      >
        <div slot="control-inline-start-block-start" style={{ margin: '10px' }}>
          <gmp-place-autocomplete
            ref={autocompleteRef}
            placeholder="Search for a place..."
          ></gmp-place-autocomplete>
        </div>

        {markerPosition && (
          <>
            {console.log('Marker position:', markerPosition)}
            <gmp-advanced-marker position={markerPosition}></gmp-advanced-marker>
          </>
          
        )}
      </gmp-map>
    </APIProvider>
  )
}

export default App
```

Don't worry if the details feel like a lot. The full source code is available in our GitHub repo, [react\_google\_maps\_demo](https://github.com/afilabs/react%5Fgoogle%5Fmaps%5Fdemo?ref=blog.afi.io).

But manually attaching event listeners and reaching into the DOM with refs isn't idiomatic React. A cleaner approach is to use the @vis.gl/react-google-maps built in components, which wrap Google's Maps API in React-friendly components and hooks. That's the approach I recommend, and the one we'll use in the next section.

### Google Autocomplete custom build in react-google-maps 

![Google Autocomplete using custom build](https://storage.ghost.io/c/c6/4d/c64da7e8-63a6-4cff-acdc-2782a6ebc377/content/images/2026/04/Screenshot-2026-04-21-at-1.14.19---PM.png)

Google Autocomplete using custom build

First, a heads-up. @vis.gl/react-google-maps doesn't provide a wrapper component for `google.maps.places.PlaceAutocompleteElement`. Instead, it gives you a `useMapsLibrary('places')` hook ([docs](#)) that loads the [Places Library](https://developers.google.com/maps/documentation/javascript/reference/places-widget?ref=blog.afi.io) and returns it once ready, letting you instantiate `PlaceAutocompleteElement` however you like. 

This is by design. The maintainers have actually explicitly declined to add an autocomplete hook, stating that "providing a good autocomplete solution is a lot more complicated than can properly be implemented in a simple hook" ([source](https://github.com/visgl/react-google-maps/discussions/160?ref=blog.afi.io)).

The good news is that adding your own version of Google Autocomplete to a @vis.gl/react-google-maps app is largely a matter of including boilerplate JSX code to your project and adding a `<PlaceAutocompleteInput/>` component to your render output.

1. In your `/src` folder, create a new `/components` folder and copy the following files into it ([download link](https://github.com/afilabs/react%5Fgoogle%5Fmaps%5Fdemo/tree/main/src/components?ref=blog.afi.io)):  
    
`AutocompleteStyles.css`: Basic styling for the Google Autocomplete widget.  
    
`PlaceAutocompleteInput.jsx`: The Google Autocomplete component.  
    
`SearchBox.css`: Styling for the parent `<SearchBox/>` component.  
    
`SearchBox.jsx`: The component that wraps `<PlaceAutocompleteInput/>`.
2. In `App.jsx`, add `<SearchBox/>` as a sibling of `<Map/>`. If you run the app now you'll see a working Google Autocomplete text field that returns location suggestions as you type. Selecting a location does nothing though because we haven't hooked it up.
3. Add an `autocompletePlace` state variable to store the most recently selected place.

```
const [autocompletePlace, setAutocompletePlace] = useState(null);
```

1. Pass the state setter `setAutocompletePlace` down to the `<SearchBox/>` component as a prop called `onSelectAutocompletePlace`, so the child can update the parent's state when a place is selected.

```
<SearchBox onSelectAutocompletePlace={setAutocompletePlace} />
```

1. Conditionally render a `<Marker/>` component when the `autocompletePlace` is not null i.e. the user has selected a place from the Google Autocomplete widget (also don't forget to import `Marker` at the top i.e. `import { Map, Marker } from '@vis.gl/react-google-maps';`.

```
{
  autocompletePlace && (
    <Marker
      position={{
        lat: autocompletePlace.geometry.location.lat(),
        lng: autocompletePlace.geometry.location.lng(),
      }}
    />
  );
}
```

The magic behind the custom Google Autocomplete implementation takes place in `PlaceAutocompleteInput.jsx`. Its return statement contains a text input field with a `ref="inputRef"`.

```
return (
  <div className="PlaceAutocompleteInput">
    <input ref={inputRef} />
  </div>
);
```

In the `useEffect` hook of `PlaceAutocompleteInput.jsx`, we bind this text input field (using the `ref` mentioned above) to a new Google Places Autocomplete instance:

```
useEffect(() => {
  if (!places || !inputRef.current) return;

  const options = {
    fields: ["place_id", "geometry", "name", "formatted_address"],
  };

  setPlaceAutocomplete(new places.Autocomplete(inputRef.current, options));
}, [places]);
```

From there, Google's Autocomplete class handles the rest. It attaches event listeners, creates and positions the dropdown, and wires up calls to the Google Places API - all automagically.

The last step is to add a listener on the `place_changed` event and pass the selected `place` data to the `onPlaceSelect` prop, which eventually bubbles up to `App.jsx`.

```
useEffect(() => {
  if (!placeAutocomplete) return;

  placeAutocomplete.addListener("place_changed", () => {
    onPlaceSelect(placeAutocomplete.getPlace());
  });
}, [onPlaceSelect, placeAutocomplete]);
```

That's it! You've now got a clean, React idiomatic Google Autocomplete widget wired up to a map with marker placement. From here, you can extend it however you like: enable smooth pan-and-zoom, add custom marker icons, display place details in a sidebar, or [restrict results to specific regions or place types](https://developers.google.com/maps/documentation/javascript/legacy/place-autocomplete?ref=blog.afi.io#constraining-autocomplete).

### Where to go from here

This series has focused on building Google Maps apps in React through small, practical examples. Our tool of choice has been [@vis.gl/react-google-maps](https://visgl.github.io/react-google-maps/?ref=blog.afi.io), though as you've seen, other approaches work just as well. Building a production app is a bigger undertaking, but we've got you covered there too. This blog has plenty of real world examples using various Google Maps APIs, complete with open source code. Here are a few of my favorites:

[Check the weather for any location on Google MapsHow to use the Google Weather API to check the current and forecasted weather for any location in the world.![](https://static.ghost.org/v5.0.0/images/link-icon.svg)![](https://google-maps-weather.afi.dev/logo512.png)](https://google-maps-weather.afi.dev/?ref=blog.afi.io)

[Routes API DemoUse the Google Routes API to find the shortest route between an origin and destination![](https://static.ghost.org/v5.0.0/images/link-icon.svg)![](https://routes-api-demo.afi.dev/logo512.png)](https://routes-api-demo.afi.dev/?ref=blog.afi.io)

[Get time zone information for any location on Google MapsHow to use the Google Time Zone API to get accurate local time anywhere in the world![](https://static.ghost.org/v5.0.0/images/link-icon.svg)![](https://google-time-zone.afi.dev/logo512.png)](https://google-time-zone.afi.dev/?ref=blog.afi.io)

Things move fast in both the React and Google Maps worlds. The easiest way to keep up is to follow the [Google Maps Platform blog](https://mapsplatform.google.com/resources/blog/?ref=blog.afi.io) and check in on [vis.gl](https://visgl.github.io/react-google-maps/?ref=blog.afi.io) now and then for new examples and release notes.

Part 1: [React Google Maps: Build with Google Maps using React](https://blog.afi.io/blog/react-google-maps-build-with-google-maps-using-react/)  
Part 2: [Google Maps with React: Add a Google Map and style it](https://blog.afi.io/blog/react-google-maps-build-with-google-maps-using-react/)  
Part 3: [Work with Google Maps React map markers and info windows](https://blog.afi.io/blog/work-with-google-maps-react-map-markers-and-info-windows/)   
Part 4: [Draw a Google Maps polyline in React](https://blog.afi.io/blog/draw-a-google-maps-polyline-in-react/)  
Part 5: [Three ways to add Google Autocomplete to your React app](https://blog.afi.io/blog/three-ways-to-add-google-autocomplete-to-your-react-app/)

**This article was written by** [**Afi Labs**](https://afi.io/?ref=blog.afi.io)**, a** [**Google Maps Premier Partner**](https://www.afi.io/?ref=blog.afi.io) **and reseller. We build route optimization, navigation, and fleet tracking software on Google Maps, and offer volume pricing on GMP licensing.** [**Talk to an engineer**](https://www.afi.io/contact%5Fus?ref=blog.afi.io) **or** [**follow Afian on LinkedIn**](https://www.linkedin.com/in/afian-anwar/?ref=blog.afi.io)**.**