Build a weather app with the Google Weather API
How to build a simple weather app in React using the Forecast Days endpoint of the Google Weather API.

In this tutorial, we’ll build a simple weather app using the Google Weather API. The app will show the current weather and a five-day forecast for any location worldwide. You’ll learn how to use the Weather API’s Forecast Days endpoint to fetch weather data for a selected location and display it cleanly in a React app, as well as add a Place Autocomplete text box to let users dynamically search and view the weather for different locations (source code: frontend /backend).
Part 1: Meet the Google Weather API: Real time weather for maps
Part 2: Build a weather app with the Google Weather API (this article)
Part 3: Google Maps weather along route: Weather aware route planner
Part 4: Google Maps Weather: Add a weather layer to Google Maps
What is the Forecast Days endpoint of the Google Weather API?
The Forecast Days endpoint of the Google Weather API returns up to 10 days of forecast information for a specific location, starting with the current day. The API response includes all the key details you’d expect from a comprehensive weather forecast, such as:
- Daytime (7:00 AM–7:00 PM) and nighttime (7:00 PM–7:00 AM) weather descriptions, each with corresponding icons
- Daily high and low temperatures
- Daily high and low ‘feels like’ temperatures
- Precipitation details, including probability, percentage, amount, and type
- Wind information, including direction, speed, and gusts
- Sunrise, sunset, moonrise, and moonset times
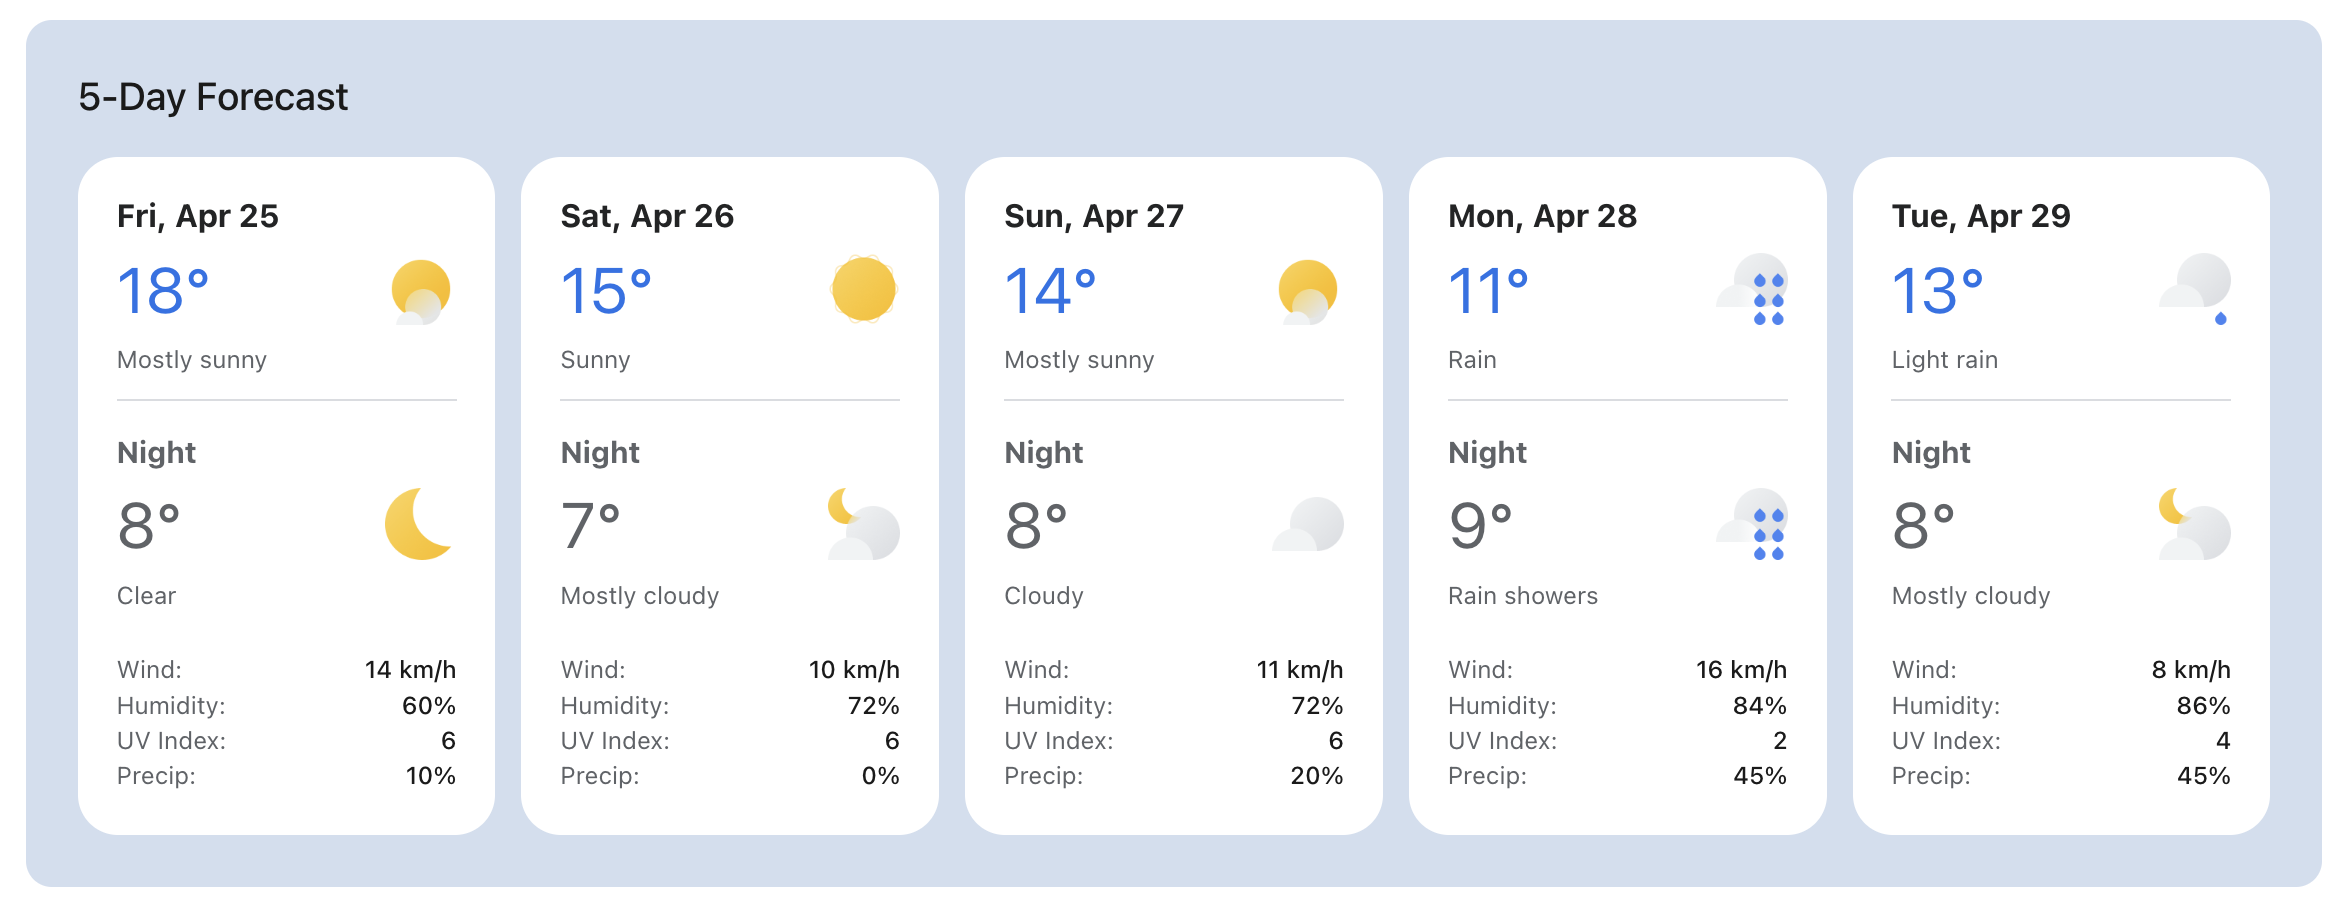
Google Weather API Forecast Days example
Here's a simple example that shows how to retrieve the five-day weather forecast for Vancouver, Canada (49.246292, -123.116226).
Endpoint: GET
https://weather.googleapis.com/v1/forecast/days:lookup?key={YOUR_API_KEY}
&location.latitude={LATITUDE}
&location.longitude={LONGITUDE}
&days={DAYS}
{YOUR_API_KEY} is the is your Google Maps API key with the Google Weather API enabled.
{LATITUDE} is latitude coordinate of the location you want to get weather for.
{LONGITUDE} is the longitude coordinate of the location you want to get weather for.
{DAYS} is the number of days you want to get the forecast for. If you don't set it, it defaults to the maximum of 10 days.
unitsSystem=IMPERIAL to your request.Endpoint: GET
https://weather.googleapis.com/v1/forecast/days:lookup?key={YOUR_API_KEY}
&location.latitude=49.246292&location.longitude=-123.116226&days=5
Response
{
    "forecastDays": [
        {
            "interval": {
                "startTime": "2025-04-25T14:00:00Z",
                "endTime": "2025-04-26T14:00:00Z"
            },
            "displayDate": {
                "year": 2025,
                "month": 4,
                "day": 25
            },
            "daytimeForecast": {
                "interval": {
                    "startTime": "2025-04-25T14:00:00Z",
                    "endTime": "2025-04-26T02:00:00Z"
                },
                "weatherCondition": {
                    "iconBaseUri": "https://maps.gstatic.com/weather/v1/mostly_sunny",
                    "description": {
                        "text": "Mostly sunny",
                        "languageCode": "en"
                    },
                    "type": "MOSTLY_CLEAR"
                },
                "relativeHumidity": 60,
                "uvIndex": 5,
                "precipitation": {
                    "probability": {
                        "percent": 10,
                        "type": "RAIN"
                    },
                    "snowQpf": {
                        "quantity": 0,
                        "unit": "MILLIMETERS"
                    },
                    "qpf": {
                        "quantity": 0,
                        "unit": "MILLIMETERS"
                    }
                },
                "thunderstormProbability": 0,
                "wind": {
                    "direction": {
                        "degrees": 288,
                        "cardinal": "WEST_NORTHWEST"
                    },
                    "speed": {
                        "value": 14,
                        "unit": "KILOMETERS_PER_HOUR"
                    },
                    "gust": {
                        "value": 27,
                        "unit": "KILOMETERS_PER_HOUR"
                    }
                },
                "cloudCover": 95,
                "iceThickness": {
                    "thickness": 0,
                    "unit": "MILLIMETERS"
                }
            },
            "nighttimeForecast": {
                "interval": {
                    "startTime": "2025-04-26T02:00:00Z",
                    "endTime": "2025-04-26T14:00:00Z"
                },
                "weatherCondition": {
                    "iconBaseUri": "https://maps.gstatic.com/weather/v1/clear",
                    "description": {
                        "text": "Clear",
                        "languageCode": "en"
                    },
                    "type": "CLEAR"
                },
                "relativeHumidity": 76,
                "uvIndex": 0,
                "precipitation": {
                    "probability": {
                        "percent": 0,
                        "type": "RAIN"
                    },
                    "snowQpf": {
                        "quantity": 0,
                        "unit": "MILLIMETERS"
                    },
                    "qpf": {
                        "quantity": 0,
                        "unit": "MILLIMETERS"
                    }
                },
                "thunderstormProbability": 0,
                "wind": {
                    "direction": {
                        "degrees": 299,
                        "cardinal": "WEST_NORTHWEST"
                    },
                    "speed": {
                        "value": 16,
                        "unit": "KILOMETERS_PER_HOUR"
                    },
                    "gust": {
                        "value": 27,
                        "unit": "KILOMETERS_PER_HOUR"
                    }
                },
                "cloudCover": 20,
                "iceThickness": {
                    "thickness": 0,
                    "unit": "MILLIMETERS"
                }
            },
            "maxTemperature": {
                "degrees": 18.4,
                "unit": "CELSIUS"
            },
            "minTemperature": {
                "degrees": 8.1,
                "unit": "CELSIUS"
            },
            "feelsLikeMaxTemperature": {
                "degrees": 18,
                "unit": "CELSIUS"
            },
            "feelsLikeMinTemperature": {
                "degrees": 7,
                "unit": "CELSIUS"
            },
            "sunEvents": {
                "sunriseTime": "2025-04-25T13:00:48.332286279Z",
                "sunsetTime": "2025-04-26T03:20:51.280776095Z"
            },
            "moonEvents": {
                "moonPhase": "WANING_CRESCENT",
                "moonriseTimes": [
                    "2025-04-25T11:59:26.781696104Z"
                ],
                "moonsetTimes": [
                    "2025-04-26T00:58:48.759135508Z"
                ]
            },
            "maxHeatIndex": {
                "degrees": 18.4,
                "unit": "CELSIUS"
            }
        }
        //... 4 more entries
    ],
    "timeZone": {
        "id": "America/Vancouver"
    }
}
The response is an array, forecastDays, where each entry represents the daily forecast record at a given location. Within each forecastDay object,
interval provides the startTime and endTime for a day's forecast. For example, in Vancouver, Canada (which is in the Pacific Time Zone, PT), the interval is "2025-04-25T14:00:00Z" to "2025-04-26T14:00:00Z". When converted to Pacific Time, this corresponds to 7:00 AM PT on April 25, 2025, to 7:00 AM PT on April 26, 2025. Having startTime and endTime expressed in ISO 8601 format is useful because it is unambiguous and can be easily understood by both people and machines. For example, you can loop through forecastDays and match a time stamp with weather conditions e.g. if you need the weather forecast for 2025-04-30T14:00:00Z, you could use the isBetween() method of Moment.js (or any modern date time library) to check that the timestamp lies within a given interval.
displayDate provides a human-readable date (year, month, and day) that you can use to determine the day of the week and display in a weather app.
dayTimeForecast gives us the weather information for that day during daytime hours (typically 7 am - 7 pm). This includes:
- A
weatherConditionobject that helpfully supplies us with a human readabledescriptione.g. "Mostly sunny" that can easily be added to a weather app as well as aiconBaseUrithat can be used to retrieve the corresponding weather icon. To display the icon, append the file type extension (.png or .svg) to this URI. precipitation, containing information about thetypeof precipitation forecasted and itsprobabibilitye.g. 10% probability of rain.wind, which gives thedirection(direction from which the wind originates, measured in degrees from North) andspeed(measured in km/h) for the prevailing wind.
nightTimeForecast provides the forecast for the evening and overnight hours (7 pm - 7 am).
maxTemperature is the maximum (high) temperature throughout the day.
minTemperature is the minimum (low) temperature throughout the day.
feelsLikeMaxTemperature is the maximum (high) feels-like temperature throughout the day. "Feels like" temperature is the temperature that your body actually feels, not just what a thermometer measures. It takes into account factors like wind, humidity, and sun exposure that change how warm or cold it feels to you.
feelsLikeMinTemperature is the minimum (low) feels-like temperature throughout the day.
sunEvents provides the sunrise and sunset times. This is especially useful for planning full day activities like hikes or road trips, so you can make sure you return before dark.
The API also returns a timeZone field, which provides the time zone of the requested location in IANA time zone format. This is especially useful for converting timestamps returned by the Weather API (such as sunrise time) into the correct local time.
Google Weather API icon
One nice feature of the Google Weather API is that it provides a weather icon you can use to visually represent the forecast.
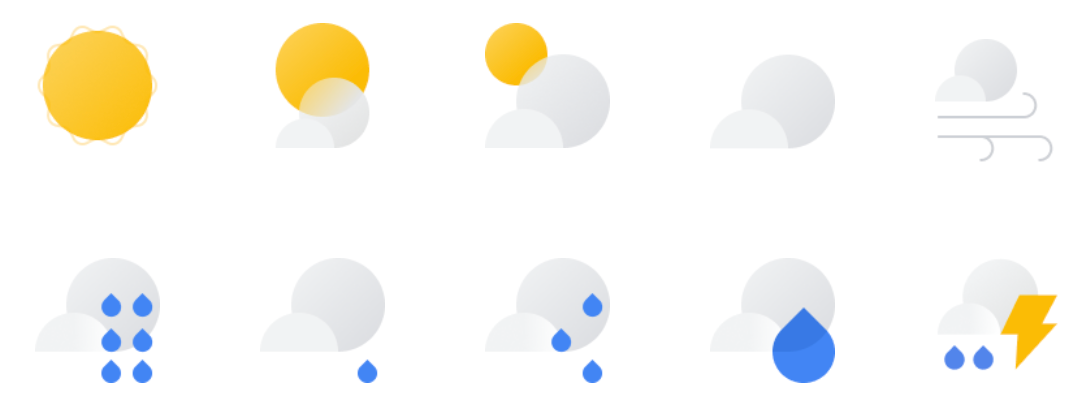
In the weatherCondition object of both dayTimeForecast and nightTimeForecast, you'll find a iconBaseUri that gives you the base URI of the icon. To display the weather icon, add an optional theme (like _dark) and a file extension (.png or .svg) to the iconBaseUri. In React for example, you would render an <img/> element to display the weather icon.
<img
  className="current-weather-icon"
  src={`${weatherCondition?.iconBaseUri || ""}.png`}
  alt={weatherCondition?.description?.text || ""}
/>;
You can find a full list of icons and their descriptions at the official Weather API documentation page.
Google Weather API pagination
By default, the Forecast days endpoint returns five days of forecast information. There are two ways to get more data. You can either increase the days parameter in the request e.g. set days=10:
or pass the nextPageToken value into the pageToken parameter of your next request like so:
https://weather.googleapis.com/v1/forecast/days:lookup?key={YOUR_API_KEY}&location.latitude=49.246292&location.longitude=-123.116226&days=10&pageSize=5&pageToken=ChYKEgkaogp_hp9IQBF5PC0_cMdewBAKEAUYBSIMCLKyycAGEO7BgoQCKhFBbWVyaWNhL1ZhbmNvdXZlcg==
Building a simple weather app in React with the Google Weather API
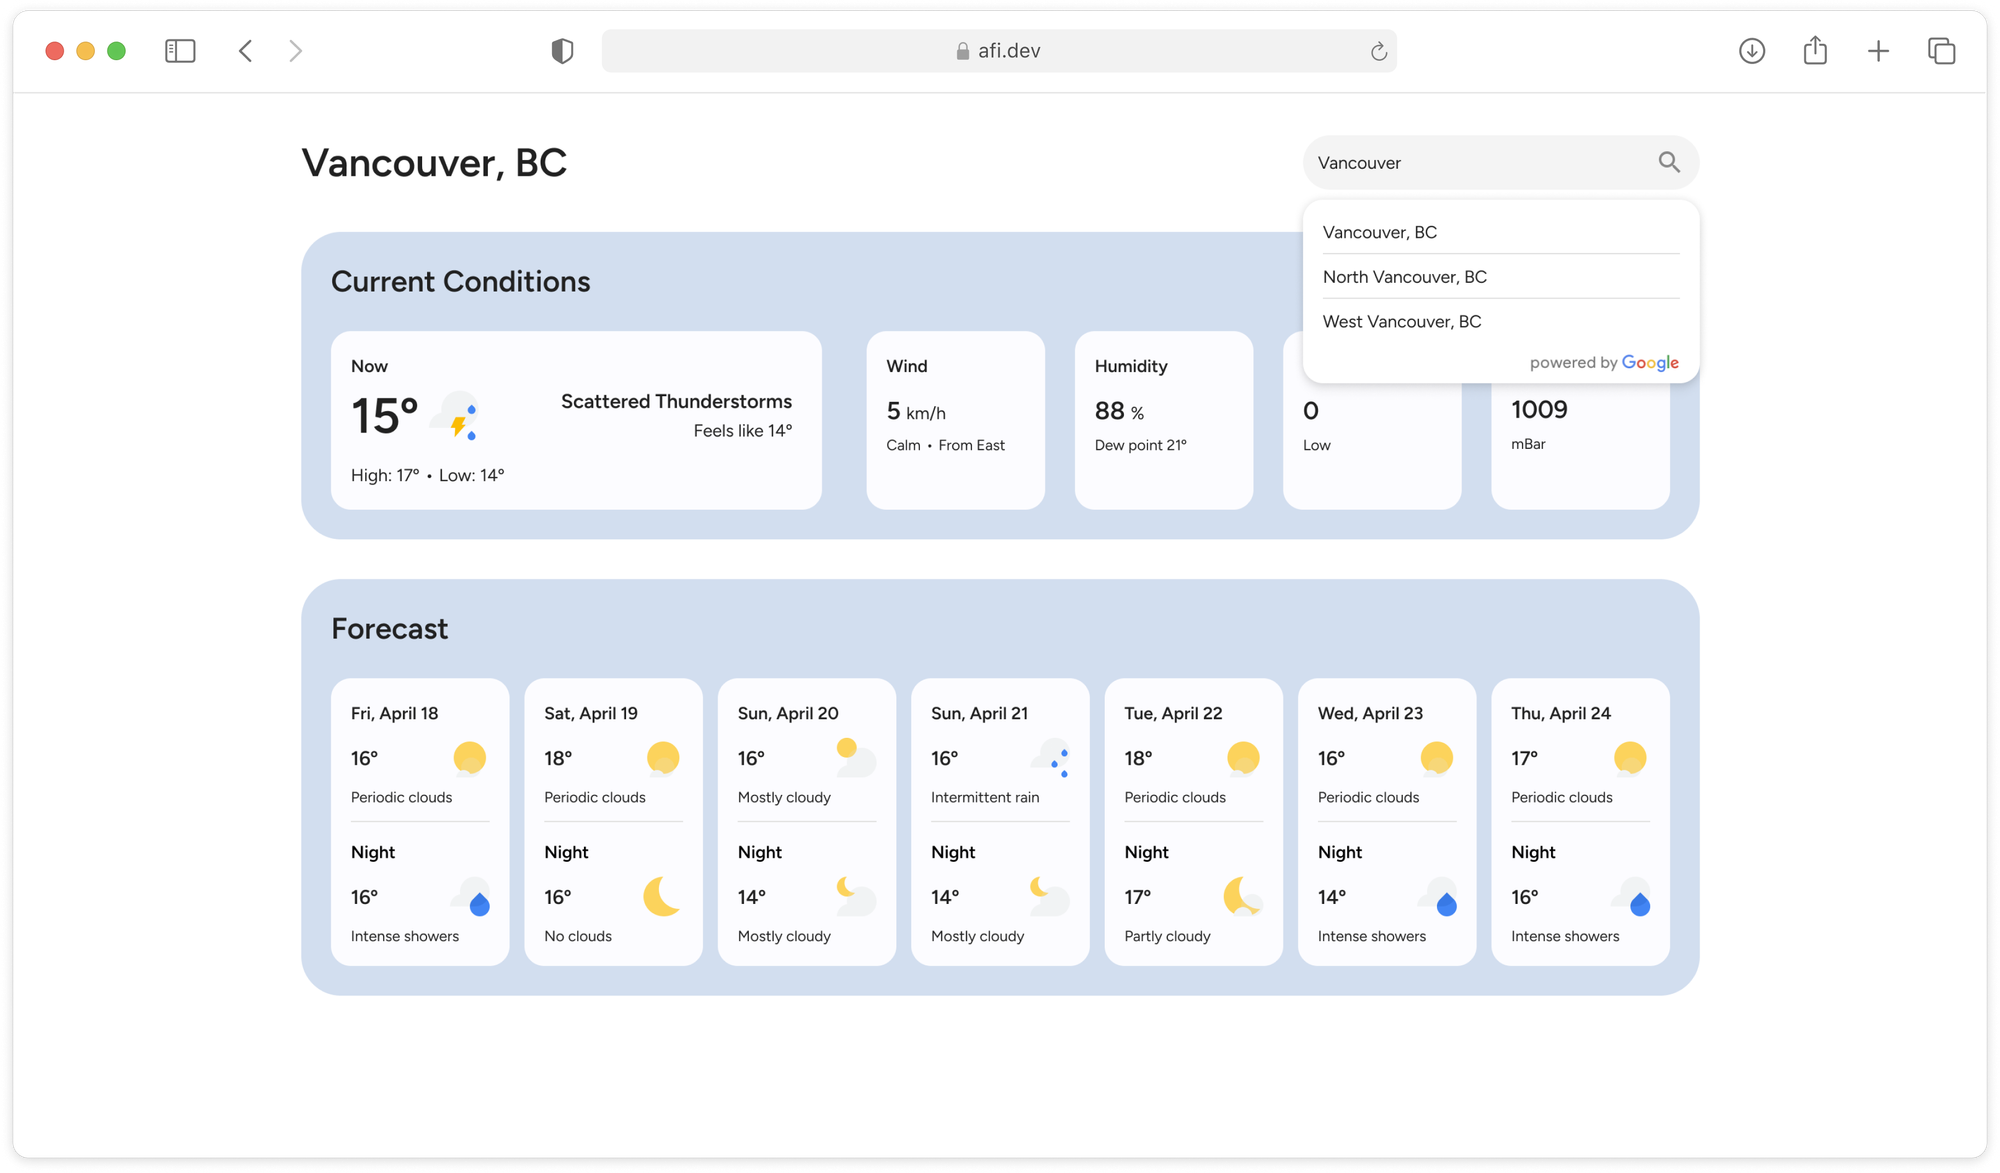
google_weather_frontend is a single-page React app that shows the current weather and five-day forecast for any location worldwide. It works together with google_weather_backend, which retrieves place data from Google Place Autocomplete and fetches weather information from the Current Conditions and Forecast Days endpoints of the Google Weather API.
If you don't want to pull the code from GitHub and run the app locally, you can play around with a live demo at https://google-weather-demo.afi.dev/.
How our code is organized
Although google_weather_frontend and google_weather_backend are in separate repositories, they are joined at the hip. The frontend sends internal API requests to the backend’s /places, /place-details, /current-conditions, and /forecast endpoints. The backend then forwards these requests to the appropriate Google Maps APIs and returns the results to the frontend, which displays them in React.

Google Weather Frontend
App.jsx
App.jsx in google_weather_frontend is the main entry point into the app. It manages the overall structure, routing, and layout of the app of course, but it is also responsible for managing state i.e. it holds data for the location, currentConditions and forecastData state variables.
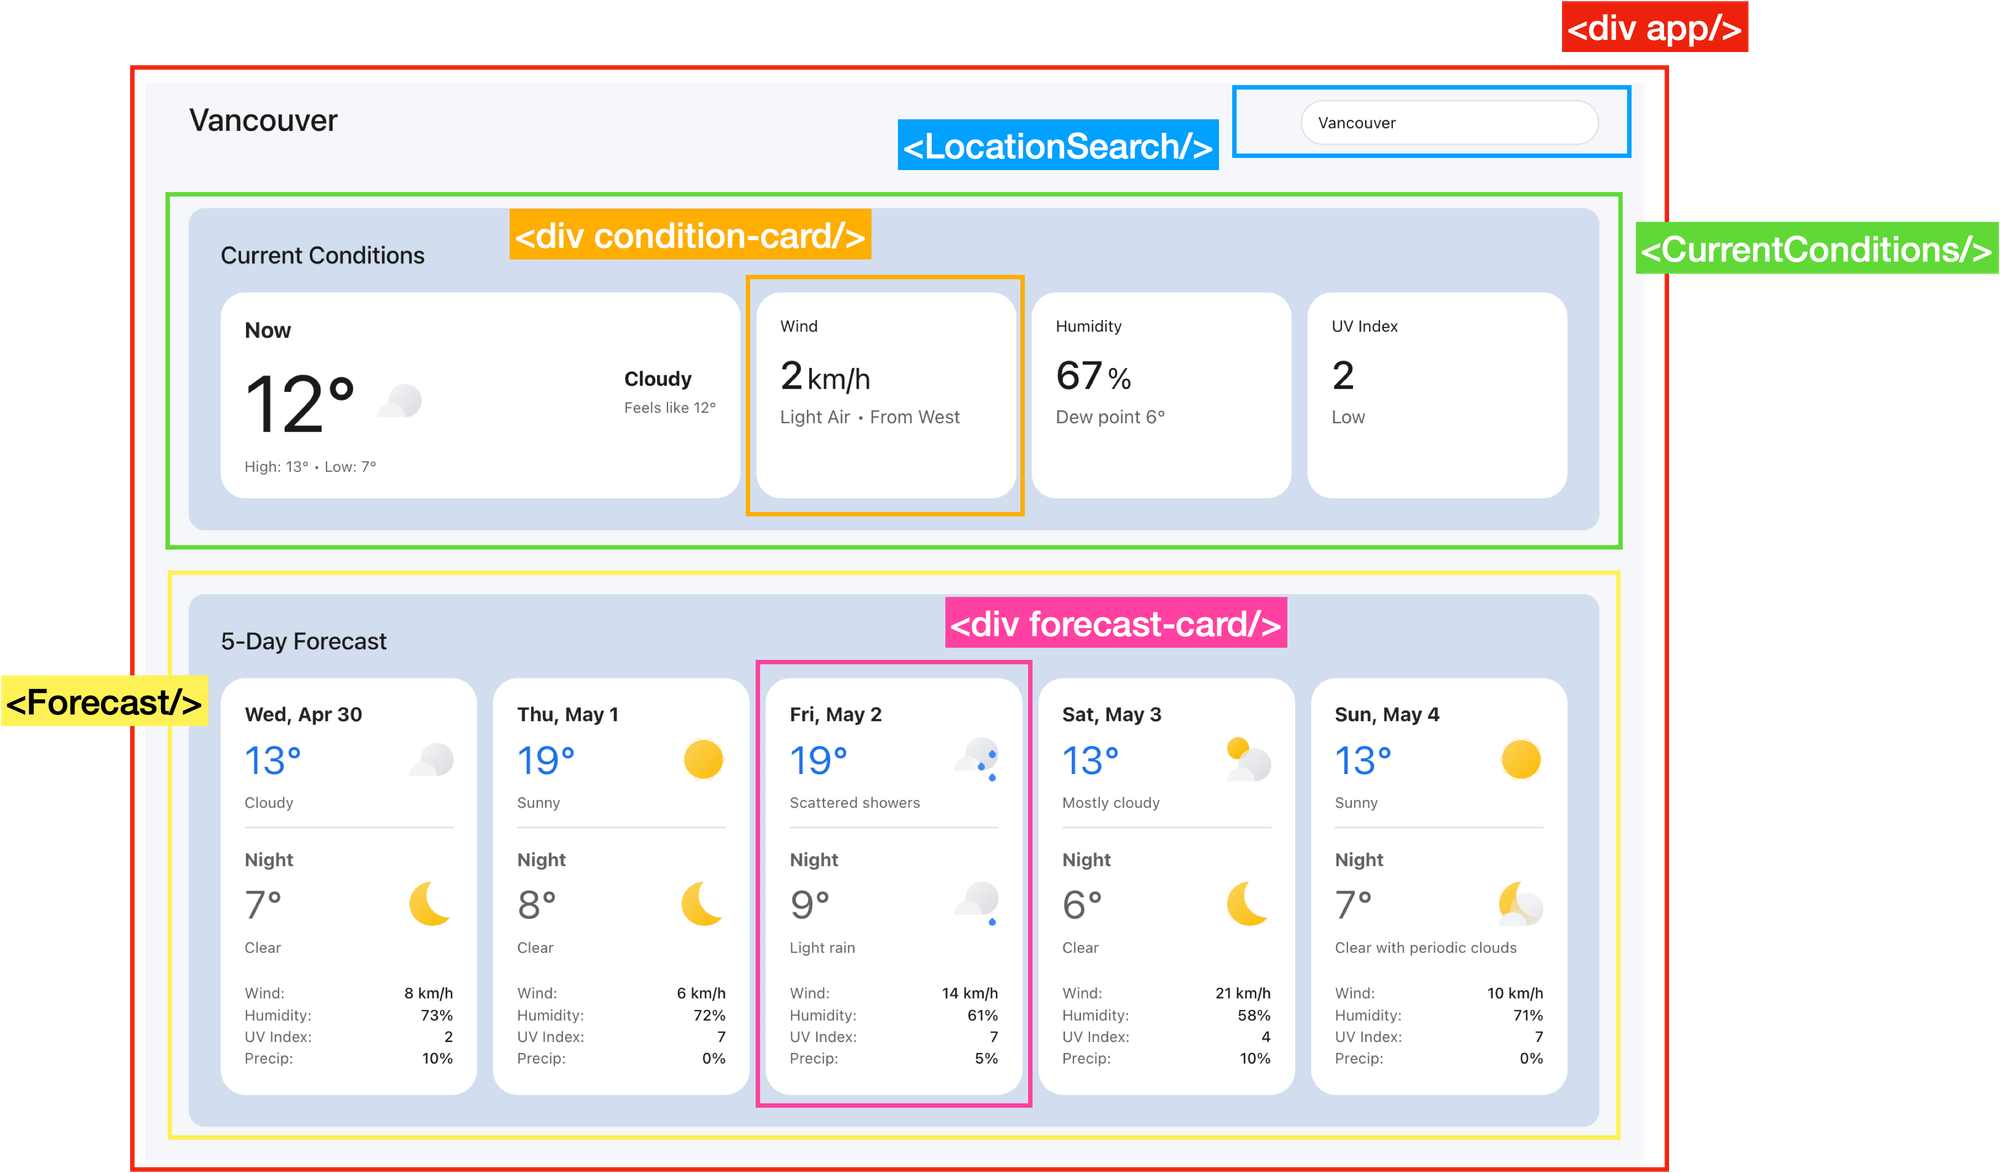
App.jsx has three child components:
<LocationSearch/>: Renders a Place Autocomplete text box that lets users search for and select a location.
<CurrentConditions/>: Uses the Current Conditions endpoint of the Weather API to get weather conditions right now at the selected location.
<Forecast/>: Fetches the five day weather forecast for the selected location using the Weather API's Forecast endpoint.
LocationSearch.jsx
LocationSearch.jsx contains a React text input that triggers the handleSearch() function whenever its value changes.
/*** components/LocationSearch.jsx ***/
return (
  <div className="location">
    <h1 className="location-title">{currentLocation}</h1>
    <div className="search-container">
      <input
        type="text"
        className="search-input"
        value={query}
        onChange={(e) => {
          setQuery(e.target.value);
          handleSearch(e.target.value);
        }}
        placeholder="Search location..."
        autoComplete="off"
      />
      // ... autocomplete-results div
    </div>
  </div>
);
In handleSearch(), we first check if the user has entered any text. If not, we simply reset the results state variable to an empty array. Next, we implement debounced search logic with a 300 millisecond delay after typing. This ensures the call to the searchPlaces() method of placesService.js and the pass through API call to Google Place Autocomplete is only triggered after the user finishes entering their search query, reducing unnecessary calls and saving money ($2.83 CPM).
/*** components/LocationSearch.jsx ***/
import { searchPlaces, getPlaceDetails } from '../services/placesService';
const handleSearch = async (value) => {
if (!value.trim()) {
setResults([]);
setIsOpen(false);
return;
}
clearTimeout(searchTimeout.current);
searchTimeout.current = setTimeout(async () => {
try {
const predictions = await searchPlaces(value);
setResults(predictions);
setIsOpen(true);
} catch (error) {
console.error('Error searching places:', error);
setResults([]);
}
}, 300);
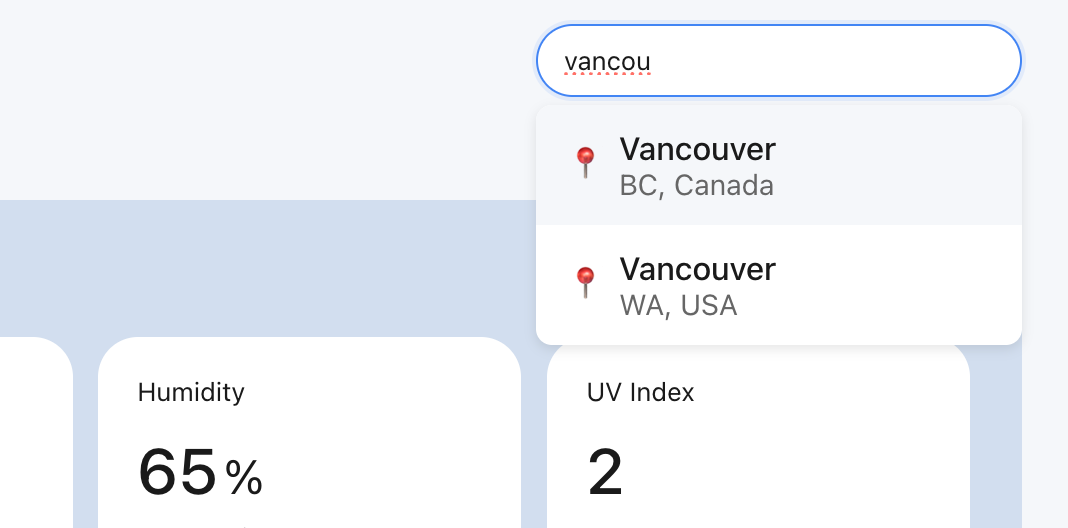
};If there's a match, the endpoint returns an array of matching predictions objects. For example, the text string "vancouver" returns an array of two objects, one for Vancouver, BC and the other for Vancouver, WA:

These predictions are saved to the results state variable and the autocomplete-results drop down list is automatically re-rendered with the new values.
/*** components/LocationSearch.jsx ***/
return (
  <div className="location">
    <h1 className="location-title">{currentLocation}</h1>
    <div className="search-container">
      // ... <input/> component
      {isOpen && results.length > 0 && (
        <div className="autocomplete-results">
          {results.map((place, index) => (
            <div
              key={place.place_id}
              className={`autocomplete-item ${index === selectedIndex ? "selected" : ""}`}
              onClick={() => handleSelectPlace(place)}
              onMouseOver={() => setSelectedIndex(index)}
            >
              <span className="location-icon">📍</span>
              <div>
                <div className="main-text">
                  {place.structured_formatting.main_text}
                </div>
                <div className="secondary-text">
                  {place.structured_formatting.secondary_text}
                </div>
              </div>
            </div>
          ))}
        </div>
      )}
    </div>
  </div>
);
When a user selects a place from the list of autocomplete suggestions, the handleSelectPlace() method is called and the place_id of the selected place is used to retrieve its name, lat and lng from the Place Details API via the /place-details endpoint of google_weather_backend. This data is passed to the onLocationSelect prop which calls the handleLocationSelect() method of App.jsx.
/*** components/LocationSearch.jsx ***/
const handleSelectPlace = async (place) => {
  try {
    const details = await getPlaceDetails(place.place_id);
    if (details?.geometry?.location) {
      onLocationSelect({
        name: place.description,
        lat: details.geometry.location.lat,
        lng: details.geometry.location.lng,
      });
      setQuery(place.description);
      setIsOpen(false);
    }
  } catch (error) {
    console.error("Error getting place details:", error);
  }
};
In handleLocationSelect(), the location state variable is updated, which automatically displays the location's name at the top left of the app. Meanwhile, fetchWeather is called to send the location's latitude and longitude to the Google Weather API, retrieving the current and forecasted weather conditions.
/*** App.jsx ***/
const handleLocationSelect = ({ name, lat, lng }) => {
  setLocation({ name, lat, lng });
  fetchWeather(lat, lng);
};
placesService.js
placesService.js is middleware. Its searchPlaces() function sets up a request client (powered by the Axios library) that receives the address string entered by the user and passes it to the /places endpoint of google_weather_backend. When a response is retrieved, the predictions array is handed back to LocationSearch.jsx.
/*** services/placesService.js ***/
import axios from "axios";

const API_BASE_URL = process.env.REACT_APP_API_URI;

const api = axios.create({
  baseURL: API_BASE_URL,
  timeout: 5000,
  headers: {
    "Content-Type": "application/json",
  },
});

export const searchPlaces = async (input) => {
  try {
    const response = await api.get("/places", {
      params: {
        input,
        types: "geocode",
      },
    });
    return response.data.predictions;
  } catch (error) {
    if (error.response) {
      throw new Error(`Server error: ${error.response.status}`);
    } else if (error.request) {
      throw new Error("No response from server");
    } else {
      throw new Error(`Request error: ${error.message}`);
    }
  }
};
Similarly, the getPlaceDetails() method of placesService.js uses the placeId retrieved from Place Autocomplete to retrieve the latitude and longitude of the location by sending it on to the /place-details endpoint of google_weather_backend, which in turn makes a pass through call to the Google Place Details API to get it.
Likewise, the getPlaceDetails() method in placesService.js takes the placeId from Place Autocomplete and sends it to the /place-details endpoint of google_weather_backend. This backend service then forwards the request to the Google Place Details API to retrieve the location's latitude and longitude.
/*** services/placesService.js ***/
export const getPlaceDetails = async (placeId) => {
  try {
    const response = await api.get("/place-details", {
      params: {
        placeId,
      },
    });
    return response.data.result;
  } catch (error) {
    if (error.response) {
      throw new Error(`Server error: ${error.response.status}`);
    } else if (error.request) {
      throw new Error("No response from server");
    } else {
      throw new Error(`Request error: ${error.message}`);
    }
  }
};
weatherService.js
Just like placeService.js, weatherService.js is a service layer that uses the Axios library to make API calls to google_weather_backend. It provides two asynchronous functions: fetchCurrentConditions() and fetchWeatherData() that are used to retrieve the current and forecasted weather conditions from the Google Weather API.
The fetchCurrentConditions() method takes the latitude and longitude obtained from the Google Place Details API and sends them to the /current-conditions endpoint of google_weather_backend. The backend then forwards this request to the Weather API's Current Conditions endpoint to fetch the latest weather data for that location.
/*** services/weatherService.js ***/
export const fetchCurrentConditions = async (latitude, longitude) => {
  try {
    const response = await api.get("/current-conditions", {
      params: {
        latitude,
        longitude,
      },
    });

    if (!response.data) {
      throw new Error("No current conditions data available");
    }

    return response.data;
  } catch (error) {
    // ... error handling code
  }
};
Similarly, the fetchWeatherData() method uses the same latitude and longitude values to get five days of predicted weather data from the Forecast endpoint of the Weather API via the /forecast endpoint of google_weather_backend.
/*** services/weatherService.js ***/
export const fetchWeatherData = async (latitude, longitude) => {
  try {
    const response = await api.get("/forecast", {
      params: {
        latitude,
        longitude,
        days: 5,
      },
    });

    if (
      !response.data.forecastDays ||
      response.data.forecastDays.length === 0
    ) {
      throw new Error("No forecast data available");
    }

    return response.data;
  } catch (error) {
    // ... error handling code
  }
};
CurrentConditions.jsx
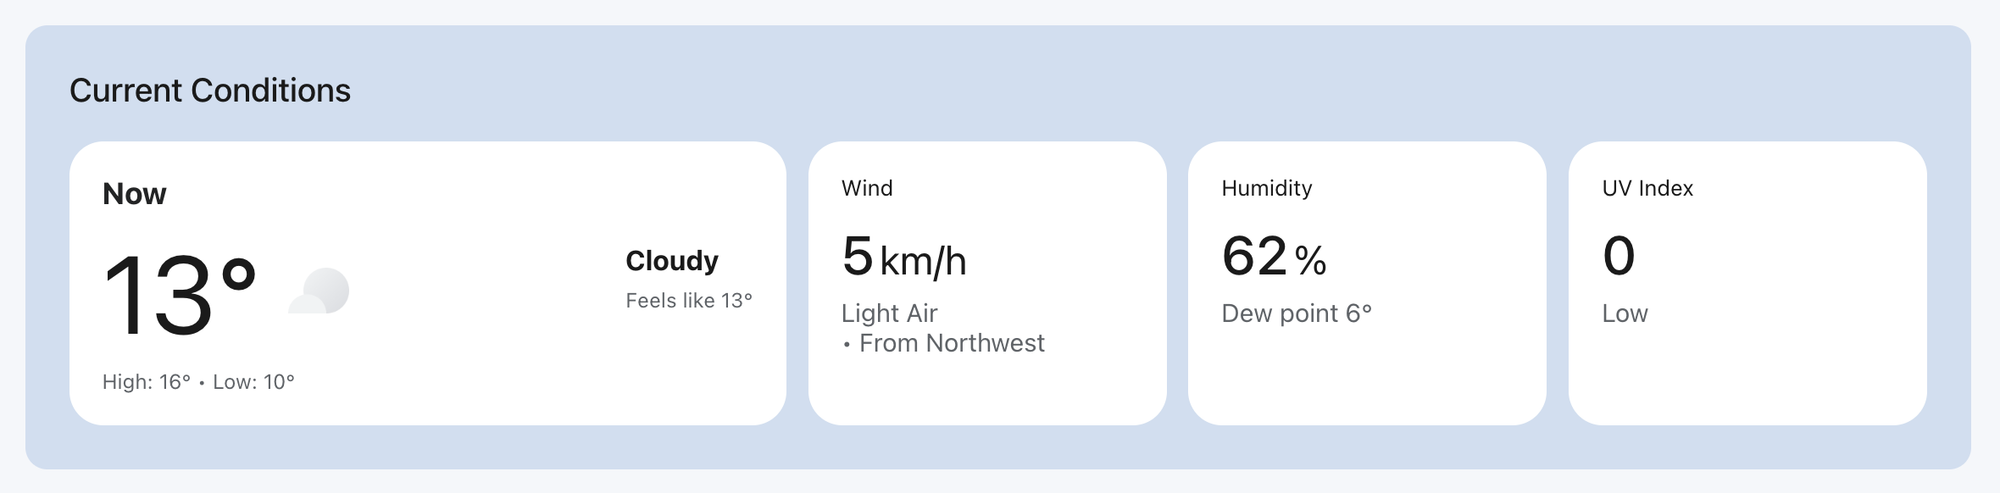
The data returned by the the /current-conditions endpoint represents the current weather conditions at the requested location. To make use of it we first use object destructuring to only extract the fields we are interested in.
/*** components/CurrentConditions.jsx ***/
const {
  temperature,
  feelsLikeTemperature,
  weatherCondition,
  wind,
  relativeHumidity,
  uvIndex,
  dewPoint,
  currentConditionsHistory,
} = data;
Next, in the return statement of CurrentConditions.jsx, we use Javascript expressions to use conditional rendering to selectively display data returned by the Google Weather API.
For example, the code below checks if the degrees property exists inside the temperature object and is not undefined. If this condition is true, it renders a <div> with the class name main-temp.
/*** components/CurrentConditions.jsx ***/
<div className="temp-container">
  {temperature?.degrees !== undefined && (
    <div className="main-temp">{Math.round(temperature.degrees)}°</div>
  )}
  <img
    className="current-weather-icon"
    src={`${weatherCondition?.iconBaseUri || ""}.png`}
    alt={weatherCondition?.description?.text || ""}
  />
</div>;
It also uses optional chaining to safely access the iconBaseUri property inside weatherCondition and display a weather icon. If weatherCondition is null or undefined, it will not throw an error—it just resolves to undefined. And if iconBaseUri is undefined or null, it defaults to an empty string which prevents a null.png or undefined.png source.
To give a concrete example, if weatherCondition.iconBaseUri resolves to "http://maps.gstatic.com/weather/v1/cloudy", <img src /> will become "http://maps.gstatic.com/weather/v1/cloudy.png" which resolves to an image of clouds ☁️ (see Google Weather API icons).
Forecast.jsx
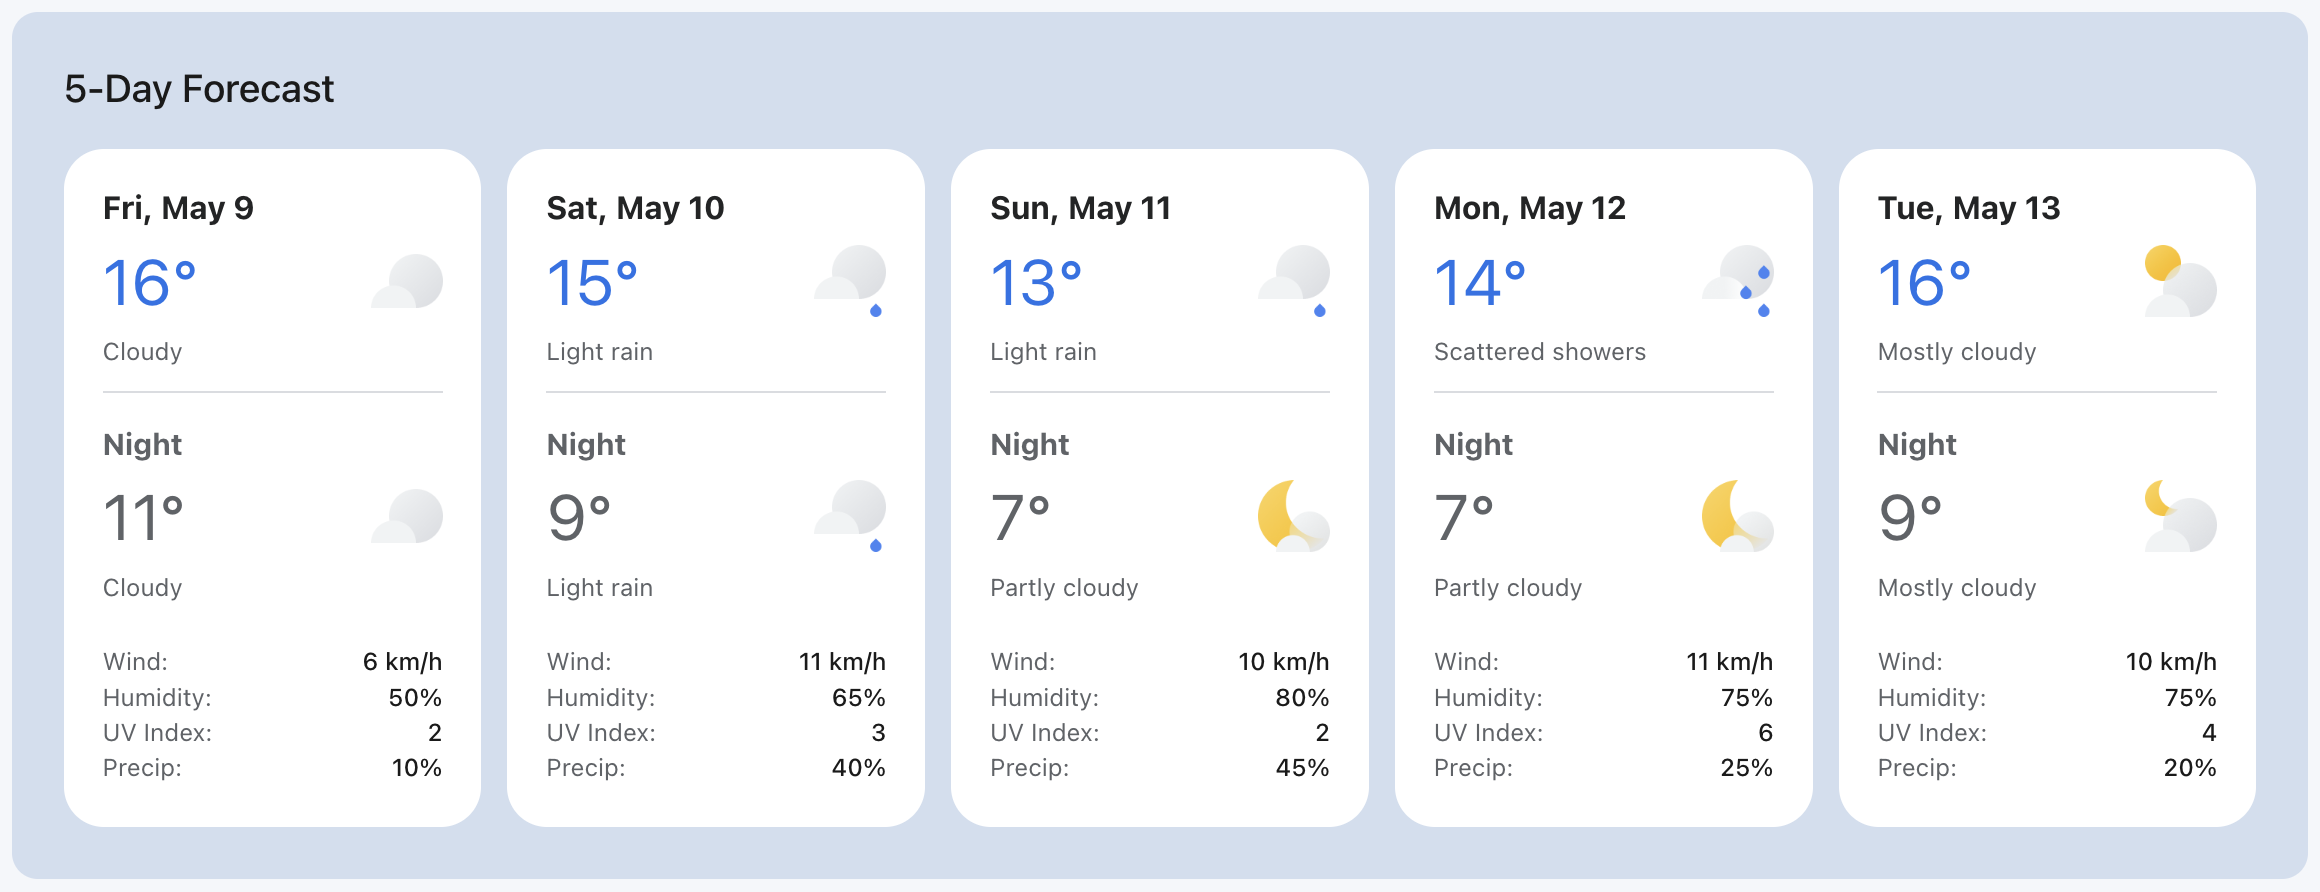
Forecast.jsx is a presentational component that works very similarly to CurrentConditions.jsx, except that it uses the five day forecast data returned by the /forecast endpoint to display a grid of forecast-card divs, one for each day.
<Forecast>
│
├── <h2>5-Day Forecast</h2>
│
├── <div className="forecast-grid"> // Grid container for the forecast cards
│   │
│   ├── Loop through `forecastDays.map(...)`
│   │   ├── <div className="forecast-card"> // Each Forecast Card
│   │   │   │
│   │   │   ├── <div className="forecast-date"> // Date of the forecast
│   │   │   │   └── [Formatted Date]
│   │   │   │
│   │   │   ├── **Day Section**
│   │   │   │   ├── <div className="forecast-temp day-temp">
│   │   │   │   │   ├── [Max Temperature °] (if available)
│   │   │   │   │   └── <img className="weather-icon" src="[Icon URL]" alt="[Description]" />
│   │   │   │   └── <div className="forecast-description day-description">
│   │   │   │       └── [Daytime Weather Description]
│   │   │   │
│   │   │   ├── <div className="break-line"></div> // Divider
│   │   │   │
│   │   │   ├── **Night Section**
│   │   │   │   ├── <div className="night-label">Night</div>
│   │   │   │   ├── <div className="forecast-temp night-temp">
│   │   │   │   │   ├── [Min Temperature °] (if available)
│   │   │   │   │   └── <img className="weather-icon" src="[Icon URL]" alt="[Description]" />
│   │   │   │   └── <div className="forecast-description night-description">
│   │   │   │       └── [Nighttime Weather Description]
│   │   │   │
│   │   │   └── **Additional Details**
│   │   │       ├── <div className="forecast-details">
│   │   │       │   ├── <div className="detail-item">
│   │   │       │   │   ├── <span className="label">Wind:</span>
│   │   │       │   │   └── <span className="value">[Wind Speed]</span>
│   │   │       │   │
│   │   │       │   ├── <div className="detail-item">
│   │   │       │   │   ├── <span className="label">Humidity:</span>
│   │   │       │   │   └── <span className="value">[Humidity %]</span>
│   │   │       │   │
│   │   │       │   ├── <div className="detail-item">
│   │   │       │   │   ├── <span className="label">UV Index:</span>
│   │   │       │   │   └── <span className="value">[UV Index]</span>
│   │   │       │   │
│   │   │       │   └── <div className="detail-item">
│   │   │       │       ├── <span className="label">Precip:</span>
│   │   │       │       └── <span className="value">[Precipitation %]</span>
│   │   │       │
│   │   │       └── </div> // End of .forecast-details
│   │   │
│   │   └── </div> // End of .forecast-card
│   │
│   └── </div> // End of forecast-grid
│
└── </div> // End of Forecast
Google Weather Backend
index.js
Now on to the backend. google_weather_backend runs on an Express web server, listening on port 4000 (you can change this in the .env file). Requests are routed to index.js for handling. There are four main methods, each corresponding to the /places, /placeDetails, /currentConditions and /forecast endpoints called by google_weather_frontend.
/*** index.js ***/
const express = require("express");
const axios = require("axios");
const cors = require("cors");
const path = require("path");

// Load environment variables based on NODE_ENV
const envFile = process.env.NODE_ENV === "test" ? ".env.test" : ".env";
require("dotenv").config({ path: path.resolve(__dirname, envFile) });

const app = express();
const PORT = process.env.PORT || 3000;

// ... CORS configuration code

app.use(express.json());

// Google Maps Places API proxy endpoint
app.get("/api/places", async (req, res) => {
  try {
    const { input, types } = req.query;

    if (!input) {
      return res
        .status(400)
        .json({ error: "Input query parameter is required" });
    }

    const response = await axios.post(
      "https://places.googleapis.com/v1/places:autocomplete",
      {
        input,
        includedPrimaryTypes: types ? [types] : undefined,
      },
      {
        headers: {
          "Content-Type": "application/json",
          "X-Goog-Api-Key": process.env.GOOGLE_MAPS_API_KEY,
          "X-Goog-FieldMask":
            "suggestions.placePrediction.text.text,suggestions.placePrediction.placeId,suggestions.placePrediction.types",
        },
      },
    );

    // Transform the response to match the previous API structure
    const predictions = response.data.suggestions.map((suggestion) => ({
      description: suggestion.placePrediction.text.text,
      place_id: suggestion.placePrediction.placeId,
      types: suggestion.placePrediction.types,
    }));

    res.json({ predictions });
  } catch (error) {
    console.error("Error fetching places data:", error);
    res.status(500).json({ error: "Failed to fetch places data" });
  }
});

// Place Details API endpoint
app.get("/api/place-details", async (req, res) => {
  try {
    const { placeId } = req.query;

    if (!placeId) {
      return res
        .status(400)
        .json({ error: "placeId query parameter is required" });
    }

    const response = await axios.get(
      "https://maps.googleapis.com/maps/api/place/details/json",
      {
        params: {
          key: process.env.GOOGLE_MAPS_API_KEY,
          place_id: placeId,
          fields: "geometry,name,formatted_address",
        },
      },
    );

    res.json(response.data);
  } catch (error) {
    console.error("Error fetching place details:", error);
    res.status(500).json({ error: "Failed to fetch place details" });
  }
});

// Weather API endpoint
app.get("/api/current-conditions", async (req, res) => {
  try {
    const { latitude, longitude } = req.query;

    if (!latitude || !longitude) {
      return res
        .status(400)
        .json({ error: "Latitude and longitude are required" });
    }

    const response = await axios.get(
      "https://weather.googleapis.com/v1/currentConditions:lookup",
      {
        params: {
          key: process.env.GOOGLE_MAPS_API_KEY,
          "location.latitude": latitude,
          "location.longitude": longitude,
        },
      },
    );

    res.json(response.data);
  } catch (error) {
    console.error("Error fetching weather data:", error);
    res.status(500).json({ error: "Failed to fetch weather data" });
  }
});

// Forecast API endpoint
app.get("/api/forecast", async (req, res) => {
  try {
    const { latitude, longitude, days } = req.query;

    if (!latitude || !longitude) {
      return res
        .status(400)
        .json({ error: "Latitude and longitude are required" });
    }

    // Validate and limit days parameter
    const requestedDays = parseInt(days) || 1;
    if (requestedDays < 1 || requestedDays > 7) {
      return res
        .status(400)
        .json({ error: "Days parameter must be between 1 and 7" });
    }

    const response = await axios.get(
      "https://weather.googleapis.com/v1/forecast/days:lookup",
      {
        params: {
          key: process.env.GOOGLE_MAPS_API_KEY,
          "location.latitude": latitude,
          "location.longitude": longitude,
          days: requestedDays,
        },
      },
    );

    res.json(response.data);
  } catch (error) {
    console.error("Error fetching forecast data:", error);
    res.status(500).json({ error: "Failed to fetch forecast data" });
  }
});

// ... module check to determine if the current index.js is run directly

module.exports = app;
Each method follows the same pattern. Take the /current-conditions endpoint for example, which acts as a proxy to the Google Weather API to fetch the current weather conditions for a specified latitude and longitude.
/*** index.js ***/
const axios = require("axios");

app.get("/api/current-conditions", async (req, res) => {
  try {
    const { latitude, longitude } = req.query;

    if (!latitude || !longitude) {
      return res
        .status(400)
        .json({ error: "Latitude and longitude are required" });
    }

    const response = await axios.get(
      "https://weather.googleapis.com/v1/currentConditions:lookup",
      {
        params: {
          key: process.env.GOOGLE_MAPS_API_KEY,
          "location.latitude": latitude,
          "location.longitude": longitude,
        },
      },
    );

    res.json(response.data);
  } catch (error) {
    console.error("Error fetching weather data:", error);
    res.status(500).json({ error: "Failed to fetch weather data" });
  }
});
First, we import the Axios HTTP request library.
const axios = require("axios");
Second, we use Axios to define a GET route for /api/current-conditions. This endpoint is called by weatherService.jsx in google_weather_frontend.
app.get("/api/current-conditions", async (req, res) => { }
Next, we destructure latitude and longitude from the request's query parameters.
const { latitude, longitude } = req.query;
For example, if the frontend makes a call to /api/current-conditions?latitude=49.257&longitude=-123.206 (Vancouver, Canada), Javascript object detructuring will be able to extract "49.257" and "-123.206" from the URL.
After that, we use Axios to make a HTTP GET request to https://weather.googleapis.com/v1/currentConditions:lookup.
const response = await axios.get(
  "https://weather.googleapis.com/v1/currentConditions:lookup",
  {
    params: {
      key: process.env.GOOGLE_MAPS_API_KEY,
      "location.latitude": latitude,
      "location.longitude": longitude,
    },
  },
);
This sends the following query parameters to the Current Conditions endpoint of the Google Weather API:
key: Your Google Maps API Key, pulled from environment variables."location.latitude": The latitude from the query string."location.longitude": The longitude from the query string.
The full request might look like:
https://weather.googleapis.com/v1/currentConditions:lookup?key=YOUR_API_KEY&location.latitude=49.257&location.longitude=-123.206
If the API call is successful, we sends back the data from the Google Weather API as JSON, unmodified.
res.json(response.data);
Deploy and run
To test the app, simply visit https://google-weather-demo.afi.dev/ and enter an address into the search box on the top right. If you'd like to run the app locally, fork both google_weather_frontend and google_weather_backend on GitHub and run npm install to install dependencies. Start the app by running npm start in each folder, then open http://localhost:3001/ in your browser to view it. Remember to update the .env files in the backend with a Google Maps API key that has both the Places API and Weather API enabled.
What comes next
This tutorial showed you how to use the Google Weather API to build a simple weather app. This was fun, but you probably won't be able to build a viable business with it because you'll have to compete with all the other Weather apps out there (also, it may violate Google's Terms of Service, as their APIs cannot be used to develop products or services that compete with Google). But what if you could combine the Weather API with other Google Maps APIs to build something cool and useful? I'll show you how do exactly that in my next blog post.
👋 As always, if you have any questions or suggestions for me, please reach out or say hello on LinkedIn.
Part 3: Google Maps weather along route: Weather aware route planner