Google Cloud Fleet Routing: CFR OptimizeTours API
Cloud Fleet Routing Deep Dive - Hands on with CFR, Google's newest Route Optimization API.

Cloud Fleet Routing (CFR) is Google's latest route optimization API. It lets you plan cost effective routes for multiple vehicles within a fleet by sending over a JSON payload and receiving a route solution - the optimal assignment of drivers to stops and the sequence in which each driver should visit the stops on his route.
In this blog post, I will highlight Cloud Fleet Routing's main features, explain pricing and run through a worked example (source code: frontend + backend) showing you how to call the cloud fleet routing OptimizeTours API and display the returned route solution on a map.
Part 1: Google Mobility: An introduction to Google ODRD, LMFS and Cloud Fleet Routing APIs
Part 2: Google ODRD: Routes Preferred ComputeRoutes API
Part 3: Google LMFS: ComputeRouteMatrix API
Part 4: Google Cloud Fleet Routing: OptimizeTours API (this article)
Part 5: Google ODRD: Navigation SDK
What is route optimization?
Route optimization is the process of strategically planning the most efficient and cost-effective routes for multiple vehicles within a fleet. The primary goal of route optimization is to minimize various factors, such as time, distance, fuel consumption, and operational costs, while ensuring that all required stops are made in a timely and efficient manner. It helps logistics and delivery companies answer the question, "How many vehicles do I need to serve all my customer deliveries tomorrow?" or, "For each driver, in what order should I sequence his route?".

The main benefits of route optimization for any logistics and last mile delivery company are threefold:
- Time savings: It dramatically reduces the time and effort spent on manual route planning, a task that can typically consume several hours each day.
- Efficiency: Routes generated by a fleet optimization API such as Cloud Fleet Routing are guaranteed to be optimal or very close to it. This results in reduced vehicle mileage, lower fuel consumption, and decreased operational costs.
- Enhanced customer service: The generated route solution also includes Estimated Arrival Times (ETAs), which can be used to tell customers when their delivery is scheduled to arrive, thereby improving customer satisfaction and trust.
Cloud Fleet Routing is API (Application Programming Interface) only and is designed to be used by logistics software applications on the backend. Unlike web based route optimization platforms like Circuit, Onfleet or Parcelizer, it doesn't have a dashboard where you can upload data and have it optimized automatically.
Cloud Fleet Routing features
Cloud Fleet Routing, like any route optimization API, works by having your app send over three pieces of information:
shipments: pickups and deliveries that need to be completed on a certain day.vehicles: drivers that are available to fulfill these pickups and deliveries.constraints: conditions that the route must satisfy. These can be requirements like time windows e.g. a delivery must be made between 9 am and 11 am in the morning or capacity constraints e.g. a delivery must be made at an address between 9 am and 11 am in the morning.
Here's how Cloud Fleet Routing's feature set compares with an open source solver like jsprit and a commercial route optimization API provider such as Routific.
| Cloud Fleet Routing | Open Source (jsprit) | Routific | |
|---|---|---|---|
| Time Windows | ✅ | ✅ | ✅ |
| Loads + Capacities | ✅ | ✅ | ✅ |
| Skills + Types | 💠 | ✅ | ✅ |
| Real Time Traffic | ✅ | ❌ | ❌ |
| Stop Durations | ✅ | ✅ | ✅ |
| Multiple Loads + Capacities | ✅ | ✅ | ✅ |
| Driver Shifts | ✅ | ✅ | ✅ |
| Driver End Location | ✅ | ✅ | ✅ |
Time windows let you specify the start and end times during which a delivery must be made e.g. during business hours 09:00 - 17:00.
Loads + capacities ensures that the number of packages assigned to a driver will never exceed the weight or size limit of his vehicle.
Skills + types enable you to assign drivers with specific skills to stops of a specific type e.g. you might want to match a driver with the skill oversize to large packages deliveries with the oversize type. This ensures that the driver has the right kind of equipment to handle those deliveries. 💠 Cloud Fleet Routing does not natively support skills and types, but you can achieve the same result by adjusting loadDemands on the shipment object to match loadLimits on the vehicle object.
Real time traffic integration adjusts the ETAs returned by Cloud Fleet Routing to account for expected traffic conditions.
Stop durations let you add an appropriate service time to each stop e.g. drivers might need 10 minutes to make a delivery to a downtown apartment building and just 5 minutes if the delivery is to a single family home in the suburbs.
Multiple loads + capacities requires Cloud Fleet Routing to consider multiple loads and capacities when coming up with a route solution e.g. your drivers might do both package deliveries as well as restaurant deliveries.
Driver shifts lets you set driver availability so that the route assigned to a driver never goes over his working hours.
Driver end location takes into account the driver's final destination e.g. his home or the central warehouse when assigning a route to a driver.
Cloud Fleet Routing pricing
Like most of Google Mobility APIs, pricing is based on real world usage and costs anywhere between $0.10 - $0.15 per completed trip (for CFR, a completed trip is defined as a successfully delivered shipment). Your Google Maps partner will typically run a proof of concept trial to make sure that your usage falls within an acceptable range before activating production pricing.
Cloud Fleet Routing setup and authentication
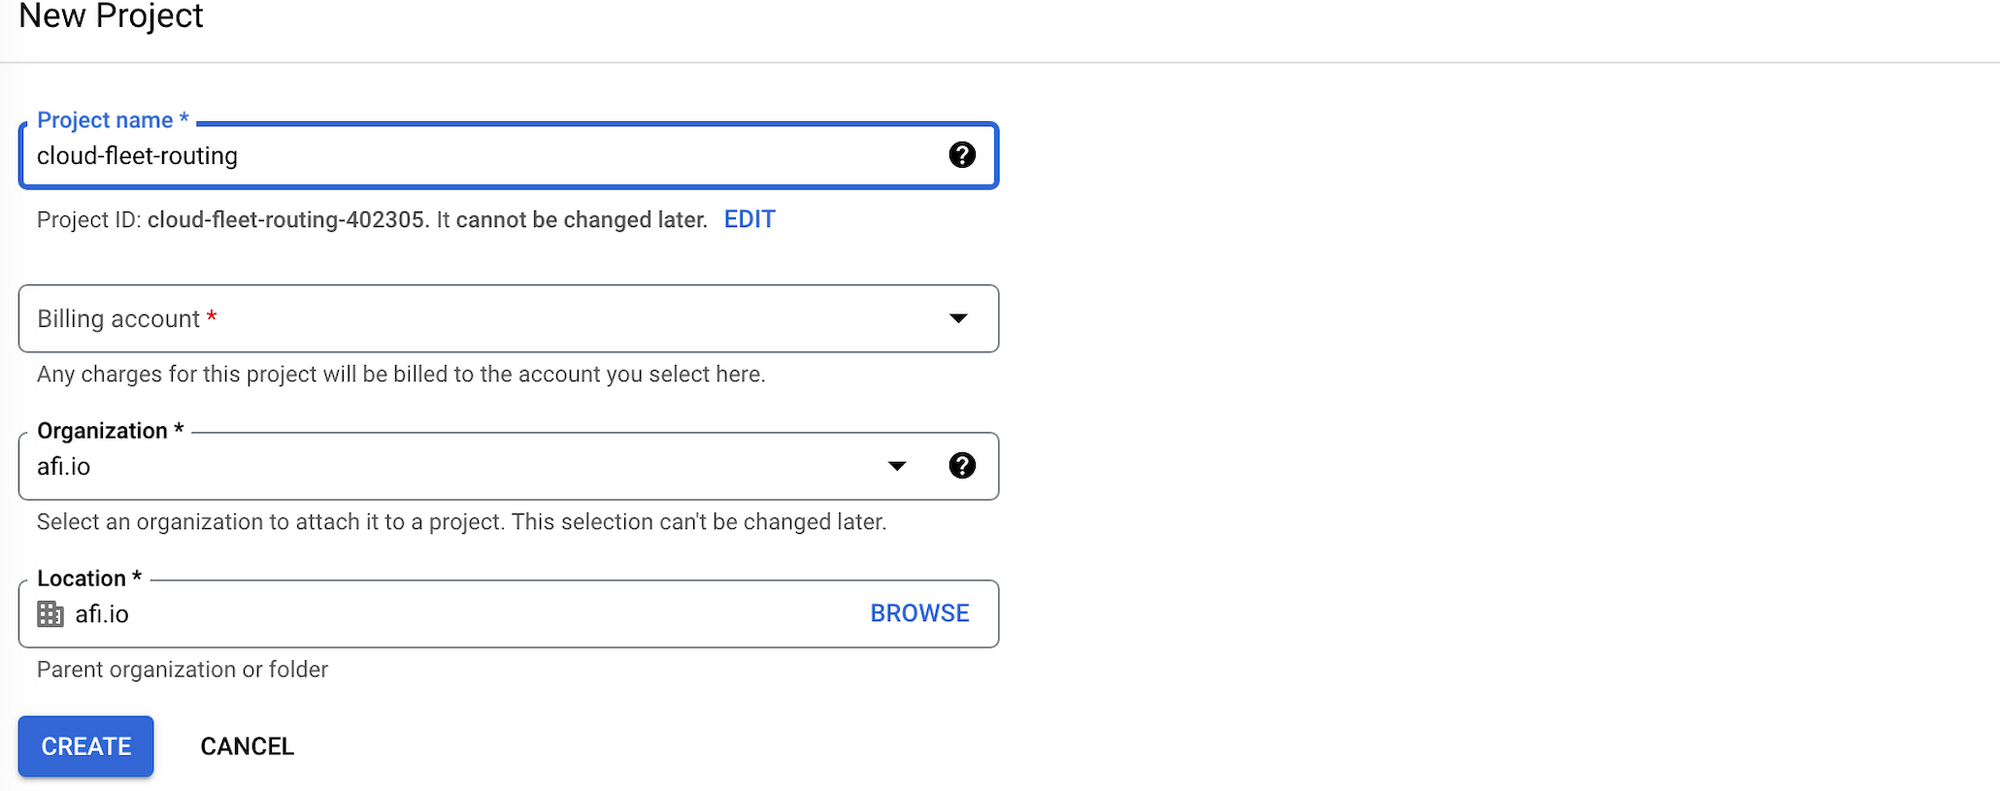
To set up Cloud Fleet Routing, the first thing you need to do is enable it in your Google Cloud console. First, create a new project from the console dashboard at https://console.cloud.google.com/ and name it cloud-fleet-routing. Click [CREATE].
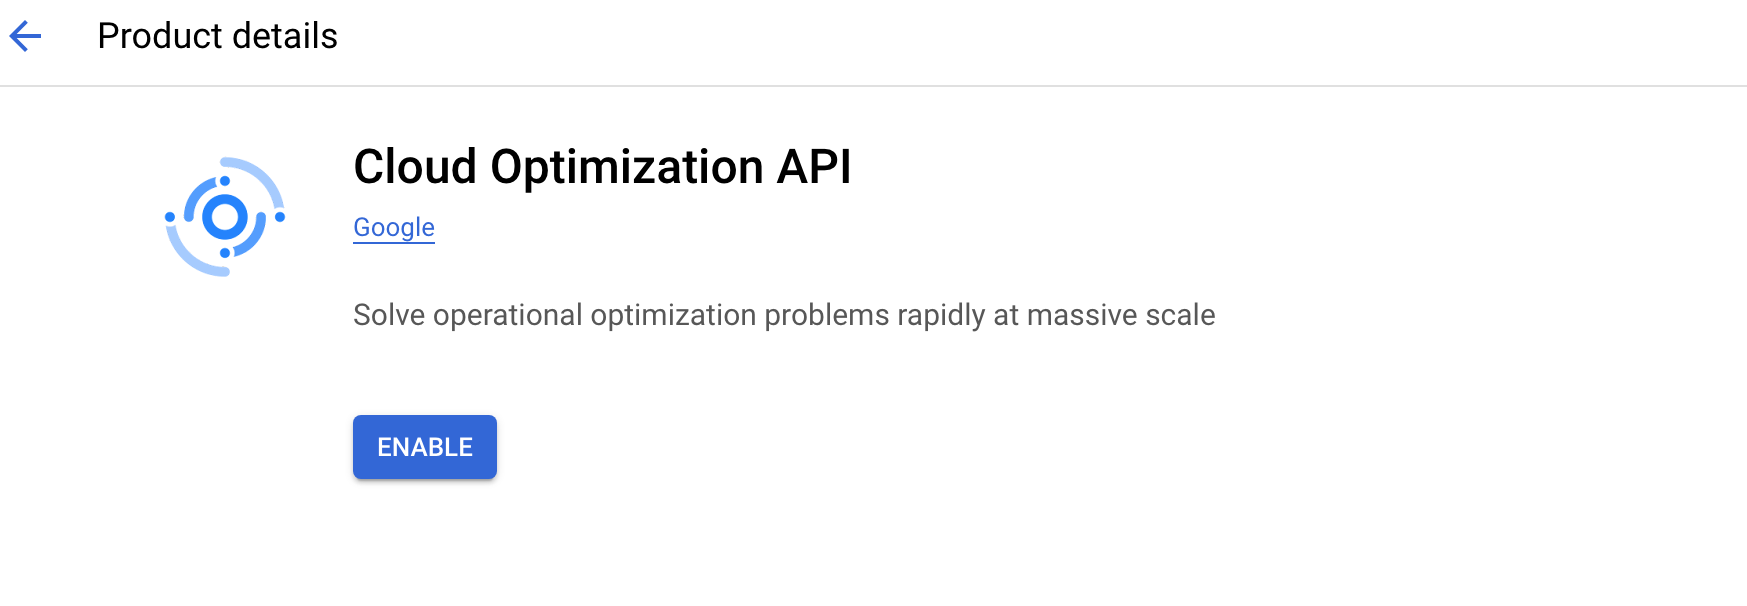
Second, you need to enable the Cloud Fleet Routing APIs by going to the APIs & Services page by selecting it on the left hand menu. Once there, choose [+ Enable APIs and Services] and search for the "Cloud Optimization API". Press [ENABLE].
Third, search for the "Google Maps for Fleet Routing" add on. You'll need this to populate the distance matrix used by Cloud Fleet Routing with real time traffic information. Press [ENABLE] again.

Now that Cloud Fleet Routing is set up on your console, we need to authenticate with Google to retrieve our API key. Unlike a typical Google Maps API key that persists until you disable it, this API key is only valid for half an hour.
To create an API key, you need to download and install the gcloud CLI (Command Line Interface). Then, initialize it by running the following command:
gcloud initNext, execute the following command to retrieve your API key:
gcloud auth application-default print-access-tokenIn a production environment, your app will be using one of Google's client side libraries to do this automatically. You should see the CLI print out the access token:

which will look something like this: Bearer ya29.afB_byJc2G3_uewqDty. In the next section, we will use this API key when making a request to Cloud Fleet Routing's OptimizeTours API to retrieve a route solution.
Cloud Fleet Routing OptimizeTours API example
Cloud Fleet Routing's primary API is OptimizeTours, which as the name suggests, returns an "optimal tour" or sequence of stops that each driver should visit so that overall travel time is minimized. With the API key from the previous section on hand, here's how a basic OptimizeTours API call with two shipments and two vehicles is structured (official docs).
Endpoint POST https://cloudoptimization.googleapis.com/v1/projects/{project_id}:optimizeTours (replace {project_id} with the name given to your project created in the previous section e.g. "cloud-fleet-routing")
Headers
Content-Type: application/json; charset=utf-8
Authorization: YOUR_API_KEY (gcloud auth application-default print-access-token - the API key generated from the gcloud CLI earlier)
x-goog-user-project: {project_id}
Body
{
    "parent": "{project_id}",
    "model": {
        "shipments": [
            {
                "pickups": [
                    {
                        "arrivalLocation": {
                            "latitude": 49.2474624,
                            "longitude": -123.1532338
                        },
                        "duration": "600s",
                        "timeWindows": [
                            {
                                "startTime": "1970-01-01T09:00:00Z",
                                "endTime": "1970-01-01T09:30:00Z"
                            }
                        ]
                    }
                ],
                "loadDemands": {
                    "weight": {
                        "amount": 10
                    }
                },
                "deliveries": [
                    {
                        "arrivalLocation": {
                            "latitude": 49.227107,
                            "longitude": -123.1163085
                        },
                        "duration": "600s",
                        "timeWindows": [
                            {
                                "startTime": "1970-01-01T09:00:00Z",
                                "endTime": "1970-01-01T09:30:00Z"
                            }
                        ]
                    }
                ]

            },
            {
                "pickups": [
                    {
                        "arrivalLocation": {
                            "latitude": 49.2395167,
                            "longitude": -123.1309948
                        },
                        "duration": "600s",
                        "timeWindows": [
                            {
                                "startTime": "1970-01-01T09:00:00Z",
                                "endTime": "1970-01-01T09:30:00Z"
                            }
                        ]
                    }
                ],
                "loadDemands": {
                    "weight": {
                        "amount": 20
                    }
                },
                "deliveries": [
                    {
                        "arrivalLocation": {
                            "latitude": 49.2593508,
                            "longitude": -123.13265
                        },
                        "duration": "600s",
                        "timeWindows": [
                            {
                                "startTime": "1970-01-01T09:00:00Z",
                                "endTime": "1970-01-01T09:30:00Z"
                            }
                        ]
                    }
                ]
            }
        ],
        "vehicles": [
            {
                "loadLimits": {
                    "weight": {
                        "maxLoad": 50
                    }
                },
                "startLocation": {
                    "latitude": 49.2553636,
                    "longitude": -123.0873365
                },
                "endLocation": {
                    "latitude": 49.2201308,
                    "longitude": -123.1085687
                }
            },
            {
                "loadLimits": {
                    "weight": {
                        "maxLoad": 60
                    }
                },
                "startLocation": {
                    "latitude": 49.2253335,
                    "longitude": -123.1653907
                },
                "endLocation": {
                    "latitude": 49.261436,
                    "longitude": -123.1190245
                }
            }
        ]
    }
}populatePolylines: true in the request body. Refer to the Optimization AI docs for more details.The Cloud Fleet Routing request is built on two main parts - shipments and vehicles, which are contained within the model:
shipments is an array of linked pickups and deliveries. These tell you where a shipment needs to be picked up and dropped off, its load (how heavy a particular shipment is or how much space it takes up) and the timeWindows within which it needs to be picked up and dropped off.
vehicles is an array of objects that defines the startLocation, endLocation and loadLimits of each vehicle used in the optimization. Cloud Fleet Routing will attempt to assign shipments to vehicles in such a way so as to minimize the total distance travelled by all vehicles, while making sure that the capacity of each vehicle is never exceeded and that the the vehicle's route starts and ends at locations specified in startLocation and endLocation. This is usually the driver's home address or a central warehouse.
Shipment object
pickups (object) tells you where a shipment needs to be, well, picked up.
pickups.arrivalLocation (object) lets you set the arrivalLocation.latitude (number) and arrivalLocation.longitude (number) of the pickup address (if you only have the address string, you'll have to geocode it first using Geocoding API).
pickups.duration (string) specifies the service time of each stop in seconds e.g. "600s" will set a duration of 600 seconds, or 10 minutes.
pickups.timeWindows (array) is an array with a single object that stores the startTime (string) and endTime (string) of the pickup time window in ISO8601 format. For example, if you are picking up a package from a business and want to make sure your driver only arrives there during business hours, you could use "startTime": "1970-01-01T10:00:00Z" to guarantee that the route optimization algorithm schedules this visit after 10 am. One of Cloud Fleet Routing quirks is that it assumes you'll complete all your pickups and deliveries within a single day, which for convenience is set to 01 Jan, 1971 UTC time. So a startTime of "10:00" hrs should be encoded as "1970-01-01T10:00:00Z".
deliveries (object) describes where a shipment needs to be delivered. The fields contained within are identical to to pickups.
loadDemands (object) refers to the size or weight of the package your driver is delivering and is measured relative to the loadLimits of the vehicle he is driving. For example, if his vehicle can safely carry 100 kg of packages and each package weighs exactly 10 kg, the routing engine will use this information to ensure that the driver will never be assigned more than 10 deliveries. To represent the above scenario add a weight (object) to loadDemands and to weight, include the field amount (string) and give it a value of 10, just like this:
"loadDemands": {
                    "weight": {
                        "amount": 10
                    }
                }
Vehicle object
loadLimits (object) tells you what the maximum capacity of the vehicle is. It's used together with loadDemands on the shipment object to ensure that packages assigned to a driver's route never exceeds the vehicle's carrying capacity. For example, to set a vehicle capacity of 100 kg, you would use:
"loadLimits": {
                    "weight": {
                        "maxLoad": 100
                    }
                }
startLocation (object) fixes the startLocation.latitude (number) and startLocation.longitude (number) coordinates of the driver's starting point. This is a required field.
endLocation (object) is an optional field that lets you set the end location of the driver's route with endLocation.latitude (number) and endLocation.longitude (number).
Output
The output of the Cloud Fleet Routing API is a route plan - a collection of optimized routes for each driver. Once the above request is sent over, you should get a response that looks similar to the following:
{
    "routes": [
        {
            "vehicleStartTime": "1970-01-01T08:48:05Z",
            "vehicleEndTime": "1970-01-01T09:34:09Z",
            "visits": [
                {
                    "isPickup": true,
                    "startTime": "1970-01-01T09:00:00Z",
                    "demands": [
                        {
                            "type": "weight",
                            "value": "10"
                        }
                    ],
                    "detour": "0s",
                    "arrivalLoads": [
                        {
                            "type": "weight"
                        }
                    ],
                    "loadDemands": {
                        "weight": {
                            "amount": "10"
                        }
                    }
                },
                {
                    "startTime": "1970-01-01T09:19:24Z",
                    "demands": [
                        {
                            "type": "weight",
                            "value": "-10"
                        }
                    ],
                    "detour": "0s",
                    "arrivalLoads": [
                        {
                            "type": "weight",
                            "value": "10"
                        }
                    ],
                    "loadDemands": {
                        "weight": {
                            "amount": "-10"
                        }
                    }
                }
            ],
            "transitions": [
                {
                    "travelDuration": "715s",
                    "travelDistanceMeters": 6062,
                    "waitDuration": "0s",
                    "totalDuration": "715s",
                    "startTime": "1970-01-01T08:48:05Z",
                    "vehicleLoads": {
                        "weight": {}
                    }
                },
                {
                    "travelDuration": "564s",
                    "travelDistanceMeters": 5105,
                    "waitDuration": "0s",
                    "totalDuration": "564s",
                    "startTime": "1970-01-01T09:10:00Z",
                    "vehicleLoads": {
                        "weight": {
                            "amount": "10"
                        }
                    }
                },
                {
                    "travelDuration": "285s",
                    "travelDistanceMeters": 1851,
                    "waitDuration": "0s",
                    "totalDuration": "285s",
                    "startTime": "1970-01-01T09:29:24Z",
                    "vehicleLoads": {
                        "weight": {}
                    }
                }
            ],
            "metrics": {
                "performedShipmentCount": 1,
                "travelDuration": "1564s",
                "waitDuration": "0s",
                "delayDuration": "0s",
                "breakDuration": "0s",
                "visitDuration": "1200s",
                "totalDuration": "2764s",
                "travelDistanceMeters": 13018,
                "maxLoads": {
                    "weight": {
                        "amount": "10"
                    }
                }
            },
            "endLoads": [
                {
                    "type": "weight"
                }
            ],
            "travelSteps": [
                {
                    "duration": "713s",
                    "distanceMeters": 6062
                },
                {
                    "duration": "566s",
                    "distanceMeters": 5105
                },
                {
                    "duration": "286s",
                    "distanceMeters": 1851
                }
            ],
            "vehicleDetour": "2119s"
        },
        {
            "vehicleIndex": 1,
            "vehicleStartTime": "1970-01-01T08:49:45Z",
            "vehicleEndTime": "1970-01-01T09:31:58Z",
            "visits": [
                {
                    "shipmentIndex": 1,
                    "isPickup": true,
                    "startTime": "1970-01-01T09:00:00Z",
                    "demands": [
                        {
                            "type": "weight",
                            "value": "20"
                        }
                    ],
                    "detour": "0s",
                    "arrivalLoads": [
                        {
                            "type": "weight"
                        }
                    ],
                    "loadDemands": {
                        "weight": {
                            "amount": "20"
                        }
                    }
                },
                {
                    "shipmentIndex": 1,
                    "startTime": "1970-01-01T09:17:37Z",
                    "demands": [
                        {
                            "type": "weight",
                            "value": "-20"
                        }
                    ],
                    "detour": "0s",
                    "arrivalLoads": [
                        {
                            "type": "weight",
                            "value": "20"
                        }
                    ],
                    "loadDemands": {
                        "weight": {
                            "amount": "-20"
                        }
                    }
                }
            ],
            "transitions": [
                {
                    "travelDuration": "615s",
                    "travelDistanceMeters": 4408,
                    "waitDuration": "0s",
                    "totalDuration": "615s",
                    "startTime": "1970-01-01T08:49:45Z",
                    "vehicleLoads": {
                        "weight": {}
                    }
                },
                {
                    "travelDuration": "457s",
                    "travelDistanceMeters": 3454,
                    "waitDuration": "0s",
                    "totalDuration": "457s",
                    "startTime": "1970-01-01T09:10:00Z",
                    "vehicleLoads": {
                        "weight": {
                            "amount": "20"
                        }
                    }
                },
                {
                    "travelDuration": "261s",
                    "travelDistanceMeters": 1433,
                    "waitDuration": "0s",
                    "totalDuration": "261s",
                    "startTime": "1970-01-01T09:27:37Z",
                    "vehicleLoads": {
                        "weight": {}
                    }
                }
            ],
            "metrics": {
                "performedShipmentCount": 1,
                "travelDuration": "1333s",
                "waitDuration": "0s",
                "delayDuration": "0s",
                "breakDuration": "0s",
                "visitDuration": "1200s",
                "totalDuration": "2533s",
                "travelDistanceMeters": 9295,
                "maxLoads": {
                    "weight": {
                        "amount": "20"
                    }
                }
            },
            "endLoads": [
                {
                    "type": "weight"
                }
            ],
            "travelSteps": [
                {
                    "duration": "584s",
                    "distanceMeters": 4408
                },
                {
                    "duration": "460s",
                    "distanceMeters": 3454
                },
                {
                    "duration": "259s",
                    "distanceMeters": 1433
                }
            ],
            "vehicleDetour": "1678s"
        }
    ],
    "metrics": {
        "aggregatedRouteMetrics": {
            "performedShipmentCount": 2,
            "travelDuration": "2897s",
            "waitDuration": "0s",
            "delayDuration": "0s",
            "breakDuration": "0s",
            "visitDuration": "2400s",
            "totalDuration": "5297s",
            "travelDistanceMeters": 22313,
            "maxLoads": {
                "weight": {
                    "amount": "20"
                }
            }
        },
        "usedVehicleCount": 2,
        "earliestVehicleStartTime": "1970-01-01T08:48:05Z",
        "latestVehicleEndTime": "1970-01-01T09:34:09Z"
    }
}
The key element in the returned JSON is routes, an array of route objects that describes the route assigned to each vehicle.
Route Object
It's annoying, but to match each route with the assigned vehicle you need to look at the vehicleIndex field. For example, in routes[1] we have:
{
    "vehicleIndex": 1,
    "vehicleStartTime": "1970-01-01T08:49:45Z",
    "vehicleEndTime": "1970-01-01T09:31:58Z",
    "visits": [
        {
            ...
        },
        {
            ...
        }
    ],
    "transitions": [
        ...
    ],
    "metrics": {
        ...
    },
    "endLoads": [
        {
            ...
        }
    ],
    "travelSteps": [
        ...
    ],
    "vehicleDetour": "1678s"
}
"vehicleIndex": 1 means that we are looking at the route assigned to the second (counting from zero) object in the vehicles array sent in the request. If there is no vehicleIndex field, it means that the value of vehicleIndex is 0 i.e. it was the first object in the vehicles array. It would be great if we could attach a name field or something that uniquely identifies the vehicle without having to refer back to the input, but this isn't supported by Cloud Fleet Routing right now.
vehicleStartTime and vehicleEndTime tell you when the driver should leave his start location and when he arrives at his end location. In the above example, "vehicleStartTime": "1970-01-01T08:49:45Z", "vehicleEndTime": "1970-01-01T09:31:58Z" simply indicates that the driver should start his route at 08:49:45 am and will end by 09:31:58 am (in both cases, ignore the date portion "1970-01-01" of the string).
The visits array lays out the optimal sequence of stops for each driver and his ETA at each stop.
{
    "visits": [
        {
            "isPickup": true,
            "startTime": "1970-01-01T09:00:00Z",
            "demands": [
                {
                    "type": "weight",
                    "value": "10"
                }
            ],
            "detour": "0s",
            "arrivalLoads": [
                {
                    "type": "weight"
                }
            ],
            "loadDemands": {
                "weight": {
                    "amount": "10"
                }
            }
        },
        {
            "startTime": "1970-01-01T09:19:24Z",
            "demands": [
                {
                    "type": "weight",
                    "value": "-10"
                }
            ],
            "detour": "0s",
            "arrivalLoads": [
                {
                    "type": "weight",
                    "value": "10"
                }
            ],
            "loadDemands": {
                "weight": {
                    "amount": "-10"
                }
            }
        }
    ]
}
For each visit object, isPickup is a boolean that is "true" if a stop is a pick up, and (again - annoyingly) doesn't appear if the stop is a drop off. In the example above, visits[0] is a pickup and visits[1] is a delivery because it doesn't have the isPickup field.
startTime tells you when the driver is supposed to arrive at the stop and the tuple arrivalLoads, demands and loadDemands indicates how much load was transferred onto (positive load values) or out of (negative load value) the vehicle at each stop.
The last field to take note of in the Cloud Fleet Routing response is metrics, an object that contains a summary of performance metrics you can use to measure the quality of the route plan returned. visitDuration adds up the service time at each stop, totalDuration is the sum of both service time and drive time across all vehicles and the difference between the two is travelDuration, or the total drive time across the fleet.
Visualizing Cloud Fleet Routing output
Learning how to use the Cloud Fleet Routing API is interesting, but what truly makes CFR valuable is that it provides the route solution in JSON format. This makes it convenient for us to seamlessly integrate CFR's output into various logistics applications. In this last section, we'll create a straightforward single-page React app that displays the output from Cloud Fleet Routing obtained in the previous section on a map, giving each route assigned to a vehicle a different color and marking pickup stops as circles and dropoff stops as squares.
Unlike previous tutorials where we wrote code from the ground app line by line, the easiest way to follow along with this one is download the cfr_demo_frontend and cfr_demo_backend repos and run them locally on your machine. To spice things up and demonstrate the interoperability of Cloud Fleet Routing, we'll be using Mapbox for the map base layer (via the amazing react-map-gl library) and Google Directions to generate the route polyline string.
cfr_demo_frontend
cfr_demo_frontend is a basic React app that contains the map layer with the route polyline and map markers overlaid on it. The first thing we need to do is configure the .env environment variables. In terminal, open up the cfr-demo-frontend folder and in the app's root directory, use a text editor like nano to create a .env file by running nano .env. Type in the following and save the file (ctrl + s).
PORT=3001
REACT_APP_GOOGLE_KEY={GOOGLE_API_KEY}
REACT_APP_MAPBOX_ACCESS_TOKEN={MAPBOX_ACCESS_TOKEN}
REACT_APP_API_URI='http://localhost:3000'
PORT lets you run cfr-demo-frontend on port:3001. This is important because as hinted at by REACT_APP_API_URI, we'll be running the backend APIs in cfr-demo-backend on port:3000.
REACT_APP_GOOGLE_KEY and REACT_APP_MAPBOX_ACCESS_TOKEN are your Google Maps (retrieving your Google API key) and Mapbox (how do I set up my Mapbox access token?) API keys.
Back in your terminal, run npm install to install the required dependencies and npm start to spin up the server. Fire up localhost:3001 in your browser and you should see a map with pins on them.
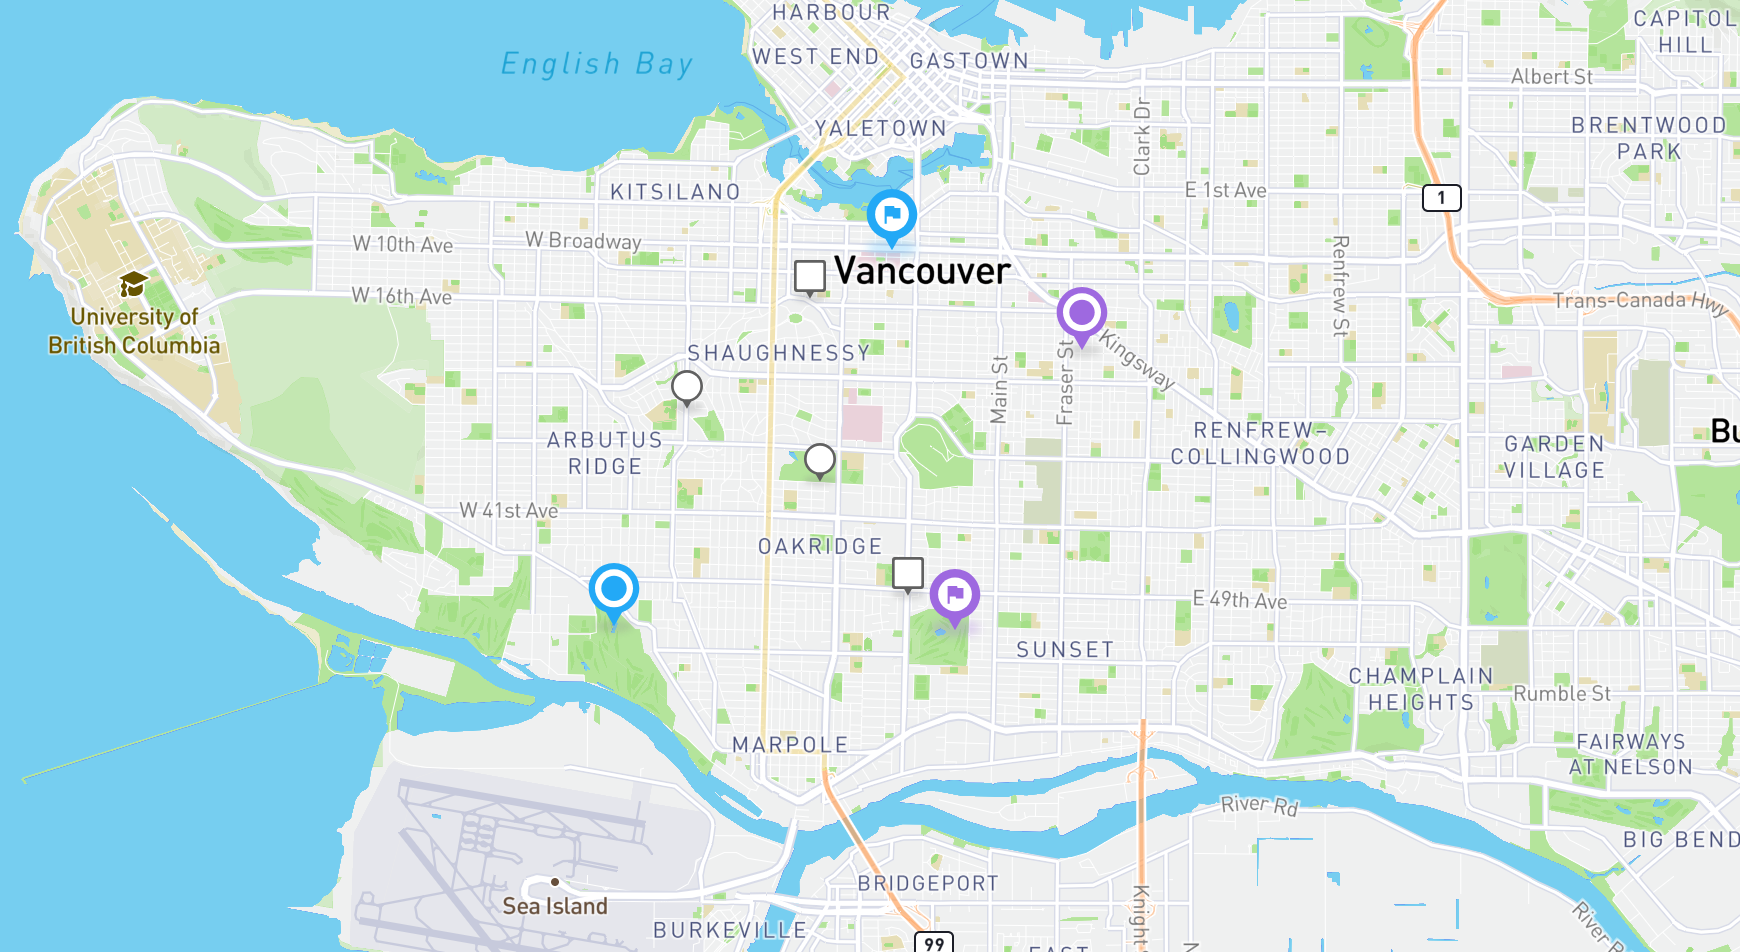
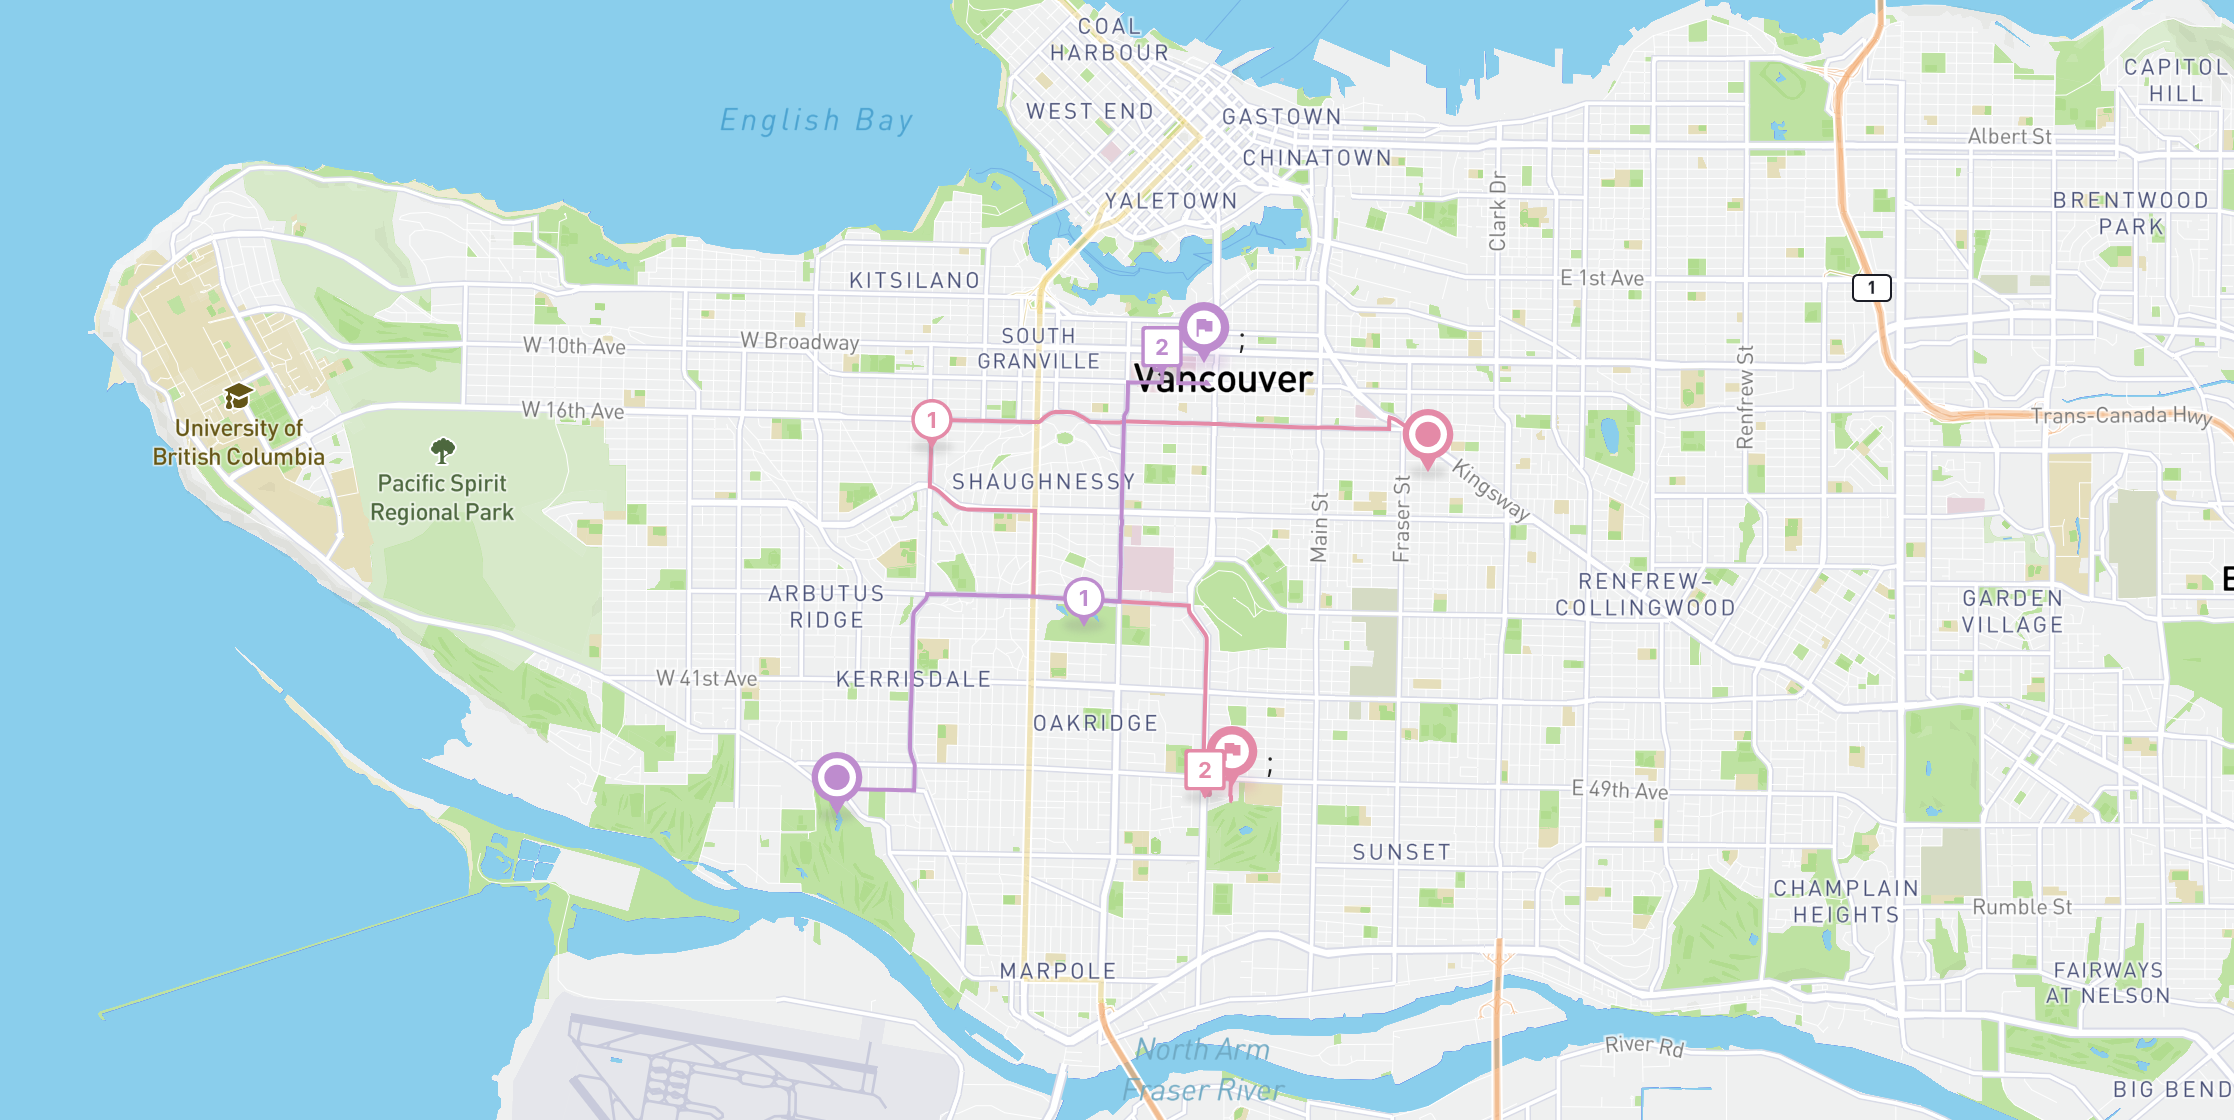
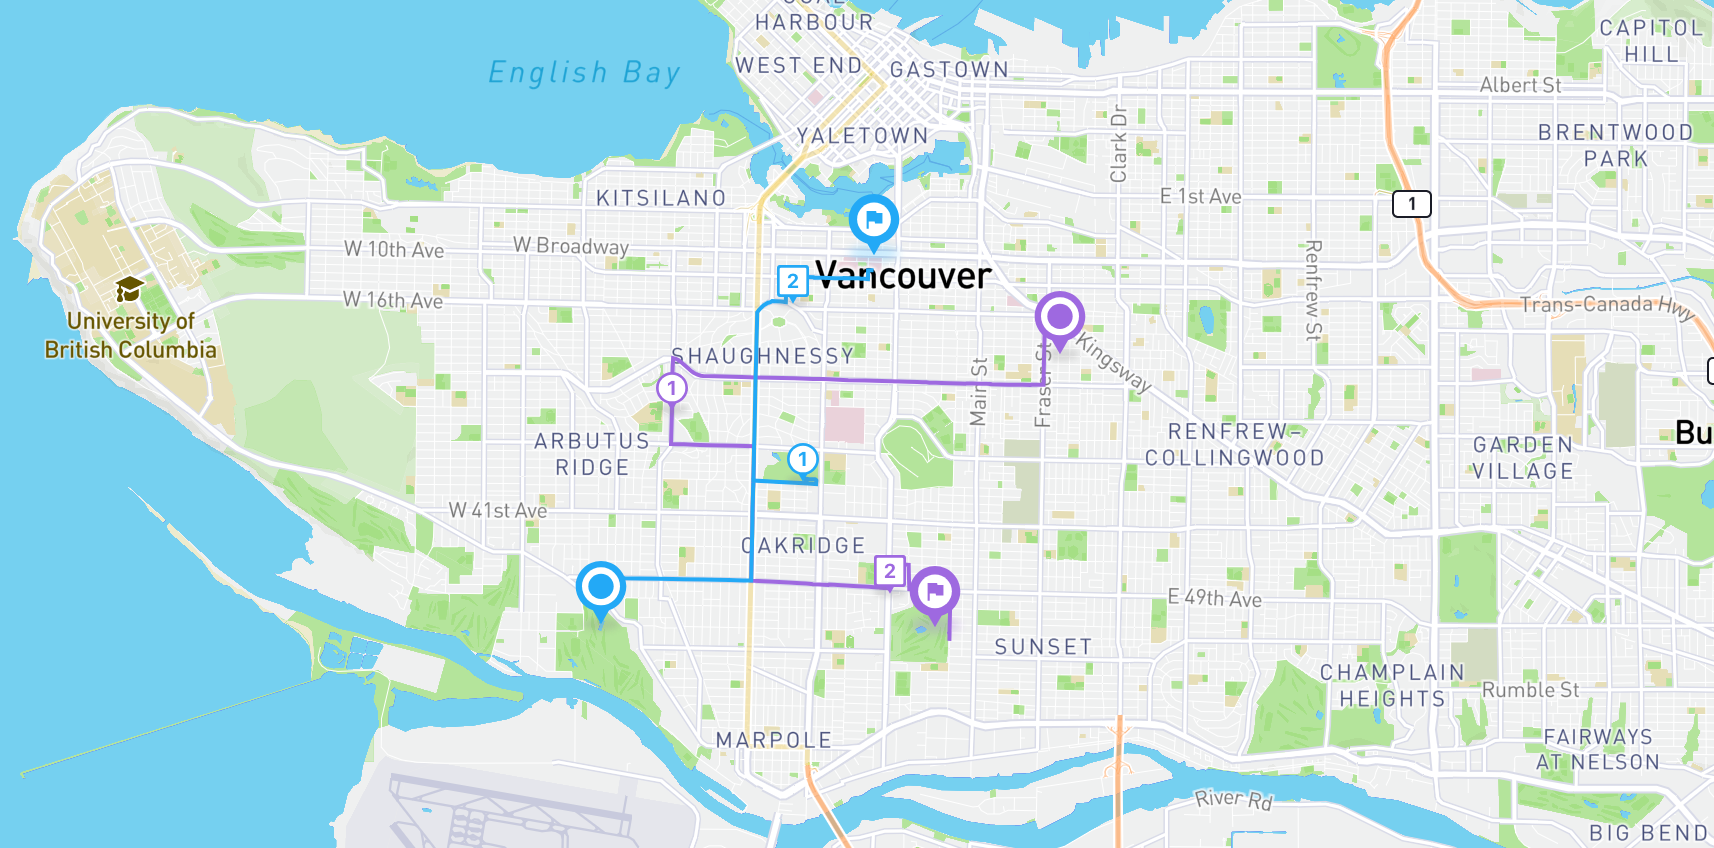
The circle markers are pickup locations while the squares are dropoffs. Each vehicle's start location is marked with a concentric circle icon while their end locations are marked with a flag icon. This data was loaded directly from /src/pages/DemoInput.json which contains the body of the CFR OptimizeTours API call from the example earlier.
The code from /src/components/Mapbox/Demo.jsx which draws the markers on the map is shown below.
/* /src/components/Mapbox/Demo.jsx */
{
  stops.map((stop, i) => {
    const markerColor = stop.color || COLOR_DEFAULT;
    const urlStop = markerIcons[stop.type][markerColor];
    return (
      <div key={stop.type + i}>
        <Marker latitude={stop.lat} longitude={stop.lng}>
          <img src={urlStop} alt="" />
          <div
            className="marker-info"
            style={{
              color: `#${markerColor}`,
              fontSize: "10px",
              fontWeight: "bold",
            }}
          >
            {stop.sortNo.toString()}
          </div>
        </Marker>
      </div>
    );
  });
}
{
  routes.map((route, i) => {
    const driver = route.driver;
    const driverColor = driver.color || COLOR_DEFAULT;
    const urlStart = markerIcons["start"][driverColor];
    const urlEnd = markerIcons["end"][driverColor];
    return (
      <div key={"driver" + i}>
        <Marker latitude={driver.startLat} longitude={driver.startLng}>
          <img src={urlStart} style={{ width: 34, height: 38 }} alt="" />
        </Marker>
        <Marker latitude={driver.endLat} longitude={driver.endLng}>
          <img src={urlEnd} style={{ width: 34, height: 38 }} alt="" />
        </Marker>
      </div>
    );
  });
}
The stops array stores the latitude and longitude, type (pickup or dropoff) and assigned driver for each shipment from the input file. Each stop is mapped to a <Marker/> tag which when mounted as a child component of a react-map-gl base map (react-map-gl Marker class docs), is rendered as a custom map marker. This is the react-map-gl equivalent of the addTo() function in Mapbox GL JS.
cfr_demo_backend
cfr_demo_backend is responsible for calling the Google Directions API to return the route polyline. If you set"populatePolylines": false in the body of the OptimizeTours request, the output of CFR will not include an encoded polyline string. Luckily, we can still display each driver's route on the map, by making a follow on call to Google Directions to get it.
Here's what the code in app.js looks like:
/* app.js */
app.use(function (req, res, next) {
    res.setHeader('Access-Control-Allow-Origin', '*');
    res.setHeader('Access-Control-Allow-Methods', 'GET, POST, OPTIONS, PUT, PATCH, DELETE');
    res.setHeader('Access-Control-Allow-Headers', 'X-Requested-With,content-type');
    res.setHeader('Access-Control-Allow-Credentials', true);
    next();
});

app.get('/directions', async (req, res) => {
  try {
    const { origin, destination, waypoints } = req.query;
    if (!origin || !destination) {
      return res.status(400).json({ error: 'Please provide both origin and destination.' });
    }

    // Make a request to the Google Directions API
    const response = await axios.get(apiUrl, {
      params: {
        origin,
        destination,
        waypoints,
        key: apiKey,
      },
    });

    const data = response.data;
    res.json(data);
  } catch (error) {
    console.error("error");
    console.error(error);
    res.status(500).json({ error: 'An error occurred while fetching directions.' });
  }
});
This is a straightforward asynchronous request that employs the axios JavaScript library to access the Google Directions API. Placing this code on the backend is essential to safeguard our Google Maps API key from being visible to everyone.
When the [Show Polylines] button is pressed, three things happen. First, our app reads /src/pages/DemoOutput.json to find out which pickup and dropoff pairs (these are listed as visits in the output file but are actually shipments in the input file) are assigned to each vehicle.
Second, the encoded polyline, together with the rest of the route data returned from the Google Directions API is passed back to the frontend where it is drawn on the map in cfr-demo-frontend's /src/components/Mapbox/Demo.jsx:
/* /src/components/Mapbox/Demo.jsx */
<Source
  type="geojson"
  data={{
    type: "FeatureCollection",
    features: [
      ...newRoutes.map((route) => {
        return {
          properties: {
            stroke: `#${route.driver?.color}`,
          },
          geometry: {
            type: "LineString",
            coordinates:
              route.pathCoordinate?.length > 0
                ? route.pathCoordinate.map((c) => [c.lng, c.lat])
                : [],
          },
        };
      }),
    ],
  }}
>
  <Layer
    id="lineLayer"
    type="line"
    layout={{
      "line-join": "round",
      "line-cap": "round",
    }}
    paint={{
      "line-color": ["get", "stroke"],
      "line-width": 3,
    }}
  />
</Source>;
This piece of code relies on react-map-gl's <Source/> and <Layer/> components to inject data and style our map.
Third, the markers and route polyline are given the same color as the vehicle that they belong to and the numbers on each marker are numbered according to the order in which they are assigned.
/* /src/components/Mapbox/Demo.jsx */
return {
  properties: {
    stroke: `#${route.driver?.color}`,
  },
  geometry: {
    type: "LineString",
    coordinates:
      route.pathCoordinate?.length > 0
        ? route.pathCoordinate.map((c) => [c.lng, c.lat])
        : [],
  },
};
and
/* /src/components/Mapbox/Demo.jsx */
{
  stops.map((stop, i) => {
    const markerColor = stop.color || COLOR_DEFAULT;
    const urlStop = markerIcons[stop.type][markerColor];
    return (
      <div key={stop.type + i}>
        <Marker latitude={stop.lat} longitude={stop.lng}>
          <img src={urlStop} alt="" />
          <div
            className="marker-info"
            style={{
              color: `#${markerColor}`,
              fontSize: "10px",
              fontWeight: "bold",
            }}
          >
            {stop.sortNo.toString()}
          </div>
        </Marker>
      </div>
    );
  });
}
The final result looks something like the map below - the purple route is assigned to "vehicleIndex": 0 while the blue route is assigned to "vehicleIndex": 1.
These colors are defined in /constants/index.js.
/* /constants/index.js */
export const COLOR_DEFAULT = "7732EF";
export const COLORS = [
  "9E69E0",
  "23A9F6",
  "83C3FF",
  "641EFD",
  ... 10 more colors
];
To run cfr-demo-backend, do the usual npm install followed by node App.js to get the server started. Don't forget to create a .env file and add the line: GOOGLE_KEY={GOOGLE_API_KEY} (where {GOOGLE_API_KEY} is the same Google Maps API key used in cfr-demo-frontend) so that the call to Google Directions goes through. Once the server is running, the [Show Polylines] button in cfr-demo-frontend should work.
Testing Cloud Fleet Routing with your own data
Cloud Fleet Routing is one of Google's most powerful APIs. It combines a state of the art route optimization engine with accurate ETAs informed by real world traffic conditions. It's a lot more hands on compared to other Google's APIs, but if you are able to successfully integrate it with your fleet optimization system it can save your business hours of manual route planning each day.
This tutorial barely scratches the surface of CFR. The best way to learn how to use it is to make API calls using data collected from your logistics business (customer delivery addresses, driver start and end locations etc) and modify the worked example above to suit your needs.
In the next post and last in our series on Google Mobility, I'll show how to use Google's Navigation SDK to give your drivers a world class in-app turn by turn navigation experience.
This article was written by Afi Labs, a Google Maps Platform Premier Partner and reseller. We build route optimization, navigation, and fleet tracking software on Google Maps, and offer volume pricing on GMP licensing. Talk to an engineer or follow Afian on LinkedIn.
Next: Part 5: Google ODRD: Navigation SDK