Building a live driver tracking backend using Google Firebase Real Time Database
A tutorial on how to build scalable live driver tracking infrastructure with Google Firebase.


Now that you've added live tracking to your driver app (Part 1: Implementing Driver Live Tracking on iOS), the next step is to save these locations in the cloud so that you can see where your drivers are. As always, you can find working sample code here.
Part 1: Implementing driver live tracking on iOS
Part 2: Building a live driver tracking backend (this article)
Part 3: Adding a live driver tracking map to your website
This is how we'll do it. When your phone detects that your location has changed, we'll make an API call to our server and save your new location to the cloud. To keep things simple, we'll only record key - value pairs with the key being your user_id and the value, a location lat/lng pair. If you wanted to build a dashboard showing real time driver locations (the topic of my next blog post!), you could use these user_ids to retrieve their respective lat/lngs and show them on a map.
There are several options we can go with for our backend. We could roll our own, using a framework like Ruby on Rails, Python/Flask or whatever the cool kids are using in 2021. Or, we can be lazy and use Google Firebase (full disclosure: lots of material in this post is blatantly ripped off from the Firebase Developer Blog because I'm lazy and the post was well written).
Afi Labs delivers custom software to meet your logistics needs. From vehicle routing, live tracking to proof of delivery, we've got you covered!
👋 Say Hello!
Google Firebase is a managed service that offers a “realtime, cloud hosted, NoSQL database" which is a fancy way of saying that as a developer, all you have to care about is writing code on the client frontend (our iOS app) to query the database. This is different than traditional app development, which typically involves writing both frontend and backend software. The frontend code just invokes API endpoints exposed by the backend, and the backend code actually does the work.
Setting up Google Firebase Real Time Database
The specific service we are going to use is called the Realtime Database and it's pretty awesome. It will give us “realtime” updates to data as it changes in the database. You use the client iOS SDK to set up a “listener” at the location of the data your app wants to use, and the listener gets invoked with that data repeatedly, every time a change is observed. This lets you keep your app’s display fresh, without having to poll the data of interest. So if you had 10 drivers moving around town and two supervisors in different locations monitoring their movements on a map, you don't need to worry about writing code to pass data around the different devices.
What type of database is Google Firebase Real Time Database?
Google's Firebase Database is a NoSQL database that uses a JSON-based data structure to store data. It's JSON-like data model (where data is stored as a tree-like structure of JSON objects) allows it to provide real-time data synchronization across multiple clients and platforms. This means that changes made to the database are immediately reflected on all connected devices without the need for manual updates or polling.
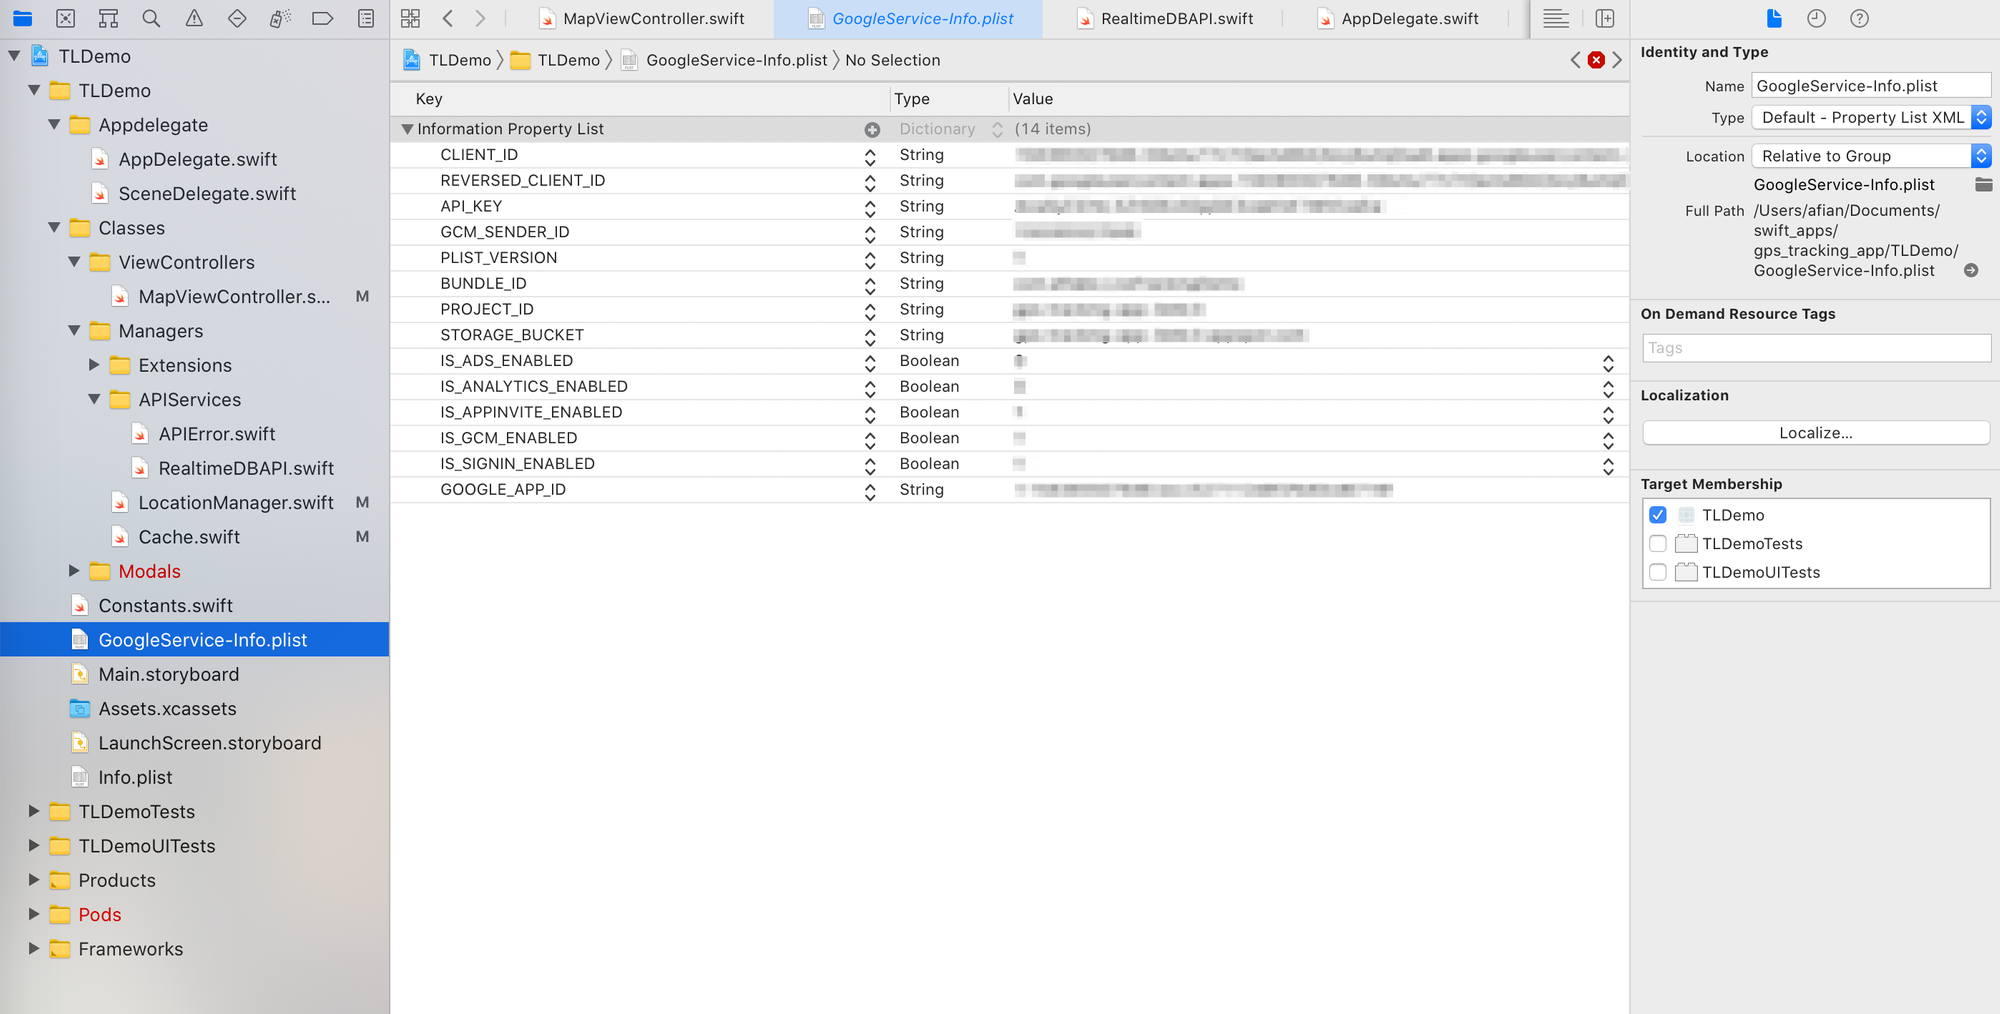
You can follow this tutorial to sign up for a free account and set up a Realtime Database project. Make sure to download the GoogleService-Info.plist automatically generated for you and add it to the root folder of TLDemo.xcodeproj.
AppDelegate.swift
Next, open Appdelegate/AppDelegate.swift and look for the application(_:didFinishLaunchingWithOptions:) method.
func application(_ application: UIApplication, didFinishLaunchingWithOptions launchOptions: [UIApplication.LaunchOptionsKey: Any] ? ) - > Bool {

  // Setup Google Maps
  GMSServices.provideAPIKey(Network.googleAPIKey)

  // Use Firebase library to configure APIs
  FirebaseApp.configure()

  LocationManager.shared.requestLocation()

  return true
}
This line of code
FirebaseApp.configure()
sets up Firebase for us (including the endpoints, project name etc) behind the scenes. It knows what to do because
import Firebase
was added at the start of AppDelegate.swift.
MapViewController.swift
Recall that in MapViewController.swift we had this line in the updateCurrentLocationToServer() method.
Cache.shared.lastUpdateLocation = (lat: _currentLocation.latitude, lng: _currentLocation.longitude, time: Date().timeIntervalSince1970)
RealtimeDBAPI.shared.trackingLocation(location: _currentLocation) {
  (result) in
  //
}
Here, we invoke the trackingLocation() method of the RealtimeDBAPI singleton. Let's see what's going on.
RealtimeDBAPI.swift
Take a look at Managers/APIServices/RealtimeDBAPI.swift, the class that handles our connection with Firebase. In the initializer, we see
override init() {
  ref = Database.database().reference()
}
This establishes a connection to your Firebase database using the credentials provided in GoogleService-Info.plist and allows you to sync data to Firebase.
But what data gets sent over? Take a look at the trackingLocation() method.
func trackingLocation(location: CLLocationCoordinate2D, callback: @escaping(_ result: APIResult) - > Void) {
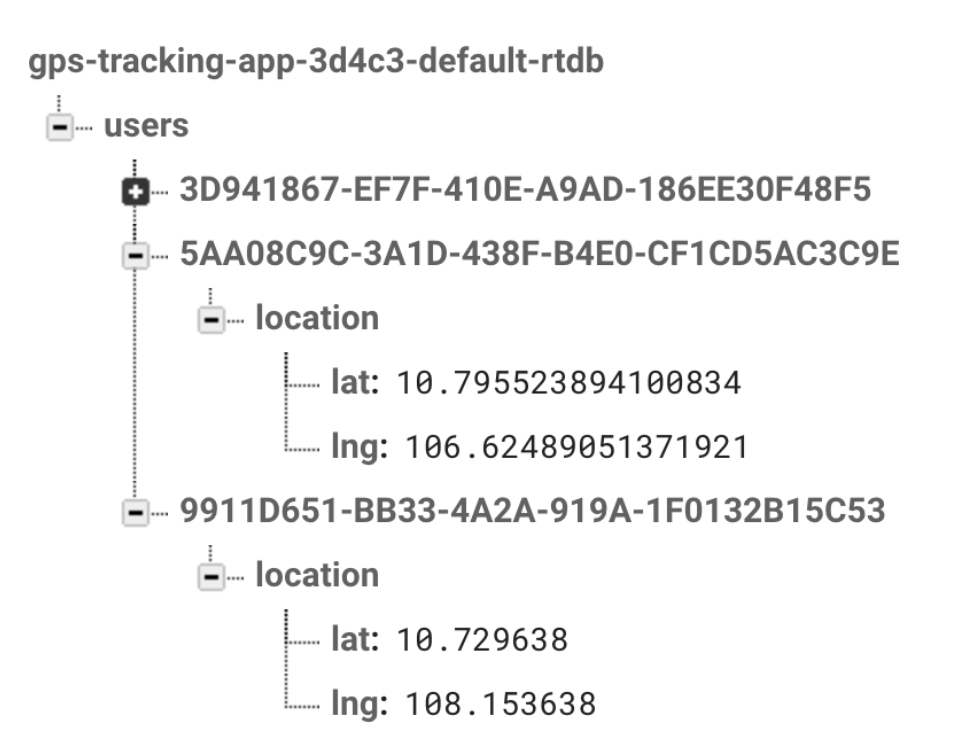
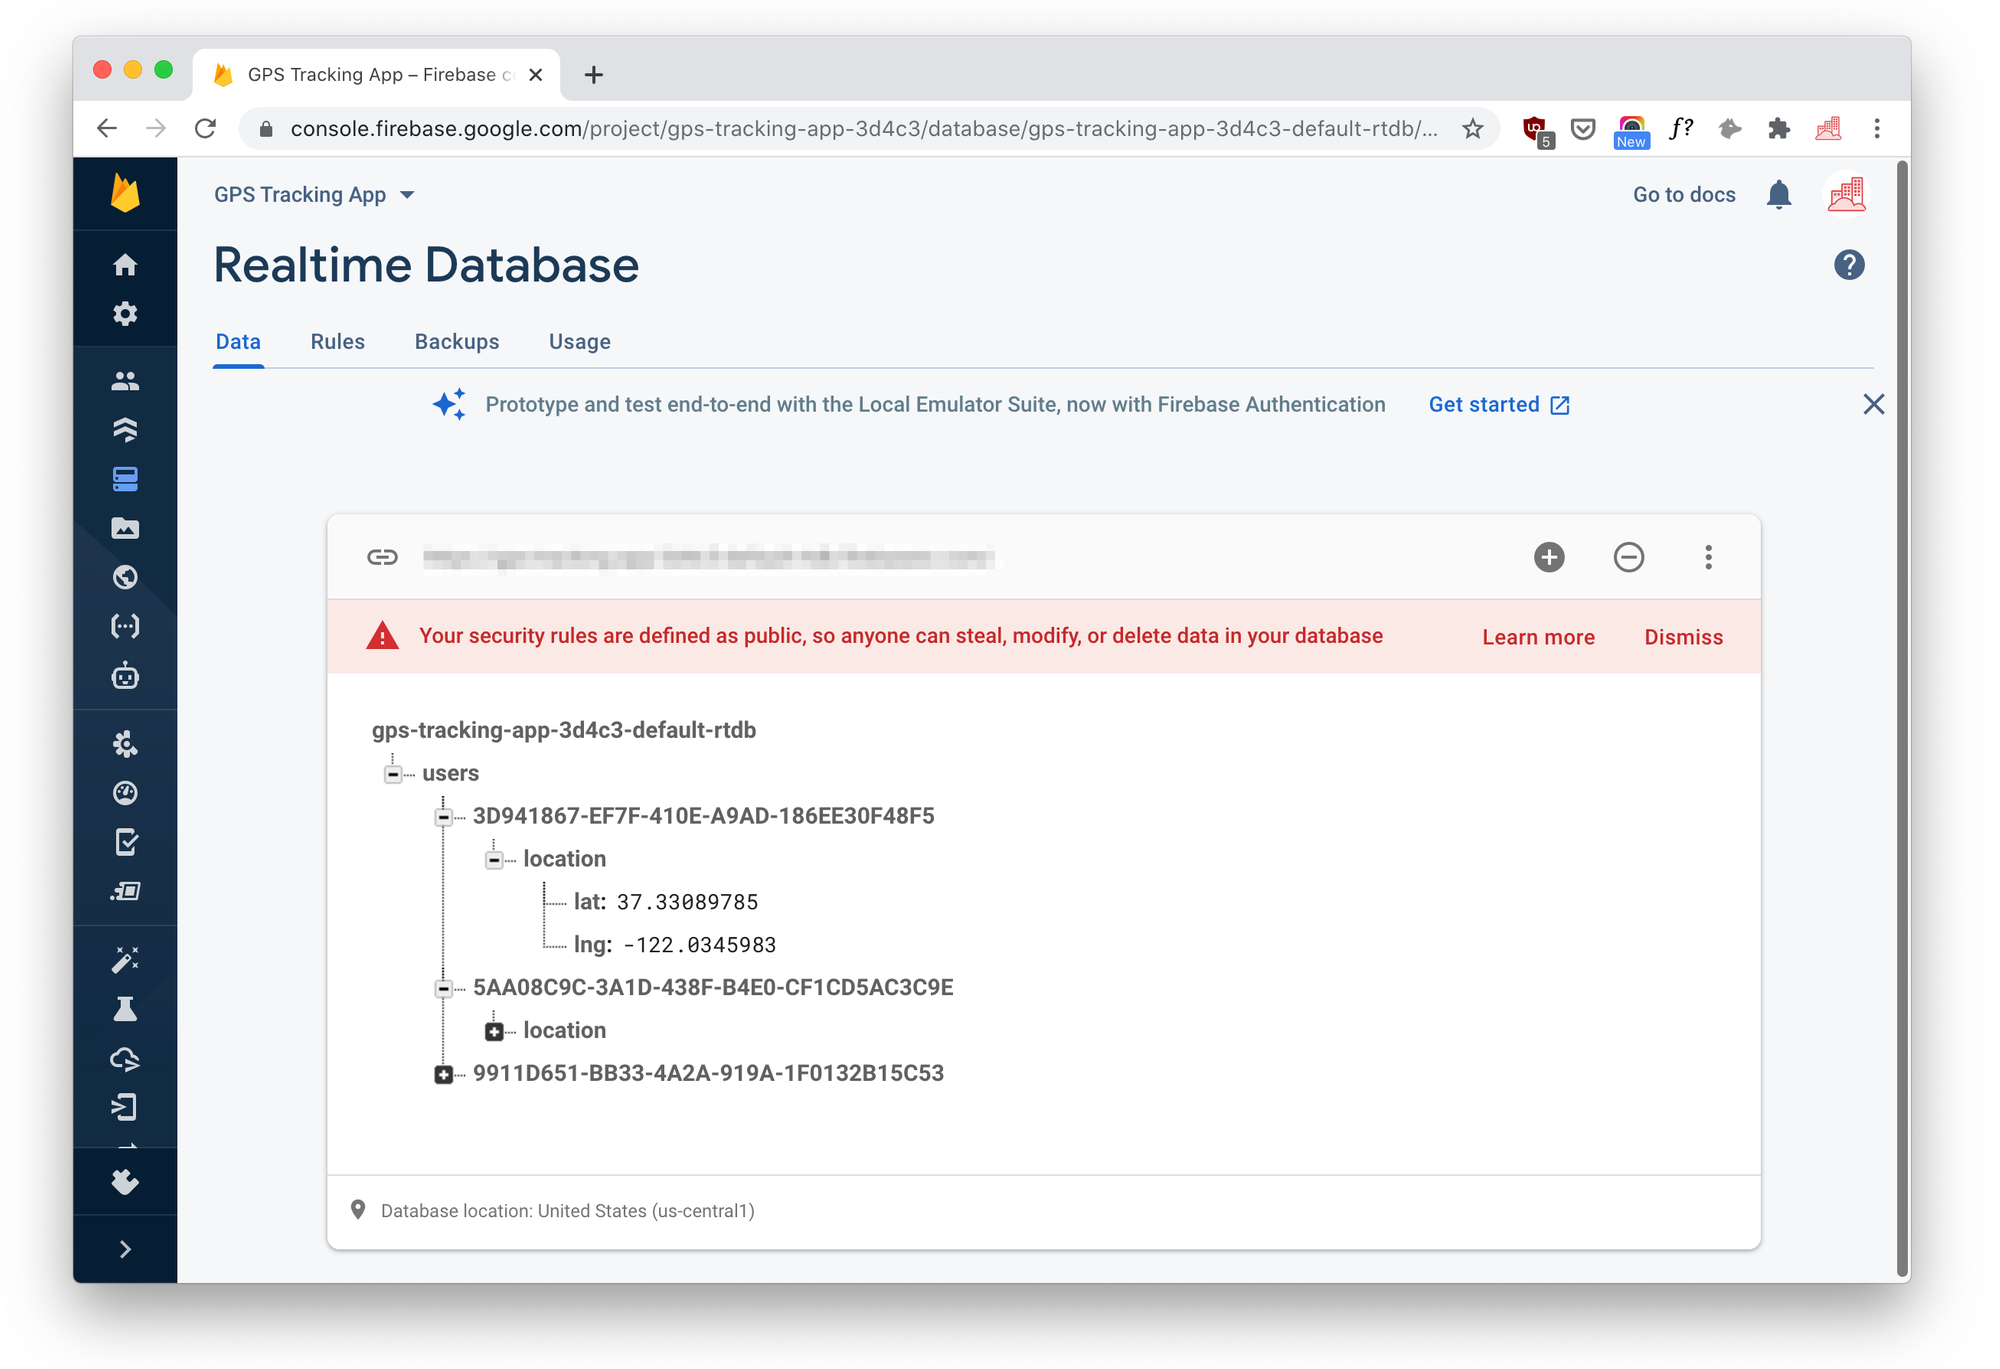
let user_id = UIDevice.current.identifierForVendor?.uuidString ?? ""
let value = ["location": ["lat": location.latitude, "lng": location.longitude]]
self.ref.child("users").child(user_id).setValue(value) {
(error, dbRef) in
if (error == nil) {
callback(.success(data: dbRef.database))
} else {
callback(.error(error: error))
}
}
}
Let's break this down line by line.
let user_id = UIDevice.current.identifierForVendor?.uuidString ?? ""
This saves the phone's device ID to the user_id variable. We'll be using this to uniquely track our drivers.
let value = ["location": ["lat":location.latitude,"lng":location.longitude]]
This stores the phone's latitude and longitude (lat and lng) as attributes of a location object, saved to the value variable. Lastly,
self.ref.child("users").child(user_id).setValue(value) {
  (error, dbRef) in
  if (error == nil) {
    callback(.success(data: dbRef.database))
  } else {
    callback(.error(error: error))
  }
}
Here's what's going on:
- Create a child reference using
child()called "users". - Create a child of "users" and set its value to
user_id. - Set the value of
user_idas thelocationobject. UsesetValue()to save data to Firebase Real Time Database.
The end result is a real time database structure that looks like this:
What's next
In the previous post, I showed you how to track your drivers on an iOS app and in this one, I give a practical approach to using Firebase Real Time Database to save real time driver locations to the cloud. In my next post, we'll add to what we learned in this post to build an online map that shows where your drivers are.
👋 As always, if you have any questions or suggestions for me, please reach out or say hello on LinkedIn.
Next: Part 3: Adding a Live Driver Tracking Map to your Website